You have the photos. Hundreds, probably thousands. The wedding, the new baby, that fortnight in Italy. They live on your phone, and you almost never look at them.
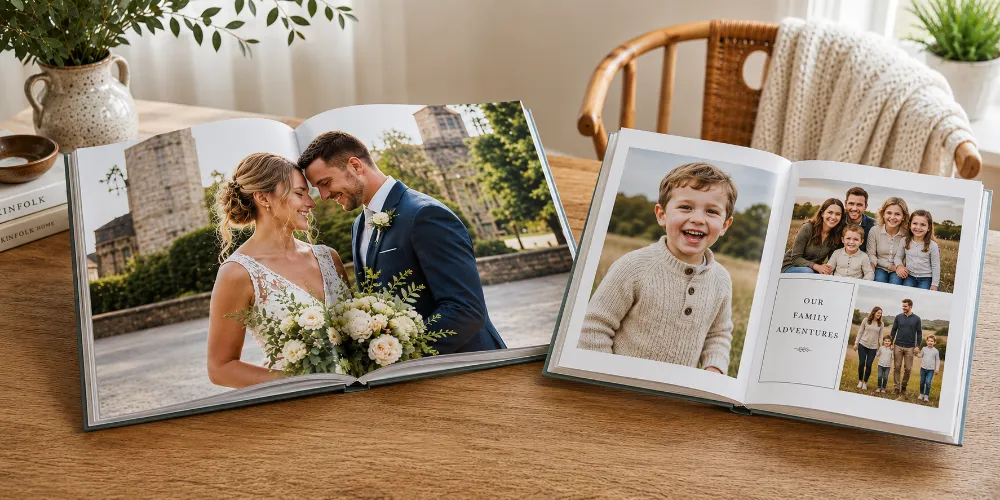
A photo book is the cure. It lifts your best shots out of the endless scroll and turns them into something you can hold, flick through and pass around the sofa. But the second you start making one, you hit a wall of decisions. What size? Glossy or matte? Hardcover or soft? Layflat or standard? Square or landscape? How many photos is too many?
This guide answers every one of those questions in plain English, with real numbers where they help and none of the printing-industry jargon where they don't. Read it top to bottom and you will know exactly what to choose for your project — whether that's a slim travel keepsake or a chunky coffee-table album you'll still be proud of in thirty years.
Key Takeaways
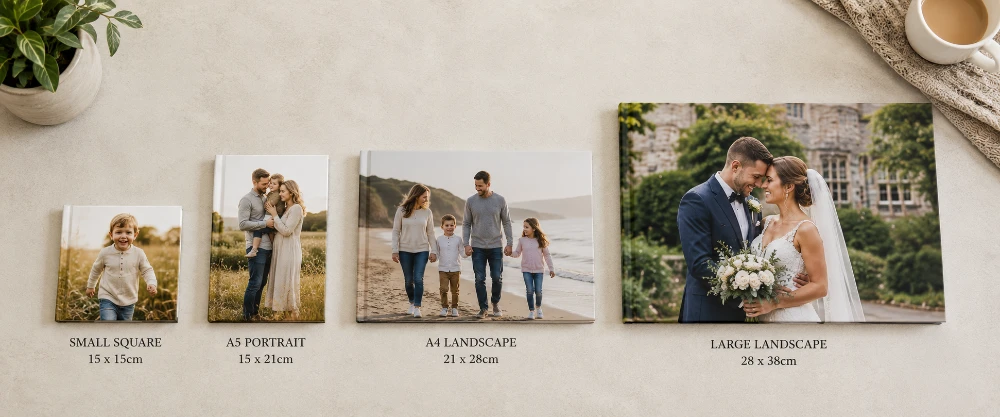
Size first. Square (around 20x20cm) flatters everyday and Instagram photos; A4 landscape is the safe all-rounder; large landscape suits weddings and coffee-table display; A5 is best when you need several affordable copies.
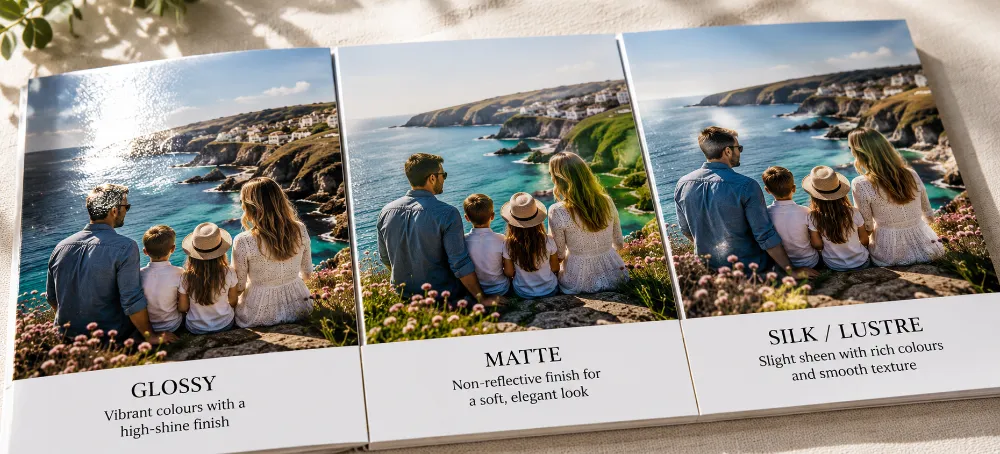
Paper finish changes the look. Glossy makes colours pop but shows fingerprints and glare; matte is smudge-proof and elegant but slightly less vivid; silk or photographic (lustre) paper sits in the middle and is the safest all-round pick, especially for skin tones.
Paper weight changes the feel. Photo books generally use 170gsm and up; 200–250gsm feels properly premium. Heavier pages resist show-through and bending.
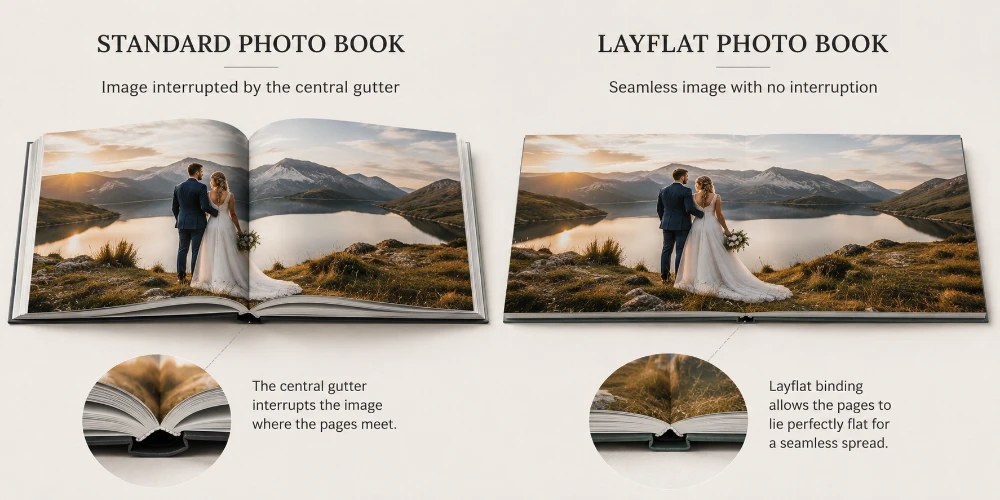
Layflat is the biggest upgrade. Layflat pages open completely flat, so a photo can run across two pages with nothing lost in the central gutter. Essential for panoramas and full wedding spreads.
Resolution rule of thumb. Aim for around 300 pixels per inch at print size; 200 is still fine. An A4 page needs roughly 8–9 megapixels — well within any phone from the last decade.
Edit ruthlessly. A tight 60–100 photo edit beats 300 average ones. One to four images per page is the comfortable range.
Why a Printed Photo Book Still Beats Your Camera Roll
We take more photos than at any point in history, and we look at them less than ever. The average phone holds thousands of images, yet how often do you sit down and actually go through them? Almost never. They scroll past in seconds and vanish back into the pile.
A printed book changes the whole experience. It slows you down. You turn a page, you pause, you point things out. It's a shared object on the coffee table, not a private screen held at arm's length. And unlike a hard drive or a cloud account, it never needs a password, a charger or a software update to keep working.
There's substance behind this, not just sentiment. Surveys of parents have found that the overwhelming majority feel more connected to their children when they look at photos together, and that displaying family pictures strengthens a child's sense of belonging. Researchers point out that prints are also far more durable than digital files: cloud services fail, devices break and login details get forgotten, but a book on a shelf survives all of that and can be handed down through generations.
If you'd like a short explainer on the format itself — what actually counts as a photo book and how the modern printed version came about — our introduction to photo books covers the basics in a couple of minutes.
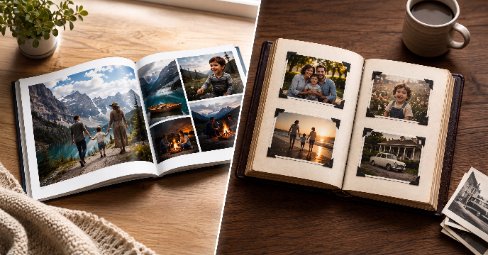
Photo Book or Photo Album? The Difference in One Minute
People use these two words interchangeably, but there's a genuine distinction worth knowing before you start.
A traditional album holds loose, separately printed photos in sleeves or on sticky pages. You slot the prints in yourself, and the pages are essentially empty until you do.
A photo book is digitally printed: your images and any text are built directly into the pages before the book is bound. The finished result looks and feels like a published book.
This guide is about photo books, which is what most people now mean when they talk about "making an album" online. If you'd genuinely rather slot in physical prints the old-fashioned way, you can always order loose copies on photographic paper and mount them yourself.
Photo Book Sizes: The First and Most Important Choice
Size shapes everything else: how your photos look on the page, how the book feels in the hand, how much room you have for text, and what it costs. Nail this and the rest of your decisions fall into place naturally.
The Main Formats, Explained
Square (around 20x20cm to 30x30cm)
The modern favourite, and deservedly so. Square books look clean and contemporary, and they handle a mix of portrait and landscape photos better than any other shape, because neither orientation dominates the page. Most phone and Instagram shots drop straight in with little or no awkward cropping.
Best for: family books, baby books, Instagram round-ups, everyday memories
Why people love it: no fighting over portrait versus landscape — square simply works with both
A4 Landscape (around 28x21cm)
The all-rounder, and the choice to default to if you're unsure. Landscape orientation matches the way most cameras and phones shoot, and there's plenty of room for several photos per page or one big image per spread. Generous without tipping into coffee-table prices.
Best for: holidays, year-in-review books, mixed collections, first-time makers
A5 and Smaller Portrait (around 15x21cm)
Compact, pocketable and easy on the wallet. A smaller book is perfect when you want to order several copies — one for each set of grandparents, say — or when the book tells a single short story rather than an epic. It's also the friendliest format to post.
Best for: gifts, multiple copies, single-event books, mini keepsakes
Large Landscape (near A3)
The showstopper. A big landscape book has real presence on a coffee table and gives wedding and landscape photography the space it deserves. It costs more, naturally, but for a once-in-a-lifetime event it's money very well spent.
Best for: weddings, professional portfolios, statement coffee-table books
Quick Size Picker
Your project
Best size
Why it works
New baby / family year
Square 21x21cm
Forgiving with mixed photo shapes, lovely to hold, survives little hands
Holiday or travel
A4 landscape
Wide scenery looks its best running across the page
Wedding
Large landscape
Big enough for full-spread, layflat hero shots
Gift for relatives
A5 portrait
Affordable when you need several copies, easy to post
Instagram highlights
Small square
Matches the square crop you already shot in
Coffee-table display
Large landscape
Statement size that earns its place on the table
My Picture offers a wide spread of size formats — softcover, hardcover and layflat — so you can match the book to the occasion rather than squeezing the occasion into a fixed size. You can compare every format on the photo book product page.
Photo Book Paper: Finish, Weight and Coating Decoded
Paper is the part most people skip past, and it's the part you actually touch every single time you open the book. The finish decides how your photos look; the weight decides how the book feels. Both deserve a moment of thought, and neither is complicated once you know the basics.
Glossy vs Matte vs Silk: The Honest Comparison
Finishes come from a thin coating on the paper. Coated papers reproduce vivid colour and sharp detail; the coating's sheen is what separates the three options.
Finish
Strengths
Trade-offs
Best for
Glossy
Punchy colours, deep blacks, crisp detail
Shows fingerprints and reflects light
Bold scenery, sunsets, vivid colour
Matte
No glare, fingerprint-proof, soft modern look
Colours look slightly less saturated
Portraits, B&W, books handled often
Silk / lustre
Rich colour with a subtle sheen, superb skin tones
Usually a small step up in price
All-rounder, the safe default choice
So which should you pick? If your book is full of bold, colourful scenery — sunsets, markets, autumn leaves — glossy or silk will make those colours sing. If it's mostly portraits, or you simply can't stand glare and smudges, matte is the calmer, classier option. And if you want one finish that does almost everything well, silk (sometimes called lustre or semi-gloss) is the professional's quiet favourite for exactly that reason.
Worth knowing: at My Picture, all photographic printing formats come with a layflat design, and you choose glossy or matt to suit your style. The photographic option uses the same premium paper as our loose photo prints, so the colour quality carries straight across to the page.
Paper Weight (gsm), Without the Jargon
Paper weight is measured in gsm — grams per square metre. The higher the number, the heavier and thicker the sheet. You don't need to memorise figures; you just need a sense of scale:
gsm range
What it feels like
Where it fits
Up to ~120gsm
Light, like a magazine page
Budget and text-heavy books; can show through
150–170gsm
Solid, like a quality brochure
Good everyday photo book pages
200–250gsm
Substantial, card-like, premium
Keepsakes, gifts, coffee-table books
250gsm+ / mounted
Rigid board, true layflat spreads
Premium layflat and lay-flat wedding books
As a rule, photo books look and feel best from 170gsm upwards, and the most-loved premium weights sit around 200–250gsm. Heavier pages resist bending, stop colour and images showing through from the other side, and simply feel more invested — which matters a great deal for a gift.
Rule of thumb: When you're torn between two weights, go one step heavier than you think you need. Nobody ever wished their wedding book felt flimsier.
Coated or Uncoated?
One last term you might meet. Coated paper has a fine surface layer that holds ink crisply and makes colours vivid — it's what almost every photo book uses. Uncoated paper has a natural, slightly textured feel that's lovely for writing on but softer for photos. For an image-led book, coated is the right call nearly every time.
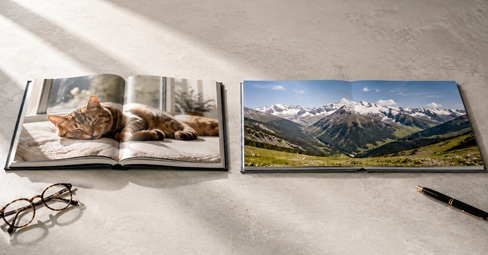
Layflat Pages: The Upgrade Most People Miss
Here's a problem you've seen many times without naming it. In an ordinary book, the two facing pages curve down into the middle where they're bound. That dip is called the gutter, and it quietly swallows anything placed across the centre of a spread. Faces get lost in the fold. Horizons bend. Half a panorama simply disappears into the crease.
A layflat photo book solves this completely. The pages are mounted so the book opens to a flat 180 degrees, with no curve and almost no visible seam down the middle. That means a single image can run right across two pages and lose nothing — the trick professional wedding albums have used for years.
When Layflat Is Worth It
Wedding books, where a wide ceremony shot or a big group photo deserves a full, uninterrupted spread
Landscape and travel books built around sweeping scenery and panoramas
Any book where you want that unmistakable premium, gallery finish
The good news: you don't have to pay a small fortune for it. At My Picture, the layflat design is built into our photographic printing formats — choose a Hardcover or Softcover binding with photographic print, and your book lies properly flat as standard, no premium tier required.
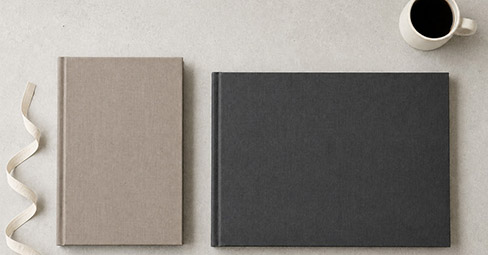
Covers and Binding: Hardcover vs Softcover
The cover sets the tone before anyone opens a single page, and it's where the biggest jump in both feel and price happens. Get it right and the book signals "keep me" the moment it's picked up.
Hardcover
A rigid, protective cover that gives the book a proper, published-book presence. It stands up on a shelf, survives years of handling, and reads instantly as a gift rather than a printout. If the book matters, go hardcover.
Best for: weddings, milestone gifts, coffee-table books, anything meant to last
Softcover
A flexible cover, lighter and cheaper, much like a quality paperback. Ideal for everyday books, travel diaries you might toss in a bag, or when you're ordering several copies and want to keep the total sensible.
Best for: budget books, multiple copies, casual everyday memories
Choosing Your Cover Image
Whichever binding you pick, the cover photo does a lot of heavy lifting. A few habits make all the difference:
Choose one strong, uncluttered image. A single clear subject beats a busy collage every time.
Mind the framing: leave a little breathing room so the title or spine text doesn't crowd a face.
Keep wording short. The year, a name, a two-word title. The picture should still be the star.
Think about the spine. On a shelf, a readable spine title helps you find the book in seconds.
Photo Book Layouts: Making Pages Look Designed, Not Dumped
This is where a good book and a great book part company. The very same photos can look chaotic or considered depending entirely on how they're laid out. The encouraging part: a handful of simple habits gets you most of the way to a professional finish.
The Golden Rules of Layout
Let pages breathe. Resist the urge to cram. One strong photo on a page often beats six small ones. White space looks expensive.
Vary the pace. Alternate busy pages with calm ones. A full grid followed by a single full-page image gives the eye a rest and gives the book a rhythm.
Group by moment, never at random. Keep photos from the same place or event together so the story flows the way the day did.
Mind the edges and the gutter. Keep faces and key detail away from the very edge of the page, and out of the central fold — unless you're using layflat pages.
Pick one hero per spread. Make one photo clearly bigger than the rest on each two-page spread. It gives every opening a focal point.
Be consistent. Keep margins and the gaps between photos even throughout. Consistency is the single biggest thing that separates a designed book from a dumped one.
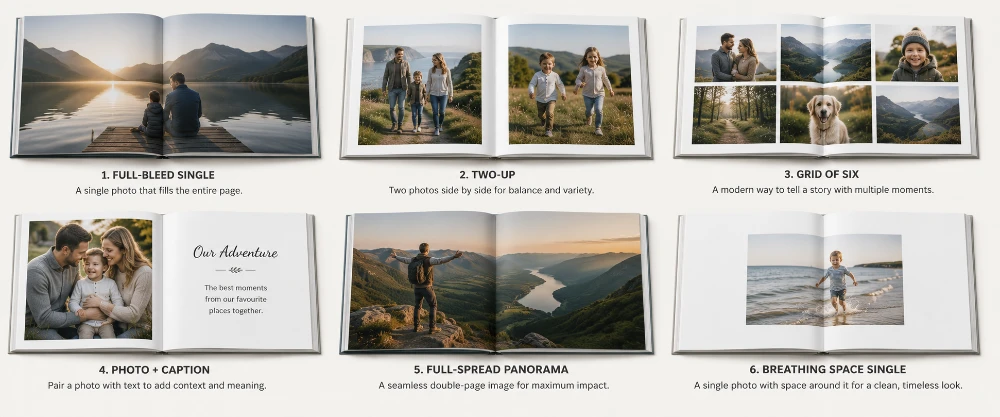
Layout Styles Worth Stealing
The Clean Single
One photo, full page, generous margins. The simplest layout there is, and often the most striking. Save it for your very best shots and let them command the page.
The Full-Spread Panorama
One wide image stretched across both pages. Reserved for layflat books, this is the most dramatic move in the entire book — so use it sparingly. Two or three full spreads in a wedding book is plenty; any more and the impact fades.
The Tidy Grid
Four to six photos in a neat grid with equal gaps. Brilliant for showing lots of small moments — party guests, food, details — without the page looking messy. The secret is keeping every gap identical.
The Photo and Caption
One image with a short line of text beneath. A date, a place, a one-liner. Captions quietly turn a pile of pictures into a story, and they're the detail you'll be most grateful for in ten years' time when you can't quite remember where a photo was taken.
The Two-Up
Two photos side by side that talk to each other — a wide shot and its close-up, a before and after, two faces mid-laugh. Pairing is an easy way to add meaning without adding clutter.
Manual or Automatic Design?
Most online photo book makers give you two routes. A smart or automatic mode analyses your uploads and arranges them for you in seconds — a lifesaver when you're short on time. A manual mode hands you full control over every page. The smartest approach is usually a blend: let the software do the first pass to lay everything out, then tidy the pages that matter most by hand. You get 90% of the work done in minutes and keep control where it counts.
How Many Photos Should a Photo Book Have?
This is one of the most common questions, and the honest answer surprises people: far fewer than you think.
It's tempting to include everything — you took all those photos, after all. Don't. A ruthless edit is the single biggest favour you can do your book. One to four photos per page is the comfortable range. For a typical 30-page book, that works out at roughly 60 to 100 well-chosen images, not the 400 sitting in your camera roll.
How to Edit Down Without the Heartache
Do a quick first pass and keep only the photos that make you feel something. Be fast and instinctive — overthinking is the enemy here.
When you have near-duplicates, pick the single best one and let the rest go. Three almost-identical sunsets become one great sunset.
Cut anything blurry, badly lit or unflattering. A weak photo drags down the strong ones around it.
Aim for a story shape: a few scene-setting wide shots, the key moments, then a handful of close-up details. That mix reads beautifully on the page.
A simple test: If you wouldn't frame it or text it to a friend, it probably doesn't earn a place in the book.
Will My Photos Be Sharp Enough? Resolution Made Simple
Almost certainly, yes — but this is the one technical area worth understanding, because a low-resolution photo blown up across a big page is the most common way a book disappoints. Here's everything you need, without the maths headache.
Print sharpness is measured in pixels per inch (PPI). The industry standard for crisp prints viewed up close, like the pages of a book, is around 300 PPI. You can drop to about 200 PPI and still get perfectly acceptable results. Below that, detail starts to soften.
The easy way to check whether a photo is big enough: divide the longer side of your image (in pixels) by 300. That tells you the largest size, in inches, it will print crisply. A photo 3000 pixels wide prints sharply up to about 10 inches; the same file stretched to 30 inches drops to just 100 PPI and looks soft.
Resolution You Need by Page Size
Page size (approx.)
Pixels at 300 PPI
Roughly equals
Phone-friendly?
15x10cm (6x4 in)
1800 x 1200
~2 MP
Yes — any phone
20x20cm square
2400 x 2400
~6 MP
Yes — any recent phone
A4 (28x21cm)
2481 x 3507
~8–9 MP
Yes — phones from ~2014 on
A4 spread / panorama
5000 x 3500
~17 MP
Best with a good recent phone or camera
Large landscape (A3)
3508 x 4961
~17 MP
Recent phones and cameras
The reassuring takeaway: modern smartphones — iPhones from around 2014–2016 onwards, and recent Samsung Galaxy and Google Pixel models — comfortably clear the bar for standard photo book pages. The emotional pull of a candid moment matters far more than chasing the last few megapixels.
When to Take Extra Care
Heavily zoomed shots. Digital zoom throws away real detail, so these can look soft when enlarged across a page.
Screenshots and social-media saves. Images pulled from Instagram or WhatsApp are often compressed and too low-resolution for a clean print.
Scanned old prints. Scan them at the highest setting your scanner offers; the better the scan, the better the page.
Very dark or blurry images. Enlarging them only makes the problem more obvious, not less.
A quick gut-check: if a photo looks sharp at full size on your laptop screen, it'll print well. If it already looks fuzzy on screen, it won't improve on paper. Good photo book software flags any image that's too low-resolution for the size you've placed it at, so you're never caught out at the till.
A Word on Editing Before You Print
You don't need to be a photographer to lift your photos. A few quick tweaks in a free app like Snapseed or Lightroom Mobile go a long way:
Nudge brightness and contrast up slightly — prints benefit from a touch more contrast than a screen needs.
Add a small amount of saturation so colours stay lively on paper, which can mute them a fraction.
For black-and-white, use a proper mono conversion with adjusted contrast rather than just sliding saturation to zero. The difference is night and day.
Choosing by Occasion: A Practical Cheat Sheet
Different events suit different books. Here's a clear steer for the most popular projects, so you can skip straight to what fits.
Wedding Books
Go big and go layflat. A large landscape book with layflat pages lets your photographer's best wide shots run across full, uninterrupted spreads, and hardcover is a must for something you'll treasure for decades. This is the one book in your life genuinely worth spending a little extra on. Order it in chronological order — getting ready, ceremony, portraits, speeches, first dance — and it reads like a film of the day.
We've written a full walkthrough for exactly this — our guide to designing a wedding photo book covers album styles, page order, how soon to start, and plenty of real-couple advice on getting it right.
Baby and Family Books
Square hardcover is the sweet spot. It copes effortlessly with the chaos of mixed photo shapes, feels lovely in the hand, and survives sticky fingers. Many families make one every year and slowly build a shelf of them — a growing, tangible timeline that beats any folder on a phone.
Travel and Holiday Books
A4 landscape is hard to beat. Wide scenery gets the room it needs, and a softcover keeps the price sensible if you travel often. Group the book by destination or by day so it reads like a journey rather than a shuffle of unrelated shots. A single map or ticket stub scanned in at the start of each section is a lovely touch.
Coffee-Table and Gift Books
Large landscape, hardcover, heavier pages. This is a book designed to be seen as much as read. A single clean cover image and a restrained, spacious layout inside will make it look like something lifted straight off a bookshop shelf.
Stuck on which moments deserve a whole book of their own? Our photo album ideas piece is packed with themes, from single-event books to year-in-review collections and beyond.
Photo Books vs Other Ways to Print Your Memories
A book is the best way to hold a lot of photos in one place — but it isn't the only way to enjoy them, and the smartest homes mix and match. Think of the book as your archive, telling the long story, and wall art as your highlights reel, celebrating the single best shot.
Format
Best for
Strength
Photo book
Whole events, large collections, gifts
Holds dozens of photos in one tactile object
Loose photo prints
Fridge, frames, scrapbooks, sharing
Cheap, flexible, classic
Canvas print
One hero image as wall art
Gallery-wrapped, no glare, lasts for decades
Framed print
Portraits and formal shots
Timeless gallery look with a white mount
Panoramic canvas
Sweeping landscapes and group shots
Wide format suits scenery a page can't
Want one standout image on the wall to go with the book? A canvas print turns your hero photo into gallery-wrapped wall art. For a classic look with a white mount, a framed photo print suits portraits and formal shots, while a panoramic canvas print gives a sweeping landscape the width it deserves.
From Camera Roll to Finished Book: A Simple Seven-Step Plan
Gather your photos in one place — a single folder on your phone or computer so nothing gets missed.
Edit ruthlessly down to your strongest 60 to 100 images using the rules above.
Pick your format: size, paper finish, weight, cover and binding, guided by the sections above.
Choose a ready-made template, or start from a blank book if you'd like more control.
Lay it out — let the auto-design do a first pass, then refine the key pages by hand.
Add short captions, a title and a spine label where they help tell the story.
Review the whole book page by page, check every photo for resolution warnings, then order. Most UK books arrive within a few working days.
Photo Book Jargon, Translated
A quick reference for the terms you'll meet while designing, so none of them trip you up.
Term
Plain-English meaning
gsm
Paper weight in grams per square metre — higher means heavier and thicker
Gutter
The central fold where two facing pages meet
Layflat
Binding that lets the book open to a flat 180 degrees, with no gutter dip
Spread
A pair of facing pages seen together
Full-bleed
A photo that runs right to the edge of the page, with no white border
Coated paper
Paper with a fine surface layer for vivid colour and sharp detail
Silk / lustre
A finish between glossy and matte, with a subtle sheen
PPI
Pixels per inch — how much detail a photo has at print size
Softcover / hardcover
A flexible paperback-style cover, or a rigid protective one
Ready to Make Yours?
Choosing a photo book comes down to a handful of clear decisions: the right size for the occasion, a paper finish that flatters your photos, a weight that feels worth keeping, layflat pages if you want full-spread drama, and a cover that suits whether it's an everyday book or a once-in-a-lifetime keepsake. Get those right, edit your photos with a firm hand, and you'll end up with something far better than a folder you never open.
Frequently Asked Questions
What size photo book is best for a wedding?
A large landscape book with layflat pages is the best choice for a wedding. The wide format and flat-opening pages let big group shots and full-spread images look their best, and a hardcover protects the book for decades. Arrange the photos in the order the day happened for the most satisfying read.
Is glossy or matte better for a photo book?
Glossy makes colours pop and detail look sharp, but it shows fingerprints and reflects light. Matte is glare-free and smudge-proof with a softer, modern look, though colours appear slightly less vivid. Choose glossy for bold scenery and matte for portraits or books you'll handle a lot. Silk (or lustre) sits between the two and is the safest all-round pick, with excellent skin tones.
What gsm is best for photo book pages?
Photo books look and feel best from around 170gsm upwards. The most-loved premium weights are 200–250gsm, which feel substantial, resist bending and stop images showing through from the other side. For a keepsake or gift, lean towards the heavier end.
What is a layflat photo book?
A layflat photo book has pages that open to a completely flat 180 degrees, with no curve into the central gutter. This lets a single photo run across two pages without losing any detail in the middle, which is ideal for panoramas and full-spread wedding shots.
How many photos should I put in a photo book?
Aim for one to four photos per page. For a 30-page book that's roughly 60 to 100 images. A tight edit of your strongest photos always looks better than cramming everything in — duplicates and weak shots only dilute the good ones.
What resolution do I need for photo book photos?
Aim for around 300 pixels per inch at the size you're printing, though 200 PPI is still acceptable. In practice, an A4 page needs roughly 8–9 megapixels, which any phone from the last decade comfortably exceeds. Avoid heavily zoomed shots, screenshots and very dark or blurry images, which can look soft when enlarged.
Hardcover or softcover — which should I choose?
Choose hardcover for keepsakes, gifts and books you want to last, as it's sturdy and feels like a published book. Choose softcover for everyday books, travel diaries or when ordering several copies on a budget.
Can I use phone photos for a photo book?
Yes. Phones from roughly 2014 onwards have plenty of resolution for standard photo book pages. Just avoid heavily zoomed shots, social-media saves and very dark or blurry images, which lose quality when printed large.
What is the difference between a photo book and a photo album?
A traditional photo album holds loose prints in sleeves or on sticky pages, which you add yourself. A photo book is digitally printed with your photos and text built directly into the pages, giving a clean, published-book finish.
How long do photo books take to arrive in the UK?
Most UK photo books are produced and delivered within a few working days, though busy periods such as Christmas can take a little longer. Always check the delivery estimate shown at checkout for your specific order.
How do I stop my photo book looking cluttered?
Let the pages breathe, pick one clear hero photo per spread, keep the gaps between photos even, and group images by moment rather than scattering them at random. Cutting the weakest photos does more for a clean look than any single design trick.