Key Takeaways
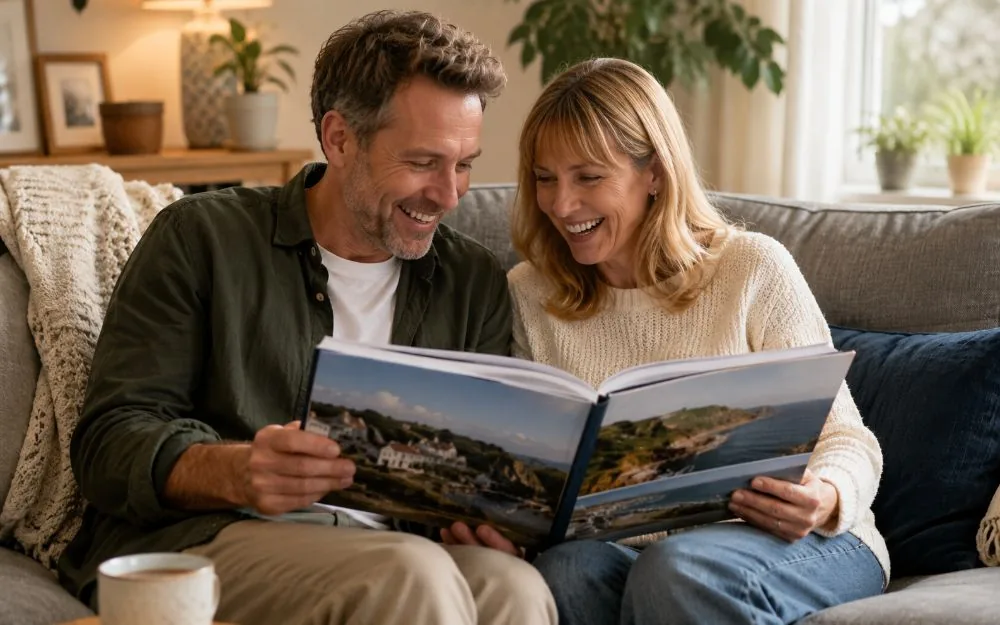
- A travel photo book is a printed, bound book of trip photos arranged into a story — the single most reliable way to actually enjoy holiday photos again rather than letting them vanish into your camera roll.
- Decide on a structure first. Chronological (day by day) suits a single trip; thematic (food, people, places) suits long or multi-country journeys; story-led suits honeymoons and milestone trips.
- Aim for roughly 60–120 photos across 30–60 pages, and think in photos per spread rather than total. Fewer strong images always beat more weak ones.
- Vary the rhythm: full-page hero shots, then quiet grids, then a single image with space around it. Keep margins consistent and group photos by moment.
- Match the format to the trip — layflat for big landscapes, square for city breaks, hardcover for milestone keepsakes — and write captions while the trip is still fresh in your mind.
What is a travel photo book?
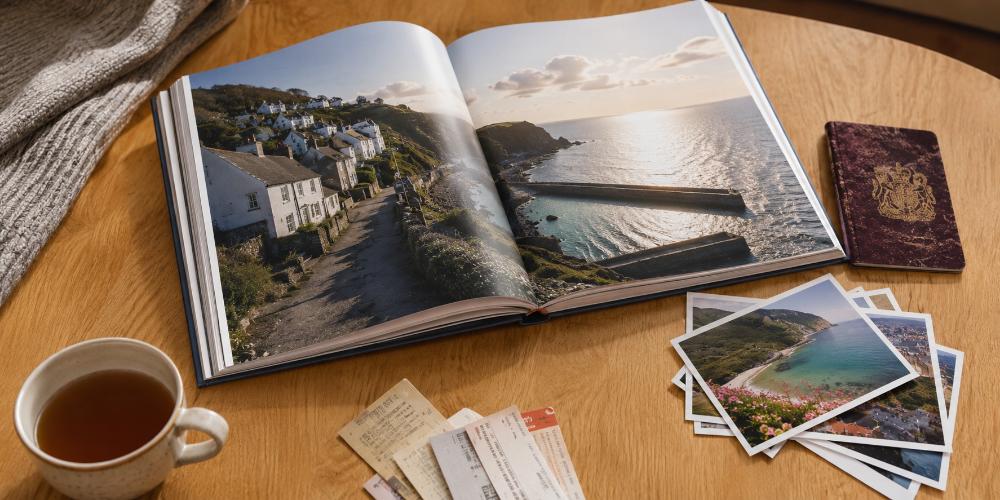
A travel photo book is a printed, bound book that collects the photographs from a holiday or trip and arranges them into a single visual story. Unlike a phone gallery, it is curated and ordered, so it reads like a short chapter of your life rather than a random dump of files. The images are printed directly onto the pages and the whole thing is bound like a real book, so it can sit on a shelf for decades.
People often ask whether they want a photo book or a photo album. The difference is simple. A photo book has your images printed straight onto the pages for a clean, modern, magazine-like finish. A traditional photo album holds individual prints slotted into sleeves or pockets. For travel, a photo book usually wins, because you get full-bleed landscapes, flexible layouts and captions on the same page — things a sleeve album cannot do. If you want the full side-by-side, our guide to creating a personalised photo album breaks down every difference.
Why a printed book beats the camera roll
There is a real reason a book feels different from scrolling, and it is not just nostalgia. When you hold a book you slow down. You look at one page at a time instead of swiping past at speed, and you tend to share it with people in the room rather than alone behind a screen. Research from the University of Southampton on the emotional value of physical photographs has long pointed to the same thing: tangible images strengthen the connection to a memory in a way a screen does not.
- You will actually revisit it. A book on the coffee table gets opened by you and by guests. A folder buried in your phone does not.
- It survives. Phones get lost, cloud accounts lapse, file formats change. A printed book just sits there, ready whenever you want it.
- It edits your memory for the better. By choosing the best shots, you build the version of the trip you want to remember — the highlights, not the queue for the airport.
- It makes a genuinely good gift. Make one copy for yourself and one for whoever you travelled with. It beats a fridge magnet from the gift shop every time.
Step 1: Choose your structure before you touch a single photo
This is the step almost everyone skips, and it is the one that decides whether your book flows or feels like a slideshow. Before you start dragging images into a template, decide how the story will be ordered. There are three structures that work for nearly any trip, and picking one up front saves hours of fiddling later.
Chronological — the day-by-day story
You start on day one and move through the trip in order. This is the easiest structure to follow and the most natural for a single holiday with a clear beginning, middle and end. It works especially well for road trips, cruises and any itinerary that moved between places, because the order of the photos mirrors the order you actually experienced things.
Best for: one trip with a clear route — a fortnight in Italy, a Scottish road trip, a week in the Algarve. Watch out for: long trips where every beach day looks the same and the timeline starts to drag.
Thematic — grouped by subject
Instead of time, you group photos by what they show: a food chapter, a people chapter, a landscapes chapter, an architecture chapter. This is the stronger choice for long trips, gap years and anything where the days blur together. It also lets you put your strongest images next to each other rather than scattering them across 60 pages of chronology.
Best for: long or multi-country journeys, repeat visits to the same place, and photographers who shoot a lot. Watch out for: losing the sense of a journey — add a short intro page per theme to keep it grounded.
Story-led — built around a narrative
Here the book follows a thread rather than a timeline or a subject: the story of how you proposed at the end of the trip, the journey of learning to surf over two weeks, the first big adventure as a family of four. Photos serve the story, and captions do more of the heavy lifting than in the other two structures.
Best for: honeymoons, milestone trips, anniversary travel and anything with an emotional arc you want to spell out. Watch out for: over-writing — let the photos carry most of the weight and keep the words sparing.
Quick decision rule: One trip, one country, clear route → go chronological. Long trip, several countries, or hundreds of keepers → go thematic. There is a clear emotional story (proposal, milestone, first family trip) → go story-led. Still unsure? Default to chronological. It is the easiest to build and the easiest for others to follow.
Step 2: Select your photos (and be ruthless about it)
The single biggest mistake people make is including too many photos. Five near-identical shots of the same view do not tell five times the story — they dilute it and bore the reader. The goal is a tight edit where every image earns its place. Done well, a 40-photo book of a weekend can be more powerful than a 200-photo book of the same trip.
How many photos do you actually need?
As a working guide, aim for 60 to 120 photos across a 30 to 60 page book. A short city break might need only 40. A month-long trip might justify 150. But the number that really matters is photos per spread, not the grand total — because that is what controls how crowded the pages feel.
| Trip type | Suggested pages | Suggested photos | Feel |
|---|
| Weekend / city break | 20–30 | 40–60 | Tight, punchy, giftable |
| One to two weeks | 30–50 | 70–110 | The classic holiday book |
| Long / multi-country trip | 50–80 | 120–180 | One chapter per country |
| Gap year / round-the-world | 80–120 | 180–300 | Consider splitting into volumes |
As a rule of thumb for layout: aim for an average of three to five photos per spread. Push above six or seven and the images start to feel like thumbnails; drop to one or two and the book feels premium and unhurried. Mix the two extremes and you get rhythm, which we come to in Step 3.
A simple three-pass edit
Trying to choose your best photos in one go is overwhelming. Do it in three quick passes instead, each with a different job.
- First pass — delete the obvious rejects. Blurry shots, duplicates, accidental photos of the pavement, anything you would never show anyone. Be quick and unsentimental. This usually cuts the pile by half.
- Second pass — pick favourites by moment. Go through the trip moment by moment and choose the one or two shots that capture each one best. Resist keeping three versions of the same scene; pick the best and move on.
- Third pass — fill the gaps. Now look for what is missing. A close-up of a meal, a street sign, the inside of your hotel room, the people you travelled with. The small details age far better than the postcard shots, and they are the bits you will forget without a photo.
The photos people always forget to include
After editing thousands of holiday photos, the same gaps show up again and again. These are the shots that make a book feel like a real record rather than a highlights reel.
- The journey itself. The airport, the train window, the packed boot of the car, the queue for the ferry.
- Food and drink. Meals are some of the most evocative travel memories, and almost everyone forgets to photograph them until pudding.
- Details. Door handles, tiles, menus, ticket stubs, your own feet on a beach, the view from the balcony at breakfast.
- People — including yourselves. If you always hold the camera, you will not appear in your own travel book. Hand it over, ask a stranger, or use the timer.
- The ordinary. Where you slept, what you bought, the corner shop you went to every morning. The mundane is what brings a trip back most vividly years later.
If you have instant film, disposables or old printed photos from the trip, they belong in the book too. You can scan them and drop them into the layout, or keep a few loose photo prints to tuck inside the cover — they sit happily alongside your phone shots and add a bit of physical texture.

Step 3: Check your photos will print well
Almost every modern phone photo is good enough for a photo book — but a quick check now saves disappointment later. The image quality only becomes a worry with heavily zoomed shots, screenshots, and photos taken in very low light, all of which look softer in print than they do on a glowing screen.
The simplest test needs no technical knowledge at all: open the photo on a laptop and view it at full size. If it looks sharp, it will print well. If it looks soft or pixelated on screen, printing it larger will make that worse, not better — so keep those images small in the layout, or leave them out.
If you want the numbers, here is the comfortable minimum resolution for each size of image in the book. For a deeper explanation of how resolution maps to print sizes, our UK photo sizes guide walks through it in full.
| Where it appears in the book | Comfortable minimum | Typical phone OK? |
|---|
| Small photo in a grid (quarter page) | 1000 × 1500 px | Yes, easily |
| Half-page image | 1600 × 2400 px | Yes |
| Full-page image | 2400 × 3200 px | Yes, on recent phones |
| Full double-page spread (layflat) | 3000 × 4500 px+ | Check — use your best files |
Modern phones are better than you think: iPhones from roughly 2016 onward and recent Samsung Galaxy and Google Pixel phones all capture more than enough detail for a standard photo book up to A4. The three things that genuinely degrade quality: digital zoom, screenshots, and very low light. Shoot in good light, hold steady, and do not zoom — walk closer instead. That alone keeps your travel photos print-ready.
Step 4: Lay out pages that tell a story
Good layout is mostly about rhythm. If every page has the same four-photo grid, the book feels flat and tiring. If you vary the pace — a bold full-page hero, then a quiet grid, then a single small photo with lots of space around it — the book breathes and pulls the reader through. Think of it like music: you need loud moments and quiet ones.
The layout principles that matter most
- Mix big and small. Use full-page images for your strongest shots and small grids for the supporting cast. Equal-sized photos everywhere is the quickest way to a dull book.
- Give busy images room. A crowded market scene or a packed beach needs white space around it so the eye can rest. Do not pair two busy photos on the same spread.
- Keep margins consistent. Pick a margin and use it across the whole book. Inconsistent margins are the single biggest giveaway of an amateur layout.
- One hero per spread. Let one image dominate each spread and arrange the rest around it, rather than giving five photos equal weight and equal size.
- Group by moment, not by type. Keep all the photos from one afternoon together, even if some are landscapes and some are portraits. The moment is the unit, not the orientation.
- Mind the gutter. On a standard (non-layflat) book, avoid placing a face or key detail right in the centre crease where the pages meet, or it will be swallowed by the fold.
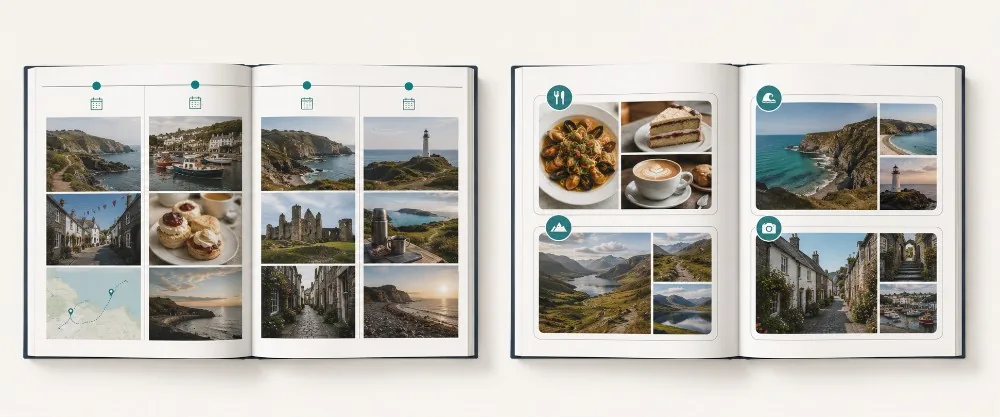
Eight travel photo book layout ideas
These are spread layouts you can repeat and vary throughout the book. Rotate between them to keep the pace interesting.
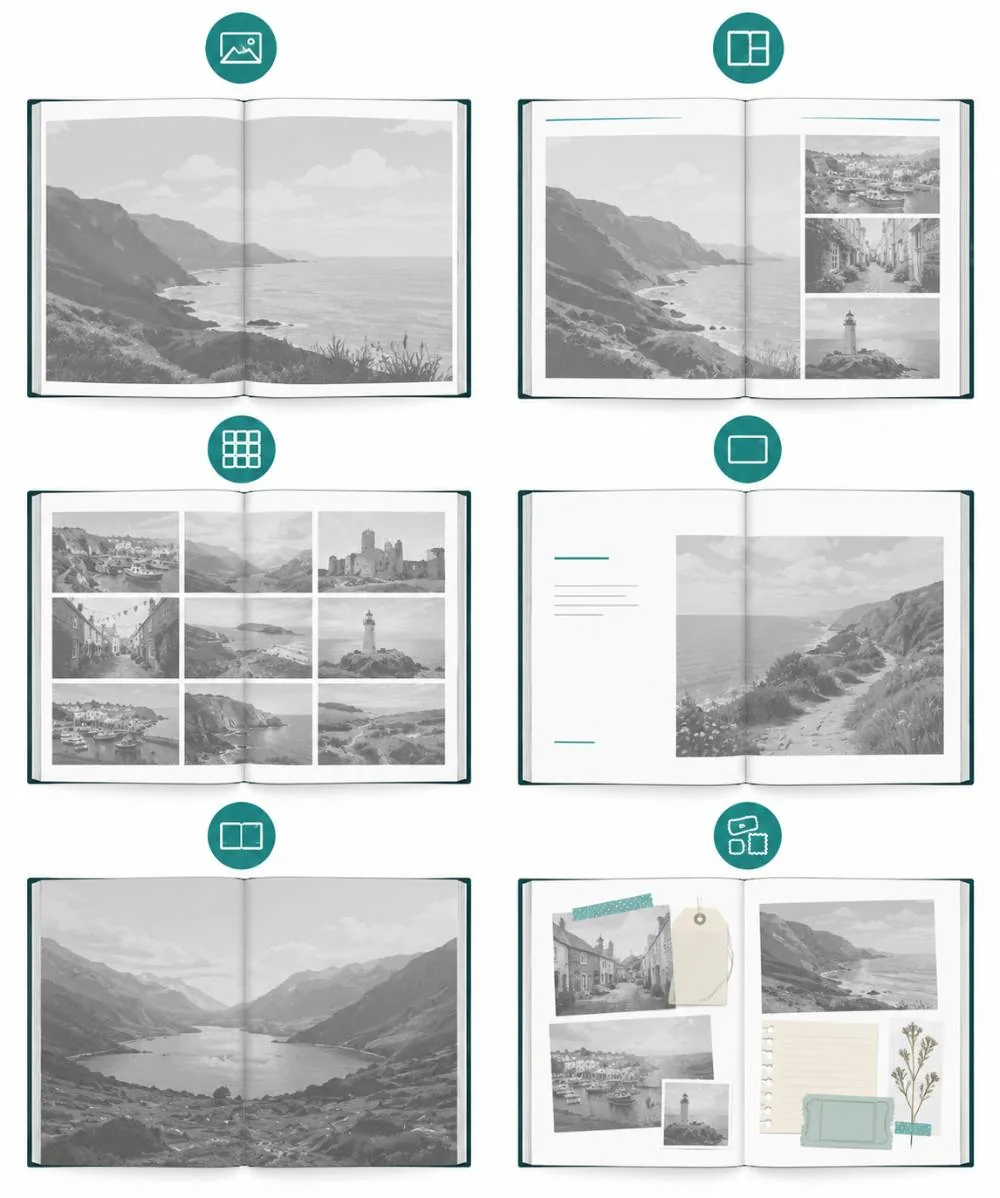
1. The full-bleed opener. Start a chapter or a new destination with one image filling the whole page, edge to edge, no margin. It sets the scene and clearly signals a new section.
2. The hero-and-supporting layout. One large image on the left page, three or four small supporting shots on the right. Classic, reliable, and the workhorse of most good books.
3. The grid of nine. A neat 3×3 grid of small square photos — perfect for a food chapter, a market, or a collection of doors, windows and signs.
4. The single image with caption. One photo, lots of white space, one line of text. Save it for your most beautiful or most emotional shot and let it breathe.
5. The double-page panorama. A wide landscape running across both pages of a layflat book with no break. Reserve it for your single best view of the trip.
6. The before-and-after pairing. Two photos side by side that show change — an empty beach at dawn and the same beach packed at noon, or one view in sun and in rain.
7. The map spread. A page that overlays your route or a simple drawn map, surrounded by photos from each stop. Brilliant for road trips and multi-city journeys.
8. The memorabilia collage. Scan tickets, boarding passes, postcards, stamps and receipts, and lay them out as a collage page. It adds texture and authenticity a phone camera never could.
Most of these layouts take seconds to build with a drag-and-drop editor. If you would rather not start from scratch, a good photo book maker offers ready-made templates as a starting point, and a smart-design option that arranges your uploaded photos automatically — you then tweak from there rather than facing a blank page.
Step 5: Write captions you will still understand in ten years
Captions are optional, but a little text turns a pretty book into a genuine record. The trick is to write them while the trip is still fresh, before you forget the name of that tiny restaurant or the village where the car broke down. A month later, you will not remember; a year later, definitely not.
You do not need to write much. The most useful captions are short and specific, and they fall into three simple types.
- Place and date. "Cinque Terre, September 2025." Plain, but you will be grateful for it later when the places start to blur.
- One honest line. "The hottest day of the trip — we gave up sightseeing and ate ice cream for lunch." A single human sentence is worth more than a paragraph of description.
- A name. Who is in the photo, the name of the dish, the beach, or the dog you befriended outside the cafe.
Resist captioning every single photo. A book where every image carries three sentences underneath becomes exhausting to read. Caption the photos that need context, and let the rest speak for themselves. If you chose a story-led structure, lean on captions a little more; if chronological, a date and place per spread is often plenty.
A quick caption-writing trick: Before you start designing, open your notes app and jot down five to ten things you do not want to forget: a restaurant name, a funny moment, the price of something that shocked you, a person you met. Those notes become your captions. It is far easier than trying to think of something clever while staring at a layout.
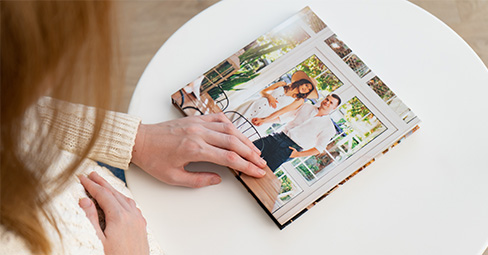
This is where most guides go quiet, and it is exactly the part that separates a book that feels like a cheap brochure from one that feels like a keepsake. The three decisions are format and size, cover type, and paper. Here is what each one actually does.
Match the shape of the book to the kind of photos you took and how you will use it.
- Square (around 20×20cm or 30×30cm). The most versatile and gift-friendly shape. Handles a mix of portrait and landscape photos gracefully. Ideal for city breaks and casual holiday books.
- Landscape (A4 and similar). The natural choice for scenery-heavy trips — coastlines, mountains, wide vistas. Landscape photos fill the page without awkward cropping.
- Portrait (A4 upright). Best if your trip is people-led, with lots of upright shots of family and friends.
- Larger formats (up to A3). For a big once-in-a-lifetime trip where you want real impact and room for double-page spreads.
Cover type
The cover is the first thing you touch and the part that takes the most wear over the years.
- Hardcover. Sturdy, substantial and protective, with a proper bookshelf spine. The right choice for a milestone trip you want to keep for decades — a honeymoon, a big family holiday, the trip of a lifetime.
- Softcover. Flexible, lighter and more affordable, with a chic magazine feel. Perfect for a casual keepsake or a gift copy you are happy to post.
- Ring-bound or booklet. Handy, informal options for a quick book or a smaller project, where flick-through ease matters more than a premium finish.
Paper finish and weight
Paper is described two ways: its finish (the look and feel of the surface) and its GSM (grams per square metre, which is just how thick and heavy it is). Higher GSM feels more premium in the hand. On finish:
- Matte. A soft, non-reflective, fingerprint-resistant surface with a timeless, artistic look. Flattering for black-and-white photos and for books you will handle a lot.
- Gloss. A shiny, reflective surface that makes colours pop and details look sharp. Brilliant for bright, sunny, colourful travel photos — beaches, markets, sunsets.
- Satin or silk. The middle ground: a slight sheen that lifts colour without the glare of full gloss. A safe, versatile all-rounder.
Standard binding vs layflat
This is the most important paper-and-binding decision for travel books specifically. A standard (perfect-bound) book is glued at the spine and is the most economical option, but a small amount of the image is lost into the centre crease where the pages meet. A layflat book opens completely flat, so a single image can run seamlessly across both pages with no gap down the middle.
If your trip is all about big landscapes — a coastline, a mountain range, a city skyline — and you want those views to run across a full double-page spread, layflat is worth the extra. For a people-and-detail book where most photos sit on a single page, standard binding is perfectly good and keeps the cost down.
| Trip / use | Best format | Cover | Paper / binding |
|---|
| City break, casual | Square 20×20cm | Softcover | Satin, standard |
| Scenery-heavy holiday | Landscape A4 | Hardcover | Gloss or satin, layflat |
| People-led family trip | Portrait A4 | Hardcover | Matte, standard |
| Honeymoon / milestone | Square 30×30cm or A4 | Hardcover | Layflat, premium |
| Quick gift copy | Square 20×20cm | Softcover | Satin, standard |
Travel photo book ideas by type of trip
Different trips suit different treatments. Here are tailored approaches for the most common kinds of travel, so you can skip straight to the one that fits.
Honeymoon photo book
A honeymoon book leans romantic and story-led. Be generous with white space, favour fewer photos per page, and weave in a few honest lines about how you felt rather than just where you were. Build it around the emotional arc — the arrival, the highlights, a quiet moment together — and end on a strong final spread such as the last sunset or the flight home. A hardcover, layflat book does this kind of trip justice.
Road trip photo book
Road trips are made for the map spread. Open with your route drawn or printed across a page, then move stop by stop in chronological order. Include the in-between moments — petrol stations, picnic stops, the view from the passenger seat, the playlist on the dashboard — because those are often the bits you remember most fondly, not the official sights.
Gap year or round-the-world book
With this much material, go thematic or split the book into one chapter per country. Resist trying to include everything; a tight edit across a year is far more powerful than a bloated archive. If you have hundreds of genuine keepers, consider a slim separate book per region rather than one enormous volume that nobody quite finishes.
Family holiday photo book
Family books work best when the people are the focus, not just the scenery. Make a deliberate point of getting everyone in shot, including whoever usually holds the camera. Turn it into a yearly tradition and you slowly build a shelf of family holidays — the kind of thing children pore over when they are older and you would not trade for anything.
City break book
Short trips suit small books. A 20-page square book of a long weekend in Lisbon or Edinburgh is quick to make and lovely to gift. Lean into texture — architecture, food, signage, street life — because a city break is more about atmosphere and detail than sweeping landscape.
Solo travel book
A solo trip book is for you, so make it personal. Pair photos with a few journal-style lines about how each place felt, not just what it looked like. Self-portraits, reflections in shop windows, even your own shadow all count — they prove you were there and give the book a point of view.
Displaying your favourite travel shots around the home
A photo book is the centrepiece, but your very best travel images deserve to be seen every day, not just when you open the book. A handful of favourites can live happily on the wall and around the house too — and the trip stays present in your home rather than tucked on a shelf.
For the one shot that stops you in your tracks — a dramatic coastline, a mountain at golden hour — a canvas print gives it real presence on a living-room wall, with a gallery-wrapped finish that suits landscape photography particularly well.
If you would rather keep things light, changeable and easy on the budget, there are simpler ways to put a big travel image on show, which we come to below — there is no need to commit your whole wall to one trip.
How to make your travel photo book, step by step
Once you have your photos and a structure, the building is the straightforward part. Here is the full process from camera roll to doorstep.
- Gather and back up your photos. Pull everything from your phone, camera and travel companions into one folder, and back it up before you start deleting anything.
- Do your three-pass edit. Cut down to your keepers using the method from Step 2 — reject, choose favourites, fill gaps.
- Choose your format, cover and paper. Use the table above to match the book to your trip: layflat for landscapes, square for city breaks, hardcover for keepsakes.
- Pick a template or start blank. A template gives you a head start and keeps the design consistent; blank gives you full control if you enjoy the process.
- Place your hero shots first. Lay down the big full-page images for each section, then build the supporting grids and pairings around them.
- Add captions. Drop in your short, specific captions where they add context. Leave the rest of the photos to speak for themselves.
- Review every spread, then order. Check for any low-resolution warnings, read your captions once more for typos, then order — and consider a second copy as a gift while you are at it.
If the editing feels like the daunting part, the fastest route is a smart-design tool. Upload your photos and it builds a first-draft layout automatically, which you then refine — far quicker than a blank page. My Picture's photo book maker offers this alongside manual design, works just as well from a phone as a laptop, and includes free UK delivery on orders over £49.
Designer shortcuts that save real time:
- Use Smart Design or auto-fill for the first draft, then refine — do not build 60 pages by hand from scratch.
- Organise your uploads into chronological folders first, even if the final book is thematic. It keeps everything findable.
- Order one extra copy at the same time. Reordering later usually costs more than adding a second copy up front.
- Leave the cover image until last. The best cover shot often only becomes obvious once the inside of the book is finished.
Common travel photo book mistakes to avoid
- Including too much. The most common error by far. A tight edit always reads better than a complete archive of every photo you took.
- No structure. Photos in random order feel like a slideshow. Pick chronological, thematic or story-led and commit to it.
- Cramming the pages. Eight photos to a page with no breathing room makes everything feel small and cheap. Let your best images sit alone.
- Using low-resolution images large. A soft screenshot blown up to full page will look worse in print than it did on screen. Keep weak files small or out.
- Leaving captions until later. You will forget the details within weeks. Write them while the trip is fresh in your mind.
- Forgetting yourself. If you always hold the camera, you will not appear in your own travel book. Hand it over sometimes.
- Ignoring the gutter and bleed. Keep faces and key details out of the centre crease, and check that full-bleed images have a little margin of safety around the important parts.
Looking after your finished book
A quality photo book is built to last decades, but a few simple habits keep it looking its best for far longer.
- Keep it out of direct sunlight. Prolonged sun fades any printed image over time. A shelf or coffee table away from a south-facing window is ideal.
- Avoid damp and extreme heat. Humidity can warp pages and covers, so steer clear of bathrooms, radiators and conservatories.
- Handle with clean, dry hands. This matters most with gloss and satin pages, which show fingerprints more readily than matte.
- Store it upright. Like any book, standing it on a shelf protects the spine and pages better than leaving it lying in a stack.
And of course, keep a copy of the original digital files backed up. The book is the keepsake you enjoy; the files are the insurance that lets you reprint or make a second copy. A few favourite shots also make great fridge decoration in the meantime as MixMags photo magnets, so the trip greets you every morning while the book sits on the shelf.
Turn your trip into something you will keep
The photos are already on your phone. The only thing standing between them and a book you will actually enjoy is an afternoon of editing and a bit of layout. Start with one trip — your favourite one — choose a structure, cut to your best shots, match the format to the journey, and give yourself permission to leave the rest out.
If you want a quick, changeable way to enjoy a few travel images while you build the book, a photo poster print puts a big shot on the wall affordably and swaps out whenever the next trip rolls around, and MIXPIX® photo tiles let you build a growing travel wall with no nails and no holes — ideal for renters and anyone who likes to keep adding as they go.