100+ Gallery Wall Ideas UK: How to Create the Perfect Photo Display
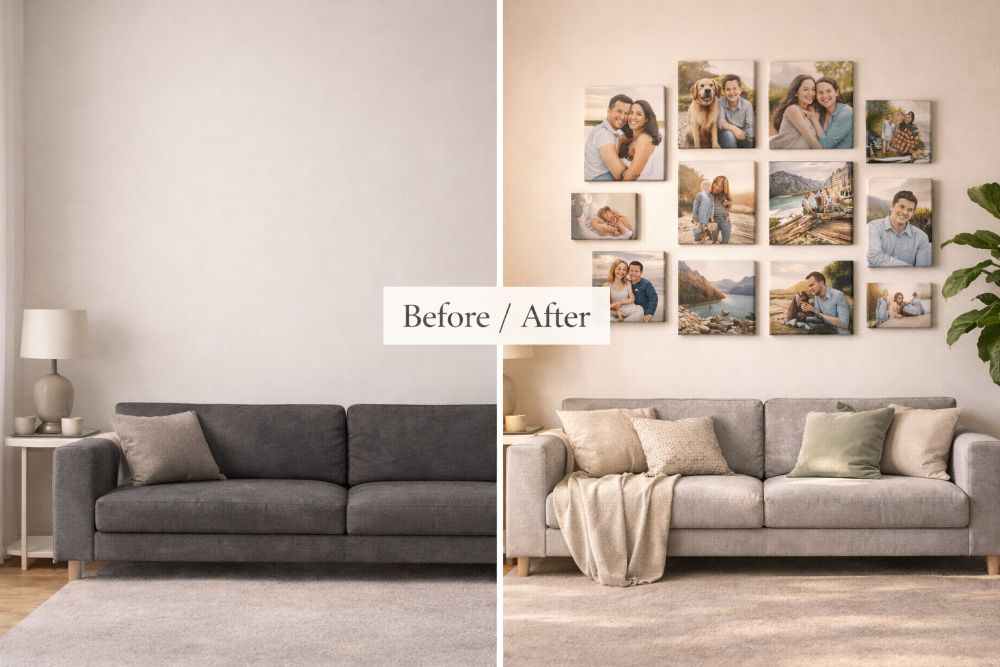
Staring at that blank living room wall and wondering what to do with it? A gallery wall might be exactly what you need.
Gallery walls have taken over British homes in 2026, and for good reason. They're personal, they're interesting to look at, and they're way more affordable than buying expensive artwork. Plus, they actually mean something – they're your memories, your family, your life displayed beautifully on your wall.
But here's the thing. Creating a gallery wall that looks brilliant (rather than like you just randomly stuck photos on the wall) takes a bit of planning. Get the layout wrong and it looks messy. Hang them wonky and it's amateur hour. Pick the wrong photos and the whole thing falls flat.
We've put together over 100 gallery wall ideas specifically for UK homes – from tiny flat walls to massive feature displays. Whether you want something minimal and modern or busy and eclectic, we've got you covered.
You'll find layout templates you can copy exactly, room-by-room ideas, step-by-step instructions, and honest advice about what works (and what doesn't). No interior design degree needed.

Why gallery walls are brilliant (and why everyone's doing them)
Walk into any British home right now and you'll probably spot a gallery wall. They've gone from "nice to have" to proper must-have territory, and here's why people love them:
They're properly personal. Unlike generic artwork from Ikea that half your street probably owns, your gallery wall is completely unique. Nobody else has your exact memories, your family, your trips. It's the one bit of wall decor that's genuinely yours.
They're cheaper than you think. A single piece of large artwork from a gallery? £200-500 easily. A stunning gallery wall with 15 canvas prints? £150-300. You get way more visual impact for less money.
They solve the "empty wall" problem. You know that wall. The one you've been meaning to do something with for months. Gallery walls fill the space properly without being too much.
They're flexible. Don't like it? Rearrange. Want to swap photos? Easy. Try doing that with wallpaper or a massive painting.
They start conversations. People actually stop and look at gallery walls. They ask about the photos, the places, the people. Your wall becomes something worth talking about.
In 2026, British homes are moving away from minimalism and towards spaces that feel lived-in and personal. Gallery walls fit that perfectly. They're also brilliant for renters – no permanent changes needed, and you can take everything with you when you move.
What makes a gallery wall look amazing (not amateur)
Here's the secret: good gallery walls follow a few basic rules. Break these rules and it looks messy. Follow them and even a simple arrangement looks intentional and professional.
- Visual balance – The wall should feel balanced even if it's not symmetrical. Heavy on one side? It'll look wonky.
- Consistent editing – Mix colour and black and white? Fine. Mix heavily filtered Instagram shots with professional portraits? Looks weird.
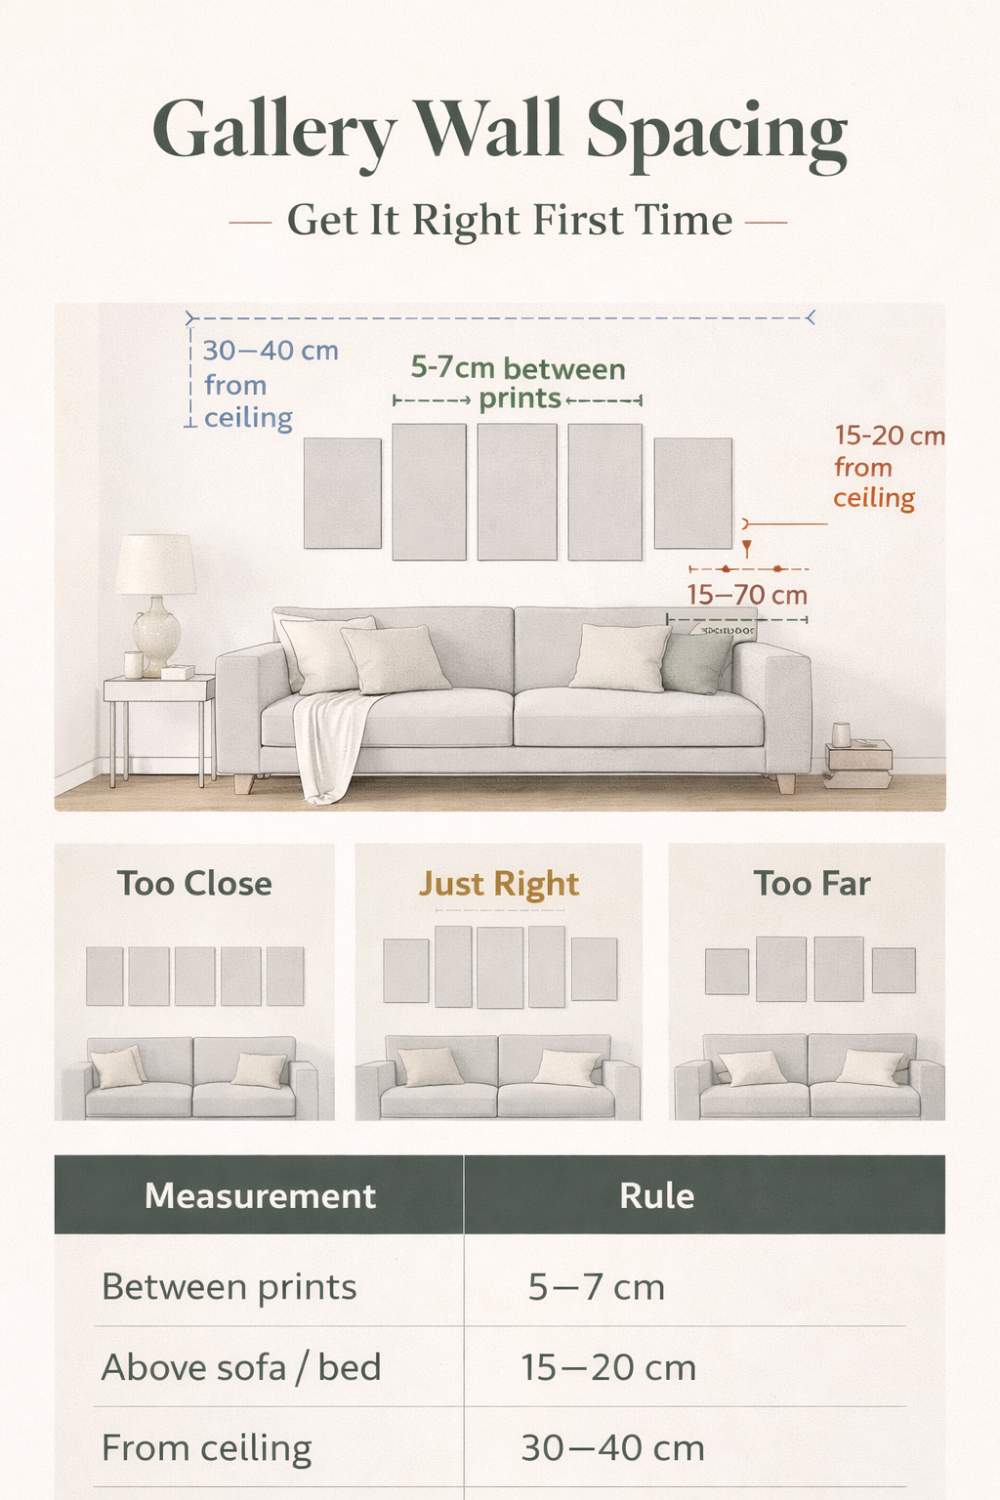
- Proper spacing – Too close together looks cramped. Too far apart looks disconnected. Sweet spot is 5-7cm between prints.
- Intentional layout – Random rarely works. Your arrangement should follow a pattern, even if it's a loose one.
- Right scale – Tiny photos on a massive wall get lost. Huge prints on a small wall overwhelm. Size matters.
- Cohesive theme – Doesn't have to be boring, but your photos should relate to each other somehow. All family? All travel? All black and white? Pick a thread.
The good news? Once you know these rules, creating a stunning gallery wall becomes pretty straightforward. Let's get into the practical stuff.
Gallery wall planning basics: measure twice, hang once
Right, before you start hammering nails into your wall, you need to plan. I know, boring. But spend 20 minutes planning now and you'll save yourself hours of filling nail holes and repainting later.
Step 1: Measure your wall space
Get your tape measure out. You need to know:
- Total wall width (obviously)
- Total wall height (floor to ceiling)
- Usable space – subtract any furniture, skirting boards, picture rails, light switches
For example, if your wall is 300cm wide but you've got a sofa that's 200cm wide sitting against it, your gallery wall space is probably 180-200cm max. You want some breathing room on either side of the sofa.
Standard UK ceiling heights are around 240cm. Your gallery wall shouldn't go right to the ceiling – that looks odd. Aim to end around 30-40cm below the ceiling.
Top tip: Take a photo of the empty wall. You can sketch layout ideas directly onto the photo to see what works.
Step 2: Choosing the right location
Not every wall is gallery wall material. Here's where they work brilliantly:
Perfect spots:
- Above the sofa in living rooms (the classic)
- Feature walls in bedrooms (above the bed or opposite)
- Staircase walls (ascending arrangements look fab)
- Long hallways (fill that awkward space)
- Dining room walls (creates ambiance)
- Home office walls (motivation + personalization)
Avoid these spots:
- Directly above radiators (heat can damage prints over time)
- In bathrooms (moisture is the enemy)
- Where they'll get direct sunlight all day (fading)
- Behind doors that open against them
- On textured walls (nightmare to hang level)
Step 3: Planning your layout before you start
Here's the method interior designers use, and it works:
The paper template method:
- Cut pieces of paper/newspaper to match your chosen print sizes
- Tape them to the wall in different arrangements
- Stand back and look at it from where you'll actually see it (sitting on the sofa, walking down the hall, etc.)
- Move things around until it looks right
- Mark the top corners of each piece with pencil
- Remove paper, hang prints at those marks
This takes 30 minutes but saves you from hanging things wrong. Trust the process.
Alternative: Use a gallery wall app
Several free apps let you input wall dimensions and print sizes, then show you layouts. "WallApp" and "Gallery Wall Creator" both work well. Though honestly, the paper method is more accurate.
Tools you'll need
You don't need a full workshop, but you do need:
- Tape measure (obviously)
- Spirit level (wonky prints ruin everything)
- Pencil (for marking)
- Hammer (for nails)
- Picture hooks (not just nails – proper hooks)
- Paper and tape (for templates)
- Optional: Laser level (makes life easier but not essential)
For canvas prints (which we'll talk about loads because they're brilliant for gallery walls), you need even less – most come with hanging fixtures already attached. Just hook and hang.
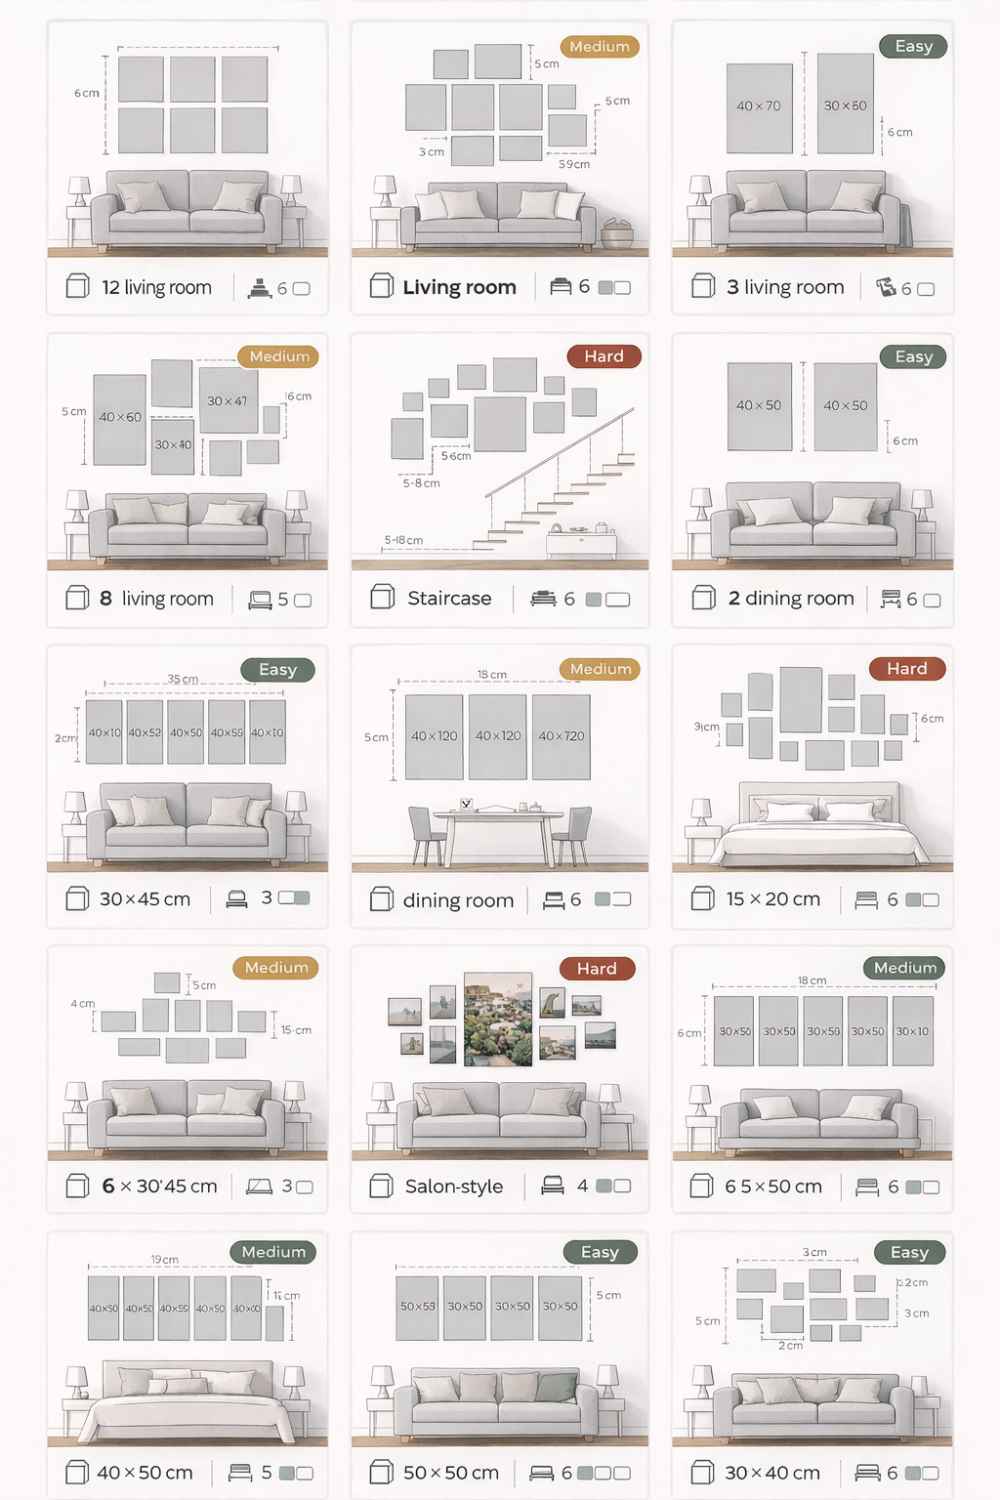
50 Gallery wall layout templates to copy exactly
This is the good bit. Fifty actual layouts you can use right now, organized by style. Pick one, measure your wall, order your prints, job done.
Symmetrical layouts (15 templates)
Symmetrical layouts are foolproof. Everything matches, everything's evenly spaced. Perfect if you like things neat and tidy.
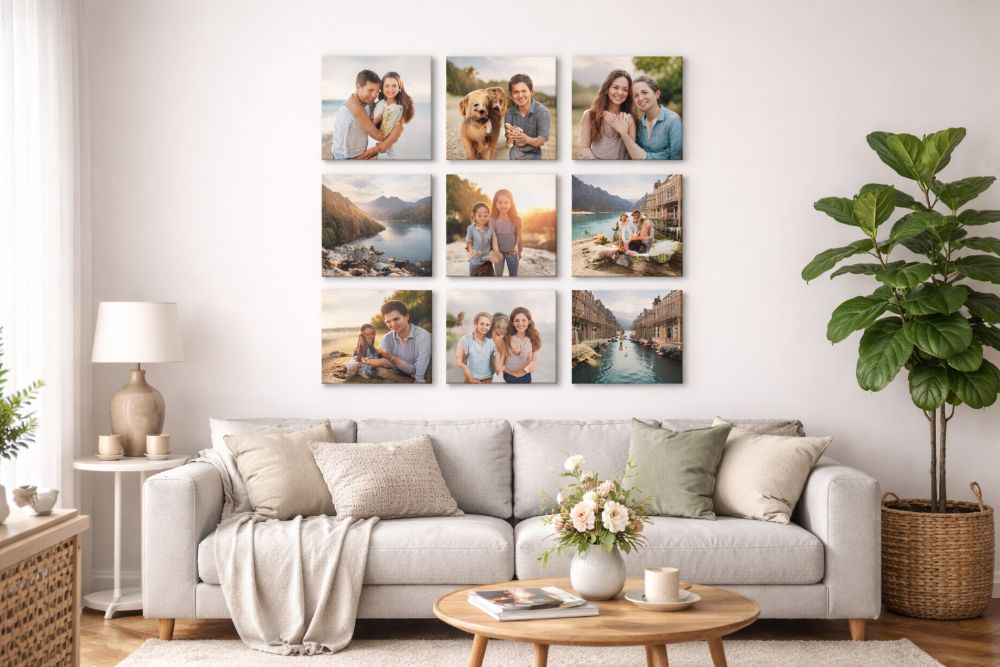
Layout 1: The Classic Grid (3x3)
- 9 prints, all same size
- Perfect squares: 30x30cm or 40x40cm
- 5cm spacing between each
- Total wall space needed: 110cm x 110cm (for 30x30 prints)
- Best for: Modern homes, family photos, minimalist style
Layout 2: The Large Grid (4x4)
- 16 prints, all 25x25cm
- Creates a major statement piece
- 5cm spacing
- Total space: 120cm x 120cm
- Best for: Large empty walls, photo collections
Layout 3: The Wide Grid (5x3)
- 15 prints in a wide rectangle
- Great above sofas
- Mix 20x20cm and 30x30cm for interest
- Space needed: 170cm x 110cm
- Best for: Living rooms, above furniture
Layout 4: The Twin Grid
- Two separate 2x2 grids with space between
- 8 prints total (4+4)
- Modern and architectural
- Creates interesting negative space
- Best for: Contemporary homes
Layout 5: The Matching Pairs
- 6 prints in three rows of two
- All same size (30x40cm portrait)
- Perfectly aligned
- Clean and simple
- Best for: Hallways, narrow walls
Layout 6: The Border Grid
- 12 small prints (20x20cm) arranged in rectangle
- Leave empty centre space
- Frame something special in the middle
- Total space: 100cm x 140cm
- Best for: Feature walls with a focal point
Layout 7: The Tri-Level
- Three rows of 3, 5, 3 prints
- 11 prints total
- Pyramid effect
- Mix sizes for depth: 20x20cm, 30x30cm, 20x20cm
- Best for: Modern geometric style
Layout 8: The Checkerboard
- Alternating sizes in grid pattern
- 16 prints: 8 large (40x40cm), 8 small (20x20cm)
- Creates visual rhythm
- Needs precision but looks amazing
- Best for: Bold statement walls
Layout 9: The Double Row
- Two horizontal rows
- 6-8 prints per row
- All matching size
- Super clean look
- Best for: Above bed, above sofa
Layout 10: The Square Frame
- Prints arranged around empty centre square
- 12-16 prints depending on size
- Centre left blank for visual interest
- Quite formal but striking
- Best for: Dining rooms, offices
Layouts 11-15: More symmetrical options
- The Triple Threat: Three vertical columns, 5 prints each
- The Four Corners: Large prints in corners, smaller in centre
- The Equal Spread: 20 identical prints in 4x5 grid
- The Mirror Image: Symmetrical arrangement from centre line
- The Bookend: Two large prints flanking smaller centre arrangement
Asymmetrical layouts (15 templates)
Asymmetrical doesn't mean random. It means the arrangement looks balanced even though the prints are different sizes and positions. Bit trickier to pull off, but when it works, it looks properly designer.
Layout 16: The Salon Style
- Mix of every size you can think of
- Completely fills the wall, edge to edge
- No visible pattern but feels balanced
- 15-30 prints typically
- Best for: Eclectic homes, maximalist style
How to make salon style work:
- Start with largest print, roughly centre
- Build outward with medium prints
- Fill gaps with smallest prints
- Maintain roughly consistent spacing (5-7cm)
- Step back often to check balance
Layout 17: The Organic Spread
- Looks random but isn't
- Various sizes scattered across wall
- More space between prints than salon style
- 8-12 prints
- Best for: Bohemian, relaxed style
Layout 18: The Asymmetric Triangle
- Prints arranged in loose triangle shape
- One large at top, smaller descending
- Creates visual flow
- 7-11 prints
- Best for: Staircase walls, sloped arrangements
Layout 19: The Off-Centre Statement
- One large print (60x80cm) positioned off-centre
- Smaller prints clustered to one side
- Asymmetrical but clearly intentional
- 5-8 prints total
- Best for: Modern, artistic homes
Layout 20: The Scattered Constellation
- Prints of varying sizes spread across wall
- Lots of negative space between
- Airy and modern
- 6-10 prints maximum
- Best for: Minimalist aesthetic
Layout 21: The L-Shape
- Prints arranged in L formation
- Perfect for corner walls
- Various sizes descending
- 8-12 prints
- Best for: Awkward corners, architectural interest
Layout 22: The Cluster Method
- Several small clusters of 2-3 prints
- Spread across larger wall
- Each cluster visually separate
- 9-15 prints in 3-5 clusters
- Best for: Large walls, multiple themes
Layout 23: The Flowing River
- Prints arranged in wavy, flowing pattern
- Creates movement
- Mix landscape and portrait orientations
- 10-15 prints
- Best for: Long walls, hallways
Layout 24: The Diagonal Sweep
- Arrangement flows diagonally across wall
- Starts dense, becomes sparse
- Dramatic visual impact
- 12-18 prints
- Best for: Feature walls, artistic style
Layout 25: The Frame Within
- Large prints form outer rectangle
- Smaller prints clustered inside
- Creates depth perception
- 15-20 prints
- Best for: Gallery-like display
Layouts 26-30: More asymmetrical options
- The Spiral: Prints arranged in loose spiral from centre
- The Weighted Corner: Heavy grouping in one corner, sparse opposite
- The Stepping Stones: Prints create stepping pattern across wall
- The Cloud: Organic cluster shape, like a cloud formation
- The Offset Grid: Grid pattern but deliberately misaligned
Asymmetrical layouts work brilliantly when you've got photos of different orientations and subjects. Our canvas prints come in loads of sizes (from 20x20cm to 80x60cm), so you can mix and match easily.
Single statement pieces (10 ideas)
Sometimes one big, beautiful print is all you need. No faffing with layouts, no measuring multiple pieces. Just one stunning focal point.
Idea 31: The Oversized Family Portrait
- One massive canvas: 80x60cm or larger
- Professional family photo or special moment
- Hung at eye level (centre around 145cm from floor)
- Makes huge impact with minimal effort
- Best for: Above sofas, feature walls
Idea 32: The Panoramic Landscape
- Extra-wide format: 100x40cm or similar
- Stunning landscape or cityscape photo
- Creates horizontal visual flow
- Works above beds, sofas, hallway walls
- Best for: Travel memories
Idea 33: The Split Triptych
- One image split across three separate canvases
- Each canvas 40x60cm
- Hung with 5-10cm gap between
- Modern and striking
- Best for: Contemporary homes
Idea 34: The Floor Leaner
- Large canvas (60x80cm or bigger)
- Lean against wall instead of hanging
- Casual, artistic vibe
- Easily swappable
- Best for: Bedrooms, relaxed spaces
Idea 35: The Vertical Drama
- Tall portrait format: 40x100cm
- Creates height illusion
- Perfect for narrow wall spaces
- Eye-catching proportions
- Best for: Between windows, narrow walls
Idea 36: The Floating Shelf Display
- Medium canvas (50x70cm)
- Placed on floating shelf with objects
- 3D display rather than flat wall
- Layer with plants, books, trinkets
- Best for: Living rooms, bedrooms
Idea 37: The Diptych Pair
- Two large matching canvases
- Same size, complementary images
- Hung side-by-side with small gap
- Elegant and simple
- Best for: Above bed, symmetrical walls
Idea 38: The Mega Canvas
- Biggest size you can get: 100x75cm+
- Absolutely dominates the wall
- One incredible photo needs this treatment
- Professional quality essential
- Best for: Main living room wall
Idea 39: The Standout Square
- Large square format: 60x60cm or 80x80cm
- Perfectly centred on wall
- Minimalist and modern
- All about the single image
- Best for: Modern, minimal homes
Idea 40: The Story Canvas
- Medium-large canvas (60x80cm)
- Photo that tells a complete story
- Properly eye-level placement
- Becomes room's focal point
- Best for: Personal milestone moments
Single statement pieces work when you've got one photo that's properly stunning. Don't waste a massive canvas on a mediocre phone snap – use your best image.
Horizontal layouts (10 templates)
Horizontal arrangements work brilliantly above furniture and in long, low spaces. Here's how to make them work:
Layout 41: The Sofa Topper (Classic)
- 3 large prints in a row: 50x70cm each
- Spans width of sofa
- 5-10cm spacing between
- Hung 15-20cm above sofa back
- Space needed: 170cm wide x 70cm high
Layout 42: The Extended Line
- 5-7 medium prints in straight line
- All same size: 30x40cm or 40x30cm
- Creates horizontal movement
- Perfect above sideboards, console tables
- Space needed: 200cm+ wide
Layout 43: The Double Decker
- Two horizontal rows
- 4 prints on top, 4 on bottom
- All matching size (30x30cm or 40x30cm)
- Clean, organized look
- Space needed: 150cm wide x 80cm high
Layout 44: The Graduated Sizes
- 5 prints arranged horizontally
- Sizes increase from edges to centre
- Creates gentle arch effect
- Visually interesting variation
- Best for: Above sofas, beds
Layout 45: The Landscape Run
- 3-4 landscape photos in a row
- All same height, varying widths okay
- Tells visual story left to right
- Great for travel photos
- Space needed: 180cm+ wide
Layout 46: The Horizontal Offset
- Two rows, deliberately misaligned
- Top row: 3 prints
- Bottom row: 2 prints, centred
- Creates interesting negative space
- Space needed: 140cm wide x 90cm high
Layout 47: The Thin Banner
- 6-8 small square prints (20x20cm)
- Single row, evenly spaced
- Delicate and minimal
- Perfect for narrow spaces
- Space needed: 160cm wide x 25cm high
Layout 48: The Hallway Sequence
- Series of 4-6 prints down hallway
- All same size and height
- Creates visual journey
- Tell a story through sequence
- Best for: Long hallways, corridors
Layout 49: The Ascending Steps
- Horizontal row but each print slightly higher
- Creates staircase effect
- 4-5 prints
- Dynamic and playful
- Best for: Modern, artistic homes
Layout 50: The Bookend Layout
- Large print on each end
- 3-4 smaller prints in middle
- Symmetrical but varied
- Anchored feeling
- Space needed: 200cm wide x 60cm high
Horizontal layouts are the safest bet if you're nervous. They're hard to mess up and they always look intentional.
85 Gallery wall ideas by room (where and how to hang them)
Different rooms need different approaches. What works in your living room might look daft in the bedroom. Let's go room by room.
Living room gallery walls (25 ideas)
The living room is gallery wall central. It's where most people put their main display, and for good reason – you spend loads of time there, guests see it, and living rooms usually have the wall space.
Idea 51: Above the Sofa (The Classic) Your sofa's probably against your biggest blank wall. Fill it.
What works:
- Width should be 2/3 to 3/4 of sofa width
- Hang 15-20cm above the sofa back
- Horizontal arrangements work best
- 3-5 large prints or 9-12 medium prints
- Keep it balanced – heavy on one side looks wrong
Idea 52: The Feature Wall Statement Got one wall with nothing on it? Gallery wall time.
- Cover 60-70% of wall space (not edge to edge)
- Mix sizes for visual interest
- Centre the arrangement on the wall
- 15-25 prints depending on wall size
- Include at least one large focal piece
Idea 53: Around the TV (Carefully) This can look brilliant or terrible, no middle ground.
Do this:
- Keep prints small so they don't compete
- Symmetrical arrangement around TV
- Black and white photos work best
- Maintain breathing room (15cm+ from TV)
Don't do this:
- Colourful busy prints (too much visual noise)
- Prints too close to TV (looks cluttered)
- Random asymmetrical (just looks messy near TV)
Idea 54: The Fireplace Surround Fireplaces are natural focal points. Enhance them.
- Gallery wall above mantelpiece
- Stop 10-15cm from ceiling
- Can extend to sides of fireplace
- Usually 7-15 prints
- Symmetrical layouts work brilliantly here
Idea 55: Corner Gallery Wall Two walls meeting? Use both.
- Prints wrap around corner
- Creates 3D effect
- Usually 8-12 prints total
- Split arrangement between walls
- Makes awkward corners interesting
Idea 56: The Floating Shelf Gallery Combine shelves with prints.
- Floating shelves at different heights
- Mix photos, plants, objects
- Layered, collected look
- More flexible (easy to rearrange)
- Very current, very Instagram
Idea 57: Window Side Walls Those narrow bits next to windows? Perfect for vertical galleries.
- Vertical arrangement of 4-6 prints
- All same width, varying heights okay
- Draws eye to natural light
- Makes windows feel larger
- Usually 30x40cm or 20x30cm prints
Ideas 58-75: More living room layouts
- The Alcove Display: Built-in shelving filled with mix of prints and objects
- The Console Table Topper: Above a console table in hallway/living room
- The Radiator Cover Display: Above (not directly on) radiator
- The Door Frame Fill: Narrow spaces beside doorways
- The Piano Top: Above upright piano
- The Bookshelf Integration: Mixed with books on open shelving
- The Staircase View: Wall visible from living room stairs
- The Split Level: Different heights on same wall
- The Monochrome Family Wall: All black and white family portraits
- The Travel Timeline: Journey through your travels
- The Pet Wall: Just your dog/cat in various moods
- The Minimalist Five: Just 5 large prints, loads of space
- The Maximalist Fill: 30+ prints, salon style
- The Colour Story: Prints arranged by colour gradient
- The Mixed Media: Canvas, frames, objects combined
- The Symmetrical Pair: Two identical arrangements flanking window
- The Floor to Ceiling Drama: Uses entire wall height
- The Picture Ledge Row: Multiple ledges holding prints
Bedroom gallery walls (15 ideas)
Bedrooms are personal spaces. Your gallery wall here should feel intimate and calming (or energizing if that's your vibe). Definitely the place for romantic photos, personal moments, and your favourite memories.
Idea 76: Above the Bed (The Bedroom Classic) If your sofa gets a gallery wall, your bed deserves one too.
What works:
- Width should match headboard width (or slightly wider)
- Hang 20-25cm above headboard
- Keep it calming – busy walls disturb sleep
- 3-5 large prints or 6-9 medium prints
- Romantic, peaceful, or personal photos
Idea 77: The Couples' Story Wall Chronicle your relationship.
- Mix of photos from your journey together
- First date → engagement → wedding → now
- Can include ticket stubs, letters (framed)
- Usually opposite bed so you see it
- 8-15 prints in organic arrangement
Idea 78: Black and White Bedroom Gallery Calming, classic, never goes out of style.
- All photos converted to black and white
- Mix of family, places, moments
- Very hotel-chic
- Sophisticated and timeless
- 9-12 prints in grid or organic layout
Idea 79: The Dressing Room Wall If you've got space near wardrobe/mirror.
- Inspirational, aspirational photos
- Fashion photos, travel goals, motivation
- Usually smaller prints (20x30cm)
- Can be more colourful/energetic
- 6-10 prints
Idea 80: The Reading Nook Gallery Cosy chair in corner? Gallery wall behind it.
- Creates defined space
- Personal photos, quotes, inspiration
- Smaller scale, intimate
- 4-8 prints
- Feels like your private retreat
Ideas 81-90: More bedroom galleries
- The Master Suite Romance: Large romantic photo above bed plus matching prints on side walls
- The Travel Dream Wall: Places you've been and want to go
- The Family Heritage: Multi-generational family photos
- The Monochrome Minimal: 4 large B&W prints, loads of space
- The Polaroid Wall: Vintage-style instant photos in grid
- The Mixed Orientation: Portrait and landscape in artistic arrangement
- The Bedside Gallery: Small arrangement on each side wall
- The Wardrobe Door Gallery: If you've got plain wardrobe doors
- The Window Frame: Gallery around bedroom window
- The Calming Blues: All photos with blue tones for peaceful feeling
Hallway & staircase gallery walls (15 ideas)
Hallways and staircases are MADE for gallery walls. You walk past them every single day, guests see them immediately, and they're usually just blank boring walls anyway. Transform them.
Idea 91: The Ascending Staircase Wall This is THE classic staircase gallery.
How to do it right:
- Follow the angle of the stairs
- Space prints evenly as you ascend
- All same size usually works best (30x40cm)
- Maintain consistent height from stair tread
- Usually 8-15 prints depending on staircase
Standard method:
- Measure 150cm up from each stair tread
- Mark this point
- Hang centre of print at this height
- Creates perfect diagonal line
- Looks intentional and professional
Idea 92: The Corridor Long Wall Long hallway walls are perfect for horizontal galleries.
- Single row of 6-10 prints
- All same size and height
- Creates visual journey down hallway
- Guides the eye forward
- Makes narrow hallways feel wider
Idea 93: The Stairwell Statement Wall That big wall you see as you go upstairs.
- Large asymmetrical arrangement
- Mix of sizes, quite dense
- Can be 20-30 prints
- Salon style works brilliantly
- Makes architectural impact
Idea 94: The Hallway Timeline Perfect for family photos.
- Photos arranged chronologically
- Left to right tells the story
- Great for kids growing up
- Easy to add to over years
- 10-20 prints in linear arrangement
Idea 95: Narrow Hallway Vertical Hallway too narrow for horizontal? Go vertical.
- Vertical arrangement of 5-8 prints
- Various sizes descending
- Doesn't crowd narrow space
- Creates height illusion
- Usually portrait orientation
Ideas 96-105: More hallway/staircase ideas
- The Gallery Corner: Turn corner with prints on both walls
- The Entry Statement: First wall guests see when entering
- The Understairs Fill: Awkward space under stairs
- The Double Staircase: Prints on both walls of staircase
- The Landing Feature: Top of stairs focal wall
- The Runner Gallery: Follows length of hallway
- The Mixed Heights: Varying heights on staircase wall
- The Symmetrical Pairs: Matching prints on opposite walls
- The Floor to Ceiling Hall: Uses full hallway height
- The Welcome Wall: Just inside front door
Dining room gallery walls (10 ideas)
Dining rooms are all about atmosphere. Your gallery wall should create talking points and pleasant viewing while eating.
Idea 106: The Conversation Starter Wall Feature wall behind dining table.
- Interesting, beautiful images
- Travel photos, food photography, family moments
- Usually 9-15 prints
- Grid or organic arrangement
- Something to look at during dinner
Idea 107: The Food & Wine Wall Themed around dining.
- Food photography, vineyard photos
- Market scenes, cooking moments
- Creates appropriate ambiance
- Usually black and white or muted colours
- 6-12 prints
Idea 108: The Family Heritage Wall Multi-generational family photos.
- Grandparents, parents, your family
- Shows family history
- Creates meaningful dinner conversations
- Usually vintage photos mixed with modern
- 10-20 prints in salon style
Ideas 109-115: More dining room galleries
- The Minimalist Statement: 3 large prints, very clean
- The Sideboard Topper: Above dining room furniture
- The Window Frame: Around dining room window
- The Colour Pop: Vibrant, energetic arrangements
- The Formal Grid: Symmetrical, traditional
- The Alcove Display: In dining room built-ins
- The Artist's Wall: Reproductions mixed with personal photos
Home office gallery walls (10 ideas)
Your workspace should motivate you. Gallery walls in home offices serve a purpose – inspiration, motivation, achievement.
Idea 116: The Motivation Wall Behind your desk, in your eyeline.
- Inspirational quotes (we can print these on canvas)
- Achievement photos
- Goals and dreams
- Places you want to go
- 6-10 prints, medium sizes
Idea 117: The Achievement Wall Certificates, photos, milestones.
- Diplomas, awards, achievements
- Professional photos
- Mix frames and prints
- Builds confidence
- Usually formal symmetrical arrangement
Idea 118: The Vision Board Wall Your goals visualized.
- Places you want to visit
- Things you want to achieve
- People who inspire you
- Dreams and aspirations
- Can change this regularly
Ideas 119-125: More office galleries
- The Client-Facing Wall: Professional, impressive (for video calls)
- The Family Balance: Personal photos to remember why you work
- The Travel Inspiration: Places fueling your wanderlust
- The Minimalist Focus: Clean, distraction-free
- The Creative Chaos: Inspiration board style
- The Before/After: Progress and transformation photos
- The Quote Collection: Motivational words on canvas
Nursery & kids' room walls (10 ideas)
Kids' rooms are fun. You can be playful, colourful, and whimsical in ways you can't in the living room.
Idea 126: The Growth Journey Wall Baby photos to present.
- Monthly photos from first year
- Birthday photos each year
- Watching them grow on the wall
- Usually 12-20 prints
- Add to it over time
We can create gorgeous canvas prints from your baby milestone photos. Start with our baby photo book, then turn favorite pages into canvas prints for the wall.
Idea 127: The Whimsical Arrangement Fun, playful, irregular.
- Mix of family photos and fun images
- Bright colours welcomed
- Organic, scattered arrangement
- Animals, nature, silly faces
- 8-15 prints
Idea 128: The Name Wall Their name in photos or letters.
- Large letters spelling name
- Photos arranged in letter shapes
- Personal and decorative
- Grows with them
- Usually 4-8 large letter canvases
Ideas 129-135: More nursery/kids' galleries
- The Rainbow Colours: Prints arranged by colour
- The Twin/Sibling Wall: Each child's photos
- The Storybook Theme: Favourite characters and stories
- The Adventure Wall: Exploring, playing, discovering
- The Family Loves You: Photos with grandparents, family
- The Height Chart Gallery: Vertical with height marks
- The Changing Gallery: Easy to swap as they grow
65 Gallery wall styles & themes (find your aesthetic)
Now you know WHERE to put them and WHAT layout to use. But what style? What photos? Let's get into themes.
Black & white gallery walls (15 ideas)
Black and white is timeless. It'll look good in 2026 and it'll look good in 2046. If you're unsure about colour, go monochrome.
Idea 136: The Classic Family Portraits All family photos, all black and white.
- Formal and informal mixed
- Different generations
- Professional and candid
- Creates cohesive collection from different eras
- Usually 12-20 prints
How to make B&W work:
- Convert all photos to B&W before printing (don't mix colour)
- Adjust contrast so they have similar tones
- Mix portrait and landscape orientations
- Include variety of shot types (close-ups, full-length, groups)
- Stick to white or black mounts/canvas edges
Idea 137: The Vintage Aesthetic Modern photos edited to look vintage.
- Sepia tones or true B&W
- Slightly faded look
- Mix old family photos with new ones edited vintage
- Creates timeless feeling
- 10-18 prints
Idea 138: The Architecture Wall Buildings, structures, urban scenes.
- All B&W photography
- Strong lines and shapes
- Very modern and artistic
- Usually larger prints (40x60cm+)
- 5-8 statement pieces
Ideas 139-150: More B&W themes
- The Portrait Gallery: Just faces, beautifully lit
- The Nature Study: Trees, landscapes, wildlife in B&W
- The Street Photography: Urban life, candid moments
- The Minimalist Monochrome: Lots of white space, few prints
- The Dramatic Contrast: High contrast, bold B&W
- The Soft Gray Tones: Gentle, subtle monochrome
- The Mixed Media B&W: Photos, quotes, artwork
- The Timeline Black & White: Chronological family history
- The Geometric B&W: Shapes, patterns, abstract
- The Celebrity Portrait Style: Magazine-style B&W portraits
- The Vintage Travel: Old travel photos or new ones vintage-styled
- The Emotional Monochrome: Weddings, moments, feelings
Black and white hides a multitude of sins – different photo qualities, various eras, mixed lighting. Converting everything to B&W creates instant cohesion.
Colourful & vibrant gallery walls (10 ideas)
Want something cheerful and energetic? Embrace colour.
Idea 151: The Rainbow Gradient Photos arranged by colour.
- Red photos → orange → yellow → green → blue → purple
- Creates ombre effect
- Very Instagram-worthy
- Requires careful photo selection
- 15-25 prints
Idea 152: The Single Colour Theme All photos feature same colour.
- All blue (ocean, sky, blue objects)
- All green (nature, plants)
- Creates striking cohesion
- Surprisingly versatile
- 9-15 prints
Idea 153: The Maximalist Colour Explosion All the colours, all the vibes.
- Vibrant, busy, energetic
- Mix of colourful photos
- No particular organization
- Joyful and bold
- 20-30 prints in salon style
Ideas 154-160: More colourful themes
- The Sunset Tones: Warm oranges, pinks, golds
- The Ocean Blues: Cool blues and greens
- The Botanical Greens: Plants, nature, life
- The Candy Pop: Bright, saturated colours
- The Pastel Dreams: Soft, gentle colours
- The Contrasting Pairs: Complementary colour combinations
- The Seasonal Colours: Autumn oranges, spring greens, etc.
Minimalist gallery walls (10 ideas)
Less is more. Sometimes three perfect prints beat fifteen random ones.
Idea 161: The Three Print Trinity Just three large prints.
- Same size (50x70cm or 60x80cm)
- Loads of space between and around
- Simple, impactful, modern
- Total cost: £75-120
- Easy to create, hard to mess up
Idea 162: The Single Focus One large print, nothing else.
- 80x60cm or larger
- Centre of wall
- Lots of negative space
- Ultra-modern aesthetic
- Your absolute best photo
Idea 163: The Floating Five Five medium prints with massive spacing.
- 40x40cm each
- Scattered with 30-40cm space between
- Airy and open
- Very current Scandinavian style
- Looks expensive, isn't
Ideas 164-170: More minimalist themes
- The Asymmetric Three: Three different sizes, carefully placed
- The Vertical Statement: One tall print (40x120cm)
- The Horizontal Pair: Two wide prints, simple and clean
- The Corner Accent: Small gallery in one corner only
- The Breathing Room: 6-8 small prints with huge spacing
- The Japanese Aesthetic: Minimal, calm, intentional
- The Grid of Four: Just 4 prints in perfect square
Minimalist works when your photos are exceptional. Don't hide mediocre photos behind a "minimalist" label – invest in great prints.
Family heritage gallery walls (12 ideas)
These are the ones that make you cry (happy tears). Multi-generational displays, family history, your legacy on the wall.
Idea 171: The Family Tree Wall Literal family tree layout.
- Grandparents at top
- Parents in middle
- Your family at bottom
- Branches show connections
- 12-25 prints depending on family size
Idea 172: The Then & Now Wall Same people, decades apart.
- Baby photo next to adult photo
- Grandma as child next to grandma now
- Powerful visual timeline
- Usually 8-16 prints in pairs
- Incredibly meaningful
Idea 173: The Generations Collage Four generations in one wall.
- Great-grandparents, grandparents, parents, kids
- Mix of vintage and modern photos
- Shows your family legacy
- Usually 15-30 prints
- Can include wedding photos from each generation
Ideas 174-182: More family heritage themes
- The Wedding Timeline: All family weddings through decades
- The Ancestry Wall: Historical family photos
- The Baby Gallery: Every generation as babies
- The Family Home: Photos of family homes through time
- The Reunion Wall: Extended family gatherings
- The Siblings Through Time: Growing up together
- The Parent Tribute: Photos of your parents' lives
- The Cultural Heritage: Photos showing family traditions
- The Recipe Wall: Handwritten recipes from grandparents + family photos
Family heritage walls have the highest emotional value. These aren't just decoration – they're your history displayed proudly.
Travel memory gallery walls (10 ideas)
Got wanderlust? Show it off. Travel walls let you relive amazing trips every single day.
Idea 183: The World Map Wall Photos arranged around world map.
- Large world map canvas as focal point
- Travel photos placed at corresponding locations
- Shows where you've been
- Motivates future trips
- 15-25 prints plus map
Idea 184: The Destination Collection Each trip gets its own mini-gallery.
- Cluster of 3-4 photos per destination
- Multiple clusters on wall
- Labels with location and year
- Easy to add new trips
- 15-30 prints total
Idea 185: The Passport Stamps Photos arranged like passport stamps.
- One photo per destination
- All same size (20x30cm)
- Grid arrangement
- Clean and organized
- Shows breadth of travels
Ideas 186-192: More travel themes
- The Adventure Timeline: Chronological travel story
- The Continent Gallery: Organized by continent
- The Landscape Collection: Beautiful places, no people
- The Culture Wall: Local people, markets, traditions
- The Architecture Tour: Buildings from different countries
- The Food Journey: Culinary experiences worldwide
- The Sunset Collection: Sunsets from different locations
Seasonal & holiday gallery walls (8 ideas)
Gallery walls don't have to be permanent. Seasonal displays keep things fresh and let you rotate through different memories.
Idea 193: The Christmas Wall Swappable Christmas photos.
- Family Christmas photos through years
- Easy to update annually
- Take down in January or keep year-round
- 9-15 prints in grid
- Very festive and cheerful
Idea 194: The Summer Holidays Display Beach, sun, ice cream, fun.
- Summer holiday memories
- Bright and cheerful
- Swap for autumn photos later
- 8-12 prints
- Makes you smile in grey February
Ideas 195-200: More seasonal themes
- The Autumn Collection: Fall colours, cosy vibes
- The Spring Garden: Flowers, growth, renewal
- The Winter Wonderland: Snow, Christmas, cold beauty
- The Birthday Wall: All birthday celebrations
- The Holiday Rotation: Different holidays throughout year
- The Seasonal Swap: Four different sets for each season
How to create your gallery wall: Step-by-step guide
Right, you've chosen your layout, picked your room, decided on a theme. Now let's actually create the thing. This step-by-step process works every time.
Step 1: Choose your photos (the most important bit)
Your gallery wall is only as good as your photos. Rubbish photos in perfect layout = rubbish gallery wall. Great photos in mediocre layout = still looks brilliant.
Selecting cohesive images:
Do this:
- Pick photos that relate to each other (all family, all travel, all same colour scheme)
- Mix of close-ups, medium shots, and wide shots
- Include people and places (not JUST faces)
- Choose photos with good composition (not cluttered backgrounds)
- Select images with meaning (not just "that looks nice")
Don't do this:
- Random unrelated photos (baby photo next to holiday snap next to dog photo = confusing)
- All identical shots (15 photos of faces gets boring)
- Blurry or poor quality images (printing large shows every flaw)
- Photos with busy, distracting backgrounds
- Images where people are tiny dots
How many photos do you need?
- Small wall (under 150cm wide): 6-9 prints
- Medium wall (150-250cm): 12-18 prints
- Large wall (250cm+): 20-30+ prints
Editing tips for consistency:
Your photos probably come from different cameras, different years, different lighting. Make them cohesive:
Basic editing checklist:
- Crop to remove distractions
- Adjust brightness so photos have similar exposure
- Tweak contrast (high contrast usually works better for wall art)
- Sharpen slightly (looks better printed)
- If going B&W, convert all the same way
Colour grading advice:
Want that Instagram-perfect cohesive look? Edit all photos with similar tones:
- Warm tones: Add yellow/orange, reduce blue (cosy, nostalgic)
- Cool tones: Add blue/teal, reduce yellow (modern, clean)
- Muted tones: Reduce saturation slightly (sophisticated, timeless)
- High contrast: Increase blacks and whites (dramatic, impactful)
We offer photo editing services if you need help getting your images print-ready. Just ask when ordering your canvas prints.
Step 2: Plan your layout (use templates, don't wing it)
Remember that paper template method? Here's the detailed version:
The foolproof paper template method:
- Measure and cut
- Cut newspaper/kraft paper to exact print sizes
- Label each piece with photo name ("Wedding 1", "Holiday 2", etc.)
- Makes it easy to swap positions
- Tape to wall
- Use low-tack painter's tape (won't damage walls)
- Try different arrangements
- Stand back at viewing distance (not right up close)
- Take photos of different layouts to compare
- Check from all angles
- View from doorway (first impression)
- View from sofa/bed (where you'll actually see it)
- View from multiple points in room
- Make sure it looks balanced from everywhere
- Mark your spots
- Once happy with layout, mark top corners with pencil
- Measure from edges to double-check alignment
- Number each position so you know which print goes where
- Remove templates
- Hang!
- Start from centre and work outward
- Use your marked positions
- Check level as you go
Smartphone apps for planning:
Several apps let you design digitally:
- WallApp (free, iOS/Android): Input wall size and print sizes, generates layouts
- Gallery Wall Creator (free, iOS): AR preview on your actual wall
- Houzz (free, iOS/Android): Design tools plus inspiration
Honestly though, the paper method is more accurate and you can involve family in choosing the layout.
Step 3: Choose your format (canvas, frames, or mixed)
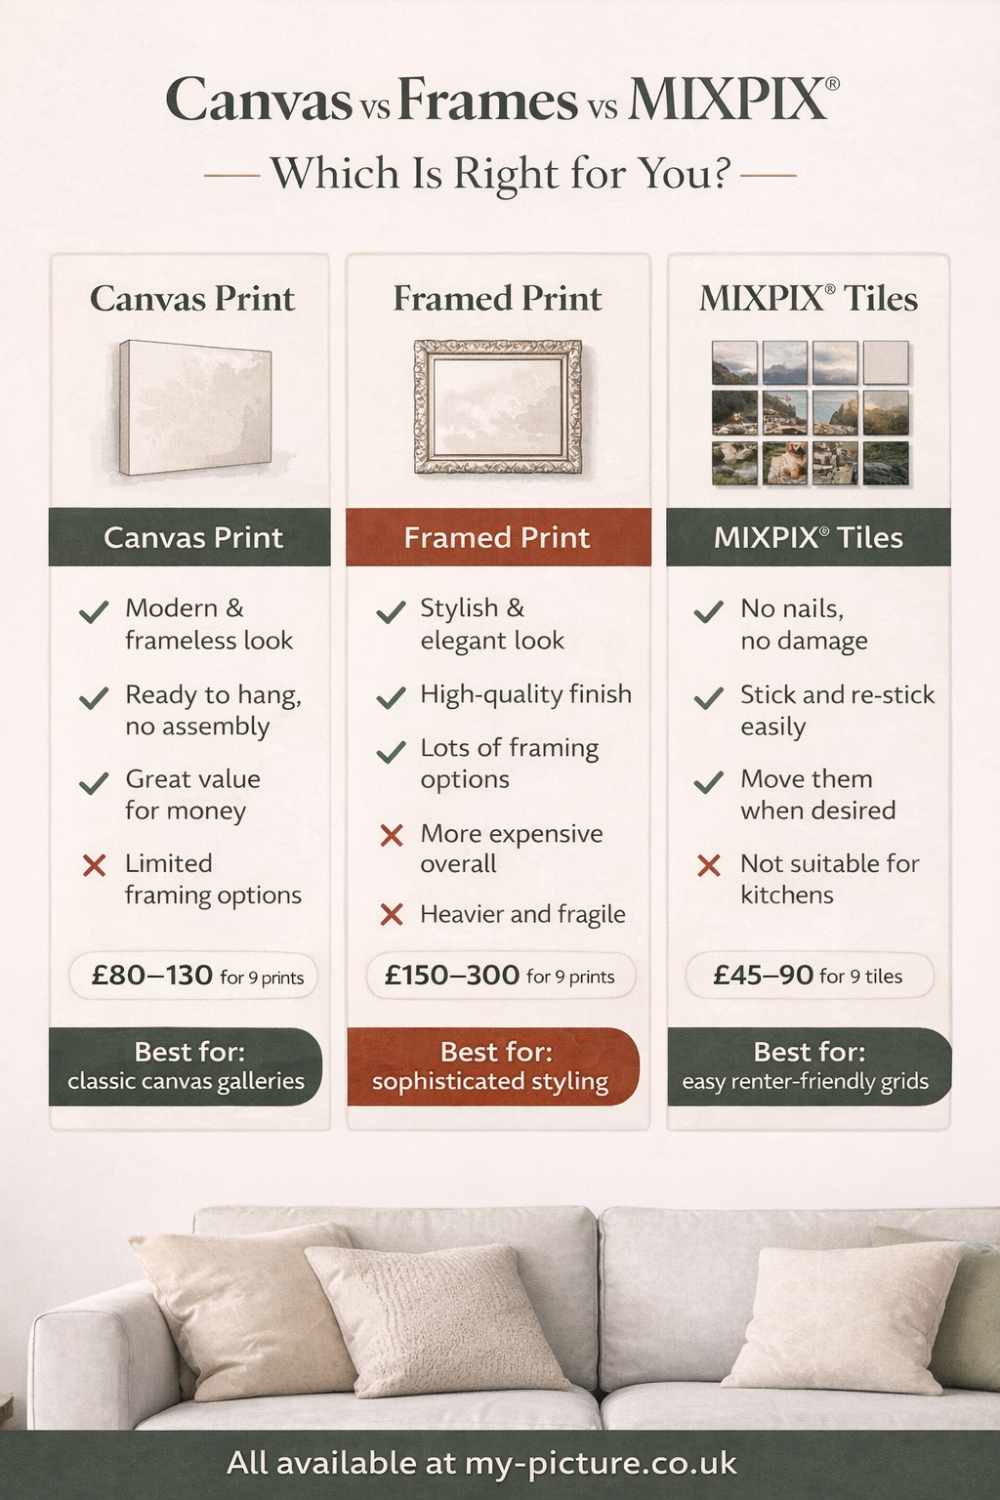
You've got options. Each has pros and cons.
Canvas prints (our favorite, obviously):
Pros:
- No frame needed = cheaper overall
- Modern, clean aesthetic
- Lightweight (easy to hang, safer if they fall)
- No glass = no reflections, no breakage risk
- Gallery-wrapped edges look professional
- Rearranging is easy (just unhook and move)
- Weather-resistant (can go in bathrooms, kitchens)
Cons:
- Less traditional than framed prints
- Can't change the photo later (framed you can swap)
- Some people prefer classic frame look
Framed prints:
Pros:
- Classic, timeless look
- Can swap photos easily
- Adds weight and importance
- Good for very formal rooms
Cons:
- Frames are expensive (£20-50 each easily)
- Glass reflects light (annoying)
- Glass breaks (dangerous with kids/pets)
- Heavier (harder to hang, dangerous if they fall)
- Matching frames for 15 prints gets pricey fast
Mixed approach (canvas + frames + objects):
Pros:
- Most visually interesting
- Very personal and collected
- Can include objects, letters, etc.
- Tells richer story
Cons:
- Hardest to make look cohesive
- Easy to make it look cluttered
- Requires good eye for design
Comparison table:
| Feature | Canvas Prints | Framed Prints | Mixed |
| Cost for 9 prints | £80-130 | £200-450 | £150-350 |
| Weight | Light | Heavy | Varies |
| Safety (kids/pets) | Very safe | Glass risk | Varies |
| Ease of hanging | Easy | Moderate | Difficult |
| Modern look | ✓✓✓ | ✓✓ | ✓✓✓ |
| Traditional look | ✓ | ✓✓✓ | ✓✓ |
| Changeability | Fixed | Easy to swap | Varies |
| Rearranging | Very easy | Moderate | Moderate |
For most people, canvas prints are the best choice – affordable, safe, modern, and easy to work with.
Step 4: Determine spacing (this makes or breaks the look)
Spacing is EVERYTHING. Perfect photos, perfect layout, but spacing wrong? Looks amateur.
Industry-standard spacing rules:
Between prints: 5-7cm is the sweet spot
- Less than 5cm: Looks cramped and cluttered
- More than 10cm: Looks disconnected and random
- 5-7cm: Looks intentional and professional
From ceiling: Leave 30-40cm minimum
- Gallery walls shouldn't touch the ceiling
- Needs breathing room at top
- Makes ceilings feel higher
From furniture: Leave 15-20cm above furniture
- Above sofa, bed, console: 15-20cm gap
- Too close: Looks squashed
- Too far: Loses connection to furniture
From floor: Usually 40-60cm minimum
- Don't go too low (looks odd)
- Exception: Floor leaners meant to be low
Edge margins: Leave 15-20cm from wall edges
- Gallery shouldn't go edge-to-edge
- Needs margin for visual breathing room
- Exception: Intentional floor-to-ceiling designs
Visual balance rules:
Think of your gallery wall like a balance scale:
- Heavy (dark, large) prints need to be balanced by other heavy prints opposite
- Light (bright, small) prints can cluster together
- If one side feels "heavier", move a large print to opposite side
- Negative space (empty areas) has visual weight too
Interactive spacing calculator (coming soon):
We're building a tool where you input your wall size and print sizes, and it calculates perfect spacing for you. Watch this space!
For now, here's the formula:
- Measure wall width
- Subtract total width of all prints
- Divide by (number of gaps + 2)
- That's your spacing + edge margins
Example: 200cm wall, 3x 50cm prints
- 200cm - 150cm (prints) = 50cm remaining
- 50cm ÷ 5 (3 gaps + 2 edges) = 10cm spacing
Step 5: Hanging & installation (don't mess this up now)
You've planned perfectly, your prints arrive, now don't ruin it with wonky hanging.
Tools you need:
- Spirit level (essential – wonky prints ruin everything)
- Tape measure
- Pencil (for marking)
- Hammer
- Picture hooks rated for weight (not just nails)
- Optional: Stud finder (for heavy prints)
Hanging canvas prints (easiest):
Most canvas prints come with sawtooth hangers or D-rings already attached. All you need:
- Mark your spot (from your template positions)
- Hammer picture hook at that mark
- Hang canvas on hook
- Check with level
- Adjust if needed
Canvas prints are brilliant because they're light – you don't need to find wall studs or use special anchors. Standard picture hooks handle them fine.
Marking your wall:
Here's the method that guarantees level prints:
- Mark where you want CENTRE of print
- Measure from top of print to hanging hardware
- Add that distance ABOVE your centre mark
- Install hook at that higher mark
- When hung, print centres at your original mark
Starting point:
Always start in the centre and work outward:
- Hang middle/largest print first
- Use it as reference point
- Work outward maintaining spacing
- Check level constantly
Level and spacing tips:
For horizontal rows:
- Use laser level to mark straight line
- Hang all prints at same height on that line
- Measure spacing between with tape measure
- Don't just eyeball it
For grids:
- Mark horizontal AND vertical guidelines
- Use intersections as reference points
- Measure everything twice
- Perfect grids require precision
For organic arrangements:
- Still use level for each individual print
- Prints should be level even if arrangement isn't
- Step back often to check overall balance
Problem solving:
Print's wonky after hanging:
- Small adjustments: Push corner up/down gently
- Big adjustments: Remove, remeasure, rehang
- Canvas prints are forgiving – easy to adjust
Hook won't hold:
- Use two hooks instead of one
- Use proper picture hooks, not just nails
- For heavy prints, find wall stud
Spacing looks off:
- Measure with tape measure (not eyes)
- Adjust positions before hammering more holes
- Remember: consistent spacing matters more than perfect spacing
Video tutorial:
We've got a full video tutorial showing every step of hanging canvas gallery walls. Search "my-picture.co.uk gallery wall tutorial" or check our YouTube channel.
Gallery wall mistakes to avoid (learn from others' cock-ups)
People make the same mistakes over and over. Don't be one of them.
Mistake 1: Hanging too high
The problem: Gallery wall floating near the ceiling, disconnected from room.
Why it happens: People think "eye level" means their eye level when standing.
The fix: Eye level means 145cm from floor to CENTRE of your arrangement. If sitting (living room), consider sight line from sofa (135-140cm).
Mistake 2: Hanging too low
The problem: Gallery wall so low it looks like it's sliding down the wall.
Why it happens: Furniture placement confusion.
The fix: 15-20cm above furniture. If no furniture, never start below 100cm from floor (exception: kids' rooms, floor leaners).
Mistake 3: Poor spacing
The problem: Prints too close (cramped) or too far (disconnected).
Why it happens: Eyeballing instead of measuring.
The fix: Use tape measure. 5-7cm between prints. Every time. Not "about" 5-7cm. Exactly 5-7cm.
Mistake 4: Random photos with no connection
The problem: Baby photo, dog, holiday, car, random building = visual chaos.
Why it happens: Choosing pretty photos without thinking about cohesion.
The fix: Pick a theme. Stick to it. All family? All travel? All B&W? All same colour palette? Choose ONE thread that connects them.
Mistake 5: Inconsistent editing
The problem: Some photos bright, some dark. Some B&W, some colour. Some warm tones, some cool.
Why it happens: Photos from different sources/times.
The fix: Edit all photos with similar settings. Match brightness, contrast, and colour tone. Or convert all to B&W for instant cohesion.
Mistake 6: Wrong scale for wall
The problem: Tiny prints on massive wall (get lost) or huge prints on small wall (overwhelming).
Why it happens: Not measuring before choosing sizes.
The fix:
- Small wall (under 150cm): 20-30cm prints
- Medium wall (150-250cm): 30-50cm prints
- Large wall (250cm+): Mix sizes, include some 50-80cm prints
Mistake 7: Wonky hanging
The problem: Prints not level, crooked, off-centre.
Why it happens: Not using level, rushing installation.
The fix: Use spirit level. Every. Single. Print. No exceptions. Takes 30 seconds per print.
Mistake 8: Ignoring the room's style
The problem: Ultra-modern minimal gallery in traditional cottage. Busy maximalist wall in sleek modern flat.
Why it happens: Copying Pinterest without considering your actual space.
The fix: Match gallery style to room style. Modern room = clean layouts, minimal spacing. Traditional room = symmetrical, classic arrangements. Eclectic room = salon style works.
Gallery wall cost guide (realistic budget planning)
Let's talk money. Gallery walls can be cheap or expensive, depending on your choices.
Budget breakdowns by size
Small gallery wall (6-9 prints):
Budget option:
- 9x 30x30cm canvas prints @ £12 each = £108
- Picture hooks = £5
- Total: £113
Mid-range option:
- 6x 40x40cm canvas prints @ £18 each = £108
- 3x 50x50cm canvas prints @ £24 each = £72
- Picture hooks = £5
- Total: £185
Premium option:
- 9x 50x50cm canvas prints @ £24 each = £216
- Professional installation = £80
- Total: £296
Medium gallery wall (12-18 prints):
Budget option:
- 12x 30x30cm canvas prints @ £12 each = £144
- 6x 20x30cm canvas prints @ £8 each = £48
- Picture hooks = £8
- Total: £200
Mid-range option:
- 8x 40x40cm canvas prints @ £18 each = £144
- 6x 50x40cm canvas prints @ £22 each = £132
- 2x 60x40cm canvas prints @ £25 each = £50
- Picture hooks = £10
- Total: £336
Premium option:
- 10x 50x70cm canvas prints @ £28 each = £280
- 6x 40x60cm canvas prints @ £25 each = £150
- Professional installation = £120
- Total: £550
Large gallery wall (20-30 prints):
Budget option:
- 20x 30x30cm canvas prints @ £12 each = £240
- 10x 20x30cm canvas prints @ £8 each = £80
- Picture hooks = £12
- Total: £332
Mid-range option:
- 15x 40x40cm canvas prints @ £18 each = £270
- 10x 30x40cm canvas prints @ £15 each = £150
- 5x 60x40cm canvas prints @ £25 each = £125
- Picture hooks = £15
- Total: £560
Premium option:
- 12x 50x70cm canvas prints @ £28 each = £336
- 8x 60x40cm canvas prints @ £25 each = £200
- 6x 40x60cm canvas prints @ £25 each = £150
- 2x 80x60cm canvas prints @ £38 each = £76
- Professional installation = £200
- Total: £962
Bundle savings:
Order 9+ canvas prints and we give you 15% off automatically. Makes a proper difference on bigger orders.
DIY vs professional installation costs
DIY installation:
- Tools (if you don't have): £30-50 one-time
- Your time: 2-4 hours
- Total cost: Free (plus tools)
Professional installation:
- Small wall (under 10 prints): £60-100
- Medium wall (10-20 prints): £100-150
- Large wall (20+ prints): £150-250
- Worth it if: You're not confident, wall's complex, or your time's valuable
Maintaining your gallery wall (keep it looking fresh)
Gallery walls aren't fit-and-forget. Bit of maintenance keeps them looking brilliant for years.
Cleaning canvas prints
Canvas collects dust like anything else on your walls.
- Monthly: Quick dust with soft, dry cloth or feather duster.
- Quarterly: Gentle vacuum with brush attachment on low suction.
- Annually: Remove from wall, check hardware, clean wall behind, and rehang.
What NOT to do: Don't use water, cleaning sprays, or chemicals. Don't scrub. Don't expose to direct sunlight.
Updating photos seasonally
Gallery walls don't have to be static. Seasonal updates keep things fresh.
- Keep same layout and sizes
- Just swap the prints themselves
- Takes 20 minutes twice a year
Rearranging tips
Want to change your layout without buying new prints?
- Lay all prints on floor first to try arrangements.
- Take photos of options to compare.
- Remeasure and rehang using the new layout.
Gallery wall shopping list (what you actually need)
Canvas prints (the main event)
From us at my-picture.co.uk, popular sizes include 20x30cm, 30x30cm, 40x40cm, and 50x70cm. You get museum-quality canvas, gallery-wrapped edges, and fade-resistant inks.
Hanging hardware
For canvas prints, standard picture hooks are usually enough. For framed prints, you'll need heavy-duty hooks and potentially wall anchors.
Tools needed
Essential tools include a spirit level, tape measure, pencil, and hammer. A laser level is helpful but optional.
Total investment
A typical 9-print living room gallery costs around £153 including prints, hardware, and basic tools. This offers incredible visual impact compared to single pieces of art.
Conclusion: Create your perfect gallery wall today
Right, that's everything you need to know about gallery walls. From planning to hanging, layouts to styling, budgets to troubleshooting – you're sorted.
The thing about gallery walls: They're personal, they're meaningful, and they make your house feel like YOUR home. Every time you walk past that wall, you'll see memories. Your family, your trips, your life displayed proudly. That's worth way more than expensive artwork that means nothing.
Frequently Asked Questions About Gallery Walls
-
There's no magic number, but small walls usually need 6-9 prints, medium walls 12-18, and large walls 20-30. It's better to start with fewer and add more later than to overcrowd the space initially.
-
5-7cm is the professional standard. Less than 5cm looks cramped, while more than 10cm makes the arrangement feel disconnected. Use a tape measure to ensure consistency.
-
Either works. Symmetrical grids are easier for beginners and suit modern or traditional homes. Asymmetrical "salon style" layouts are more artistic and eclectic but require a better eye for balance.
-
Canvas is generally better for gallery walls because it's lighter, cheaper (no frames needed), and has no glass reflections. Framed prints are better for a very traditional look or for preserving valuable original art.
-
The best way to minimize holes is to use the paper template method to plan your layout perfectly before hammering. Command strips can work for very small, light canvases, but proper picture hooks are more reliable.
-
The centre of the entire arrangement should be at eye level, which is approximately 145cm from the floor. If hanging above furniture, leave a 15-20cm gap between the furniture and the bottom of the prints.
-
For beginners, a 3x3 grid of identical square prints is foolproof. For living rooms, a wide horizontal arrangement above the sofa is the most popular and effective choice.
-
A typical 9-print canvas gallery wall costs between £105 and £155 including hardware. Larger walls with 20-30 prints can range from £300 to £700 depending on sizes and installation choices.