Photo Tiles & Polaroid Wall Display: The Complete UK Guide to Modular, No-Damage Decor (2026)
Scroll through TikTok or Pinterest for thirty seconds and you will see one. A bedroom wall covered in photo tiles arranged in a perfect grid. A staircase trailing up with little square prints. A whole bit of wall behind a bed turned into a love letter of holidays, mates and pets.
Photo walls are everywhere in the UK right now, and there are good reasons for it. Renting is the norm for millions of us, drilling holes is off the table, and a single canvas above the sofa just isn't enough anymore. People want their walls to feel personal — and they want to be able to change things up without filling the wall back in with Polyfilla every time they move.
That is where photo tiles and polaroid-style wall displays come in. Both let you cover real wall space with real photos, and neither needs nails or a stud finder. They go up in minutes, come down clean and let you swap photos whenever you fancy.
This guide covers absolutely everything — what photo tiles actually are, how polaroid walls work, the best layouts for every room, how to plan one without it looking chaotic, and how to hang them in a rented flat without losing your deposit. Whether you have got a tiny shared house in Bristol or a Victorian terrace in Sheffield, you will find ideas here that fit.
Photo Tiles vs Polaroid Walls: What Is the Difference?
People often use these terms interchangeably, but they are actually two different things. Knowing which one suits your space (or whether you want to mix the two) saves you a lot of faff later.
What Are Photo Tiles?
Photo tiles are square prints, usually around 20×20cm, made from a lightweight material like foam or hardfoam. Your photo is printed straight onto the tile in proper photo quality, and the back of the tile sticks to the wall using either an adhesive system or a clever magnetic + adhesive setup.
They look polished, almost like little gallery panels. Each tile is solid and substantial — about 1cm thick — so when you cluster a few together on a wall, the effect is genuinely impressive. They are designed to come off cleanly and be repositioned, which is exactly why they have become the go-to for renters.
If you want a deeper rundown on how they work, we have a full explainer over on our blog: What Are Photo Tiles?
What Is a Polaroid Wall?
A polaroid wall is a display of small square prints that mimic the look of vintage instant camera photos — that distinctive white border, slightly retro feel, often unframed and a bit casual. Real polaroids from a Polaroid or Fujifilm Instax camera count, but most people now use polaroid-style photo prints made from regular phone photos.
Polaroid walls have a softer, scrappier vibe than photo tile walls. Think washi tape, fairy lights, hung on string with mini pegs, or stuck up in clusters that look like memories rather than artwork. They are perfect for bedrooms, student halls, and anywhere you want a bit of personality without a polished gallery feel.

Quick Comparison
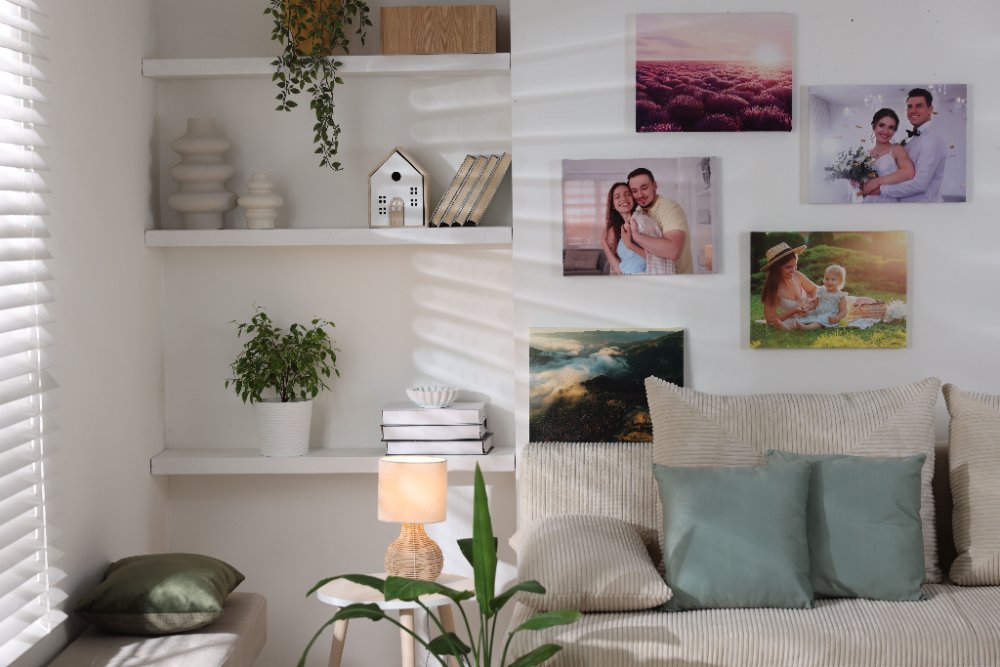
- Photo tiles — substantial, polished, gallery-style. Best for living rooms, hallways and bedrooms where you want a finished look.
- Polaroid walls — casual, scrapbook-y, romantic. Best for bedrooms, student rooms, study corners and anywhere with personality.
- Mixed — combine larger photo tiles as anchors with smaller polaroid-style prints around them. The contrast in scale looks brilliant and gives you the best of both.
The Renter-Friendly Revolution: Why No-Damage Decor Matters
If you rent in the UK, you already know the rules. Most tenancy agreements ban drilling without written permission. Even Blu Tack can leave grease marks that come out of your deposit. Hanging anything substantial on the wall has become a small minefield — and that is before you get to plasterboard new builds where one wrong drill bit can leave a hole the size of a fifty pence piece.
This is why modular, no-damage photo displays have exploded. They give renters a way to actually decorate without the dread of move-out day. And they are not just useful for rentals — homeowners with newly-painted walls, parents with kids' rooms that need refreshing every couple of years, and anyone who likes changing things up benefit from the same flexibility.
What Counts as 'No Damage'?
There is a small print issue worth flagging. "No damage" means different things on different walls. A method that leaves a fresh emulsion wall pristine might pull paint off old gloss or peel away wallpaper. Three things make a real difference:
- The age and condition of the paint. Walls painted within the last six months are much more vulnerable than properly cured paint.
- The wall finish. Matt emulsion is the easiest to work with. Silk and gloss can sometimes lift slightly. Wallpaper is the trickiest — adhesives may pull the paper itself.
- Your removal technique. Slow and steady wins. Pulling fast or at the wrong angle is what causes damage, not the adhesive itself.
If you are not sure how a wall will react, test in a hidden spot first — behind a piece of furniture, near a skirting board, or on the inside of a wardrobe door. Leave it for 48 hours, then peel slowly. If it comes off cleanly, you are good to go on the main wall.
12 Photo Tile Wall Layouts That Actually Work
Here is the honest truth about photo tile walls: the layout makes or breaks them. The same eight tiles can look like a polished gallery or a fridge full of leaflets, depending entirely on how they are arranged. These twelve layouts cover almost every wall type and every taste.
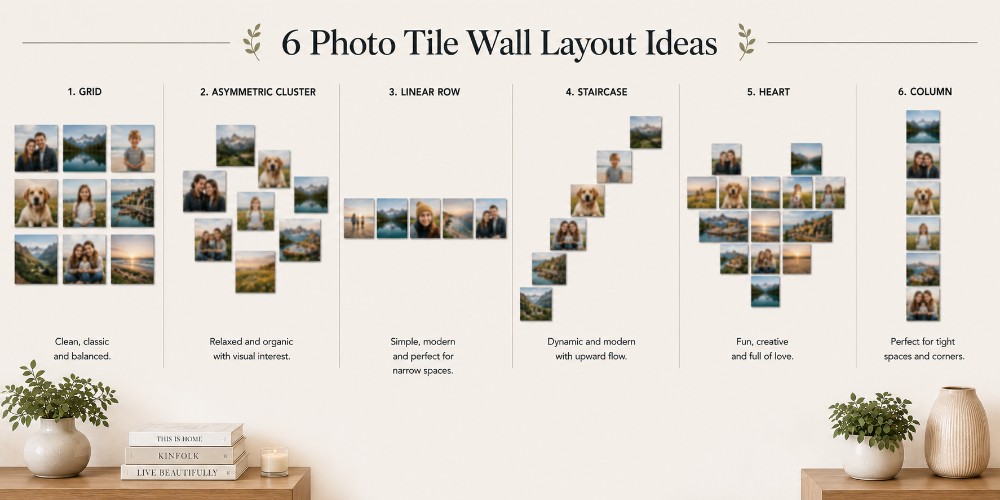
1. The Classic Grid (3×3 or 4×4)
Nine or sixteen tiles in a perfect square grid. This is the most foolproof layout there is. It looks neat, intentional and architectural — almost like a piece of designed art rather than a casual photo display.
- Best for: modern rooms, behind a sofa, above a bed, in a hallway.
- Spacing: consistent 2–3cm gaps between tiles. A spirit level is essential.
- Photo tip: use a single theme — nine shots from one holiday, or nine portraits from a single year — for cohesion.
2. The Asymmetric Cluster
Anywhere from five to fifteen tiles arranged in a loose, organic cluster. There is no rigid grid, but there is balance — the cluster has a centre, an edge, and a deliberate shape (often roughly oval or rectangular).
- Best for: bedrooms, eclectic living rooms, anywhere you want a relaxed gallery feel.
- Tip: pick one anchor tile (your favourite photo) and place it slightly off-centre. Build outward from there, varying tile orientation and photo type.
3. The Vertical Column
Three to six tiles stacked in a single vertical line. This is the layout for narrow wall slots — between two doorways, on the wall behind a bedroom door, or down the side of a chimney breast.
- Best for: small flats, awkward narrow walls, alcoves, hallways.
- Tip: tall portrait photos work especially well here — faces, full-body shots, tall buildings.
4. The Linear Row
Four to seven tiles in a single horizontal line. Clean, modern, and brilliant above any piece of furniture that runs along a wall — sofas, beds, sideboards, console tables.
- Best for: above sofas, above beds, above radiators (with a 30cm gap), down hallways.
- Tip: the row should be roughly two-thirds the width of the furniture below it. Anything narrower looks lost; anything wider feels uneven.
5. The Heart Shape
Around 15–25 tiles arranged in the shape of a heart. Cheesy on paper, genuinely lovely in person — especially in a bedroom or above a bed. Works particularly well as a Valentine's gift, anniversary surprise or first-home wall.
- Best for: bedrooms, family rooms, romantic displays.
- Photo tip: use a mix of couple shots, family photos and meaningful places — the variety adds depth to what could otherwise feel a bit twee.
6. The Cross or Plus
Five tiles arranged in a plus shape — one in the middle, one above, below, left and right. A surprisingly punchy little display that fills a small wall without overwhelming it.
- Best for: small kitchens, bathrooms (away from direct steam), home office side walls.
7. The Diamond
Tiles arranged in a diamond formation — four tiles forming a diamond outline, or a fuller nine-tile diamond with a tile in the centre. A nice change from the standard grid and works particularly well on a wall with no other features competing for attention.
8. The Cascading Staircase
Tiles that step upward (or downward) along the line of a staircase wall. Each tile sits roughly 5–10cm above the one before it, following the angle of the stairs.
- Best for: stairwells, split-level entries, hallways with a slope.
- Tip: use a piece of string and a spirit level to mark the angle of the stairs first, then position your tiles parallel to that line.
9. The Word or Letter Shape
Tiles arranged to spell out a single short word — "HOME", "LOVE", a child's name, a meaningful date — or to form a single large letter. This takes more planning than other layouts but the payoff is huge.
- Best for: kids' rooms, family rooms, statement pieces above a bed.
- Tip: lay it out on the floor first using paper templates. Words read more clearly when each letter is taller than it is wide.
10. The Statement Single with Satellites
One large central feature — this could be a single MIXPIX® tile, a small framed print or even a clock — surrounded by a handful of smaller photo tiles forming a halo. The contrast in scale gives the wall a sense of hierarchy.
11. The Half-Wall Block
A solid block of 12–20 tiles filling roughly half of a wall — usually the upper half above a bed or sofa, leaving the lower half clear for the furniture. This is the layout for people who want maximum impact.
- Best for: feature walls, large bedrooms, behind big sofas.
12. The Mixed-Media Wall
Photo tiles combined with other formats — framed prints, photo magnets on a metal panel, even a small canvas. The variety in materials and sizes gives the wall texture and stops it feeling like a single-shop catalogue.
Mixing tiles with framed photo prints is a particularly strong combination. The framed prints provide structure and gravitas; the tiles bring the modular flexibility. Stick the frames first using heavy-duty Command Strips, then build the tile cluster around them.
10 Polaroid Wall Display Ideas
Polaroid walls are where your wall decor gets to be playful. There is something about those little white-bordered prints that signals "this is real life, not curated content" — even if they came from your phone camera and a print order. These ten ideas give you the full range, from cosy bedroom corners to proper feature walls.
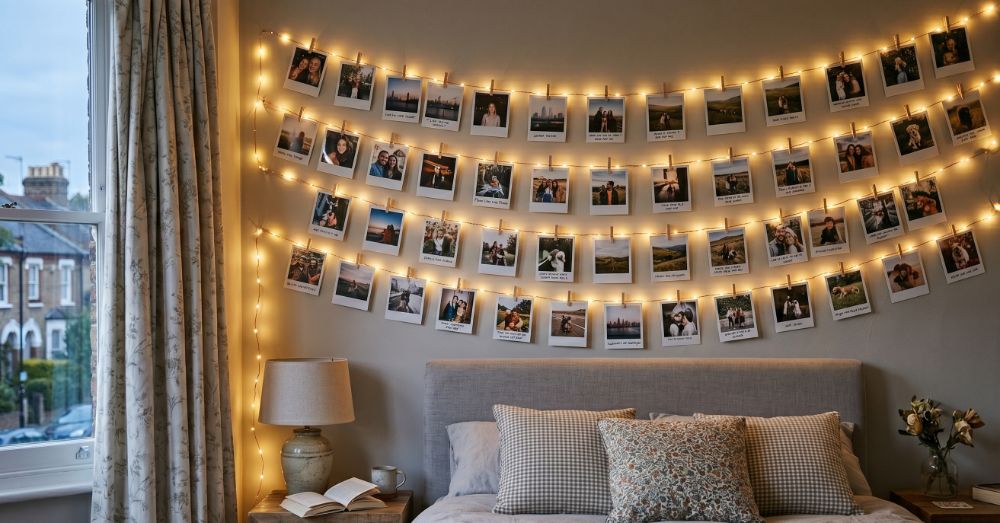
1. The Fairy Light String
The classic. A length of warm-white fairy lights hung along a wall, with mini wooden pegs clipping polaroid prints to the wire. Soft, cosy, and looks particularly good in a bedroom or reading corner. Battery-powered fairy lights mean no awkward cable trails.
2. The Twine and Mini Peg Curtain
Several lengths of twine or thin string hung vertically (or horizontally), each one carrying a row of polaroids attached with mini pegs. A whole curtain of memories. Great for filling a tall narrow wall or covering a less-than-perfect wall area without paint.
3. The Washi Tape Grid
Polaroid prints stuck directly to the wall in a perfect grid using small strips of washi tape at each corner. Washi tape comes off most painted walls cleanly and adds a small pop of colour or pattern at the edges of each print. Pinterest-perfect and surprisingly simple.
4. The Heart Wall
Polaroid prints arranged in a heart shape on a feature wall. Use small bits of double-sided tape, washi tape or removable adhesive putty. Most popular in shared bedrooms, student halls and as a romantic gesture for an anniversary.
5. The Cluster Cloud
A loose, organic cluster of 30–60 polaroid prints with no rigid pattern at all. The randomness is the point — it looks lived-in, accumulated over time, almost like a scrapbook spread across a wall. Ideal for student rooms or a teen bedroom.
6. The Wire Mesh Pinboard
A piece of wire mesh or grid panel hung on the wall, with polaroids attached using mini pegs or paperclips. The grid panel itself becomes part of the look — industrial, slightly rustic. You can pick these up for a few pounds at any home goods shop.
7. The Floating Shelf Lean
A long thin floating shelf (or picture ledge) with polaroids leaned against the wall along its length, often three or four deep. Mix in small plants, candles or trinkets between the prints. Great for renters with permission to put up one shelf rather than scattered fixings.
8. The Cork Board Statement
A large cork board hung on the wall (or several smaller ones in a grid) with polaroids pinned in any arrangement you like. Old-school, but for a reason — corks let you swap, layer and add things forever without ever damaging the wall.
9. The Door Frame Border
A line of polaroid prints running along the inside frame of a doorway or window. A small detail that turns ordinary architecture into something personal. Use small strips of double-sided tape along the trim itself rather than the wall.
10. The Travel Map Pinboard
A city map (printed, fabric or wall sticker) with polaroids of each destination pinned or taped near the country they were taken in. This is the dream for keen travellers, and the display grows naturally as you visit more places.
How to Hang Photo Tiles and Polaroid Walls Without Damaging Walls
Every method below has been used in thousands of British homes — flats, terraces, new builds, halls of residence. Match the method to your wall type and your photo format and you should be fine.
Magnetic + Adhesive Systems (Best for Photo Tiles)
This is how MIXPIX® photo tiles work, and it is genuinely clever. Two thin magnetic strips: one with adhesive sticks to the back of the tile, the other with adhesive sticks directly to the wall. The two strips snap together magnetically, holding your tile firmly in place.
The brilliant bit is that you can pull the tile off the wall any time — for cleaning, for swapping photos, for moving the layout — and then snap it back without ever re-applying anything. The wall strip stays exactly where it is.
This is the system to use if you want maximum flexibility, are likely to rearrange your display, or want a setup that survives multiple house moves.
Built-In Adhesive Backing
Some photo tiles come with permanent self-adhesive backing — peel a strip, stick to wall, done. Easier and cheaper than magnetic systems, but less forgiving. Once the tile is up, repositioning means peeling it off (carefully) and re-sticking.
Best for setups you are confident about and unlikely to change for a year or more. Always test a small spot first to make sure your wall paint can handle the adhesive.
Command Strips (Universal)
3M Command Strips work for almost everything — polaroid prints, small frames, lightweight tiles, even small canvases. They use a clever stretch-release adhesive that comes off cleanly when removed at the right angle.
- Standard small strips hold up to about 450g — fine for most polaroid prints and small tiles.
- Medium and large strips hold heavier items, including small framed prints up to 1.5kg.
- Clean the wall first with rubbing alcohol or surgical spirit on a cloth — not soapy water, which leaves a residue.
- Press firmly for 30 seconds when applying. Then wait at least an hour before hanging anything.
The single most common cause of Command Strip failure is rushing. Give them the hour.
Washi Tape (For Polaroids)
For paper-based polaroid prints, washi tape is genuinely the gentlest option. Two small strips at the top corners hold a polaroid print up indefinitely without any noticeable damage when removed. Choose a quality brand — cheap washi can leave a faint sticky residue on some paint finishes.
Picture Rails (Period Homes)
If you live in a Victorian or Edwardian home with picture rails, you have hit the no-damage jackpot. Picture rail hooks slot over the rail and hold steel picture wire, from which you can hang almost anything. Adjustable, completely non-invasive, and they look proper period-correct.
Mini bulldog clips on the picture wire let you display polaroid prints up and down the wire at any height you like.
What to Avoid
A few methods cause more grief than they are worth:
- Blu Tack and similar adhesive putties leave oil marks on most painted walls. The marks are usually invisible at first but show up clearly under certain light or after a few months. Many landlords flag these on inventory checks.
- Drawing pins and thumbtacks leave permanent holes. Even small ones.
- Double-sided foam tape from pound shops. Some brands lift paint, some leave residue. Stick to known brands like 3M Command, Tesa Powerstrips or 3M VHB if you need foam tape.
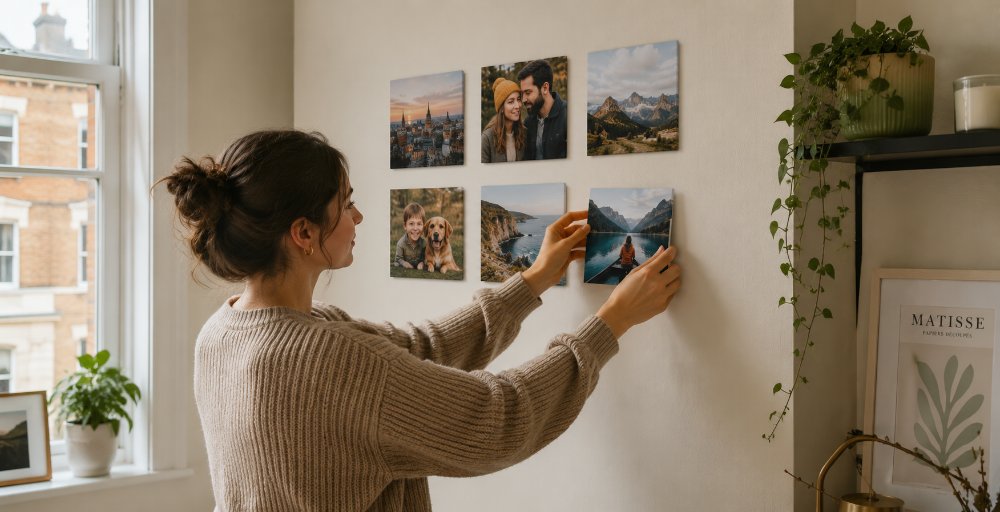
Layout Planning: Get It Right Before You Stick

This is the single biggest difference between a photo wall that looks polished and one that looks like a child's homework chart. Spend twenty minutes planning before you stick anything and you will save yourself hours of regret.
The Floor Layout
The classic. Lay all your tiles or polaroid prints on the floor in front of the wall, in the exact arrangement you are planning. Step back. Live with it for a couple of minutes. Move things around. Take a phone photo and look at it on screen — your phone shows you the composition the way other people will see the wall.
The floor layout catches problems that look fine in your head: two photos that clash, an arrangement that is too symmetrical, a single photo dragging the eye to the wrong corner.
The Paper Template Method
Cut squares of paper or kitchen roll the same size as your tiles. Tape them to the wall in your planned arrangement using masking tape or low-tack washi tape. Stand back. Move into the room from where people will normally enter and check the position from there too.
Leave the paper templates up for a day. You will spot things you missed — a tile that hangs lower than the door handle, a row that runs into a light switch, an arrangement that looks crooked because the wall itself isn't level.
Spacing Rules That Work
- Photo tiles in a tight grid: 2–3cm between each tile, consistent all the way through.
- Photo tiles in a relaxed cluster: 5–7cm spacing, slightly varied for an organic feel.
- Polaroid prints in a grid: 1–2cm between prints — they look better tight.
- Above furniture: leave 15–25cm between the top of the furniture and the bottom of your display. Closer than 15cm feels cramped; further than 25cm feels disconnected.
- Centre height: the middle of your overall arrangement should sit roughly 145cm from the floor — gallery standard, comfortable for the average eye.
Room-by-Room Photo Wall Ideas
Different rooms ask different things from a photo wall. A polaroid cluster that looks dreamy in a bedroom would look chaotic in a kitchen. A precise photo tile grid that looks sharp in a living room can feel cold in a child's bedroom. Here is what works where.
Bedroom
The bedroom is the natural home for both photo tiles and polaroid walls. Above the bed is the obvious spot — a 4×3 grid of photo tiles, a heart-shaped polaroid arrangement, a half-wall cluster of mixed sizes. The wall opposite the bed (the one you see when you wake up) is the second-best location.
Photos that work brilliantly in bedrooms: couple shots, holidays together, family at relaxed moments, pets, friends on big nights out. Anything that puts you in a good mood when you see it.
Living Room
Living rooms tend to want a more polished, gallery-style look. Photo tiles in a clean grid above a sofa, or a feature wall mixing tiles with one or two larger formats. Polaroid walls can work in living rooms too, but usually as part of a styled corner — leaning against a shelf, on a single feature wall — rather than the main display.
If you are also thinking about larger statement pieces alongside your tiles, our guide to 100+ living room canvas ideas covers how to plan a full living room wall properly.
Hallways and Staircases
Hallways are the underrated wall art opportunity in most British homes. They are usually empty, often quite long, and people walk past them every day. A vertical column of photo tiles, a cascading staircase arrangement, or a single horizontal row at eye level all work brilliantly.
For the wall above a staircase, the rule is simple: the bottom of your bottom tile should be roughly 145cm above the step it sits over. So as the stairs climb, your tiles climb with them. Use a piece of string pulled tight at the angle of the stairs to mark out the line.
Kitchen
Kitchens need decor that handles steam, splashes and grease. Photo tiles can work well in kitchens but keep them well away from the cooker and sink — the wall opposite, or above a breakfast bar, is the safer bet.
An easier and more practical option for kitchens is MixMags photo magnets — small photo prints with magnetic backing that stick to the fridge or any metal surface. You can rearrange them every five minutes if you want, and they survive accidental wiping with a damp cloth without complaint.
Home Office
Working from home has made the office wall an actual thing again. A small grid of photo tiles behind your desk shows up nicely on video calls and gives you something to look at when your brain stalls. Family photos, travel shots and motivational moments all work.
Our full home office wall decor ideas guide has 75+ specific layouts if you are kitting out a workspace from scratch.
Kids' Rooms and Nurseries
Kids' rooms are made for photo tiles. Names spelled out in tile shape, animal photos, family portraits with siblings, holiday memories — these displays grow with the child and can be updated as they get older. Magnetic + adhesive systems are particularly handy here because kids will absolutely want to rearrange things every few months.
For nurseries, soft tones and calm imagery work better than bright, busy photos. A grid of black-and-white family portraits, ultrasound scans, and one or two sentimental shots makes a beautiful display the parents end up looking at as much as the baby does.
Student Rooms and Halls
If there is one type of room that was made for a polaroid wall, it is student halls. Tiny rooms, blank walls, strict no-drilling rules from the university, and the constant flood of new memories from nights out, trips and life with new flatmates.
Mix polaroid prints with photo tiles for variety — the polaroid prints capture spontaneous moments, the tiles handle the bigger photos that deserve more presence. By third year, you will have a wall that genuinely tells the story of your time at uni.
Picking Photos That Look Brilliant on Tiles and Polaroids
The best layout in the world won't save mediocre photos. A few simple selection rules will lift your display from "that's nice" to "genuinely impressive".
For Photo Tiles
Photo tiles are usually square, so square crops work best. Most phone cameras shoot rectangular by default — when you upload, you will be cropping. A few tips:
- Keep the main subject roughly central in the frame — square crops are unforgiving of off-centre subjects.
- Avoid important detail right at the edges — the edges may be slightly cropped or wrap around the tile.
- Aim for a minimum resolution of around 1200×1200 pixels. Modern phones from the last five years are all comfortably above this.
- Photos with a clear focal point read better than busy shots. A single face, a clear horizon, a single object.
For Polaroid-Style Prints
Polaroid prints are smaller and have that distinctive white border, which means they handle different photos than tiles do. Counterintuitively, less polished photos often look better — proper candid moments, slightly imperfect shots, photos that feel like they were caught rather than composed.
- Phone snaps are perfect — the casual feel suits the format.
- Don't overthink colour grading. Polaroid prints look natural even when the original photo is a bit warm or cool.
- Crop to portrait orientation where you can — polaroids traditionally have more space below the image, which suits portrait subjects.
Cohesion: The Secret to a Wall That Looks Curated
The single best trick for making a photo wall look intentional rather than chaotic: pick a unifying treatment and stick to it. Some examples:
- All black and white. Genuinely makes any random selection of photos look cohesive. Works in any room style.
- All warm tones. Filter every photo with a slight warm cast (most phones have a one-tap option for this). Different subjects suddenly feel like a series.
- Single theme, full colour. Just travel, just family, just pets. Theme alone provides cohesion.
- Single year. Twelve photos from one specific year, in any treatment. Tells a story automatically.
Mixing Formats: Tiles, Frames, Magnets and More
The best photo walls in 2026 don't just use one format. Mixing materials creates depth, hierarchy and the kind of considered look that makes interior design feel intentional.
Tiles + Framed Prints
Anchor a wall with one or two larger framed prints, then fill around them with photo tiles. The frames provide structure and weight; the tiles provide flexibility and density. Particularly good for living rooms and hallways.
Tiles + Photo Board
For wall locations that need a slightly more substantial feel — perhaps a kitchen wall, a porch, or a partly-protected outdoor area — photo board prints work beautifully alongside photo tiles. Photo boards are made from durable hardfoam panels that handle moisture and temperature changes better than standard prints. Use them in the format that needs the resilience and tiles for the rest.
Tiles + Magnets (Kitchen)
In kitchens, photo tiles on a non-cooking wall paired with photo magnets on the fridge gives you two distinct zones of personal photos. The magnets are easy to swap with the seasons, while the tiles stay constant.
Tiles + Polaroid Prints
Mix sizes deliberately. Larger photo tiles act as the anchor pieces; smaller polaroid prints fill the gaps and add density. The size contrast is the whole point — it gives the wall hierarchy without it feeling formal.
Themes That Make a Photo Wall Feel Like a Story
A random selection of nice photos is fine. A photo wall with a theme is unforgettable. Here are themes that consistently work well:
The Year in Review
Twelve photos — one per month — from a single year. Update annually. After three or four years, you have a wall that tells the story of your decade.
The Travel Timeline
Photos from each significant trip, arranged in chronological order. Add new ones as you travel. Particularly powerful in a hallway where you walk past the timeline daily.
The Friendship Wall
One photo of you with each of your closest friends. The wall becomes a literal map of the people who matter, and adding new friendships over time is genuinely lovely.
The Pet Tribute
Eight to twelve photos of a single pet — sleepy, mid-leap, with the family, in their favourite spot. A surprisingly emotional display that turns a beloved animal into proper artwork.
The Family Generations
Old family photos (scanned and printed as tiles) alongside recent ones. Grandparents next to grandchildren, parents at your age next to you now. The visual echoes are striking.
For a more elaborate version of this theme, our 100+ gallery wall ideas guide has specific layouts for multi-generational displays.
Common Mistakes That Ruin a Photo Wall
Hanging Too High
By far the most common mistake. The centre of your photo wall should sit at roughly 145cm from the floor — eye level for most adults. Most people instinctively hang things 15–20cm higher than this, which leaves the wall looking awkwardly disconnected from the furniture below.
Not Enough Photos
Three small photo tiles on a large wall look apologetic. If your wall is bigger than 1.5m square and you only have a handful of photos, either go bigger on each photo, add more photos until the cluster fills the space properly, or move the display to a smaller wall.
Inconsistent Spacing
Some 2cm gaps, some 5cm gaps, some prints almost touching. The eye reads inconsistent spacing as disorder even if you can't quite explain why. Pick a spacing rule and stick to it across the whole arrangement.
Too Many Different Photo Styles
A bright, saturated holiday shot next to a moody black-and-white portrait next to a sepia-toned vintage photo can feel jarring. Pick a treatment for the whole wall — even if the underlying photos are completely different — and apply it consistently.
Skipping the Layout Plan
"I'll just stick them up and see how it looks." This almost always ends with you peeling tiles off and re-sticking them, which can wear down the adhesive. Always lay the arrangement out on the floor or use paper templates first.
Forgetting to Test the Wall
Different walls react differently to adhesives. Test one tile (or one Command Strip) in a hidden spot, leave for 48 hours, and remove it slowly to see how the wall handles it. Five minutes of testing is worth not having to replaster your bedroom wall in a year.
UK-Specific Considerations
Plasterboard Walls in New Builds
Most British homes built since the late 1990s use plasterboard internal walls. Adhesive-backed photo tiles work fine on plasterboard as long as the wall is properly painted and reasonably smooth. Avoid plasterboard walls that are textured or have a heavy emulsion finish — the contact area for the adhesive is reduced and the tile may slip over time.
Victorian and Edwardian Homes
Older properties are usually plaster on lath or plaster on brick. These walls handle adhesives slightly differently — older paint can be more brittle and may flake with stronger adhesives. If your home has picture rails, those are by far the gentlest option for any kind of photo display.
Damp and Cold Walls
Outside walls in older British homes can get cold and slightly damp, especially in winter. Adhesives perform poorly on cold or damp walls — they may stick initially but lose grip after a few weeks. If you live in a flat with a cold north-facing wall, prioritise internal walls for your photo display, or warm the wall with a small heater for half an hour before applying adhesives.
Rental Property Rules
UK tenancy agreements vary, but here is the rough rule: "reasonable wear and tear" is acceptable, deliberate damage isn't. A few small holes from tasteful picture hooks usually pass; a wall full of holes from a teenage poster collection won't.
If your tenancy specifically bans drilling, no-drill methods like adhesive photo tiles, Command Strips and washi tape are genuinely the safest options. Take photos of the wall before you put anything up — you have proof of the original condition if there is any disagreement at move-out.
Care, Refreshing and Removing Your Photo Wall
Day-to-Day Care
Photo tiles need almost no maintenance. A dry microfibre cloth wiped over the tiles every few weeks removes dust. Avoid spray cleaners — most contain chemicals that can affect the print surface over time.
Polaroid prints, especially those held by tape or pins, accumulate dust along the top edge fastest. A soft brush (a clean make-up brush works) keeps them looking fresh.
Rearranging
This is where modular systems really earn their keep. Magnetic + adhesive photo tiles can be lifted off and repositioned in seconds. Command-Strip-mounted polaroid prints can be moved by removing the strip carefully (pull the tab straight down, slowly) and applying a new strip in the new position.
Removing for a House Move
Two weeks before your move-out date, do a test removal on one tile or print. This gives you time to address any wall issues before the inventory check. To remove adhesive-backed tiles cleanly:
- Slowly peel from one corner at a 45-degree angle to the wall.
- If the tile resists, warm the back gently with a hairdryer on low heat for 15 seconds — this softens the adhesive.
- If any residue remains on the wall, a small amount of adhesive remover on a soft cloth usually lifts it without damaging the paint.
- For the few cases where paint does come off, a small touch-up paint can sort it for less than a tenner.
Ready to Build Your Photo Wall?
The best photo walls aren't built in a day. They start with a small grid above the bed, expand into a cluster, get added to as new memories happen, and quietly become the most personal thing in the house. The fact that you can do it without a single hole in the wall just makes it easier to actually start.
If you are ready to begin, our MIXPIX® photo tiles come with the Magnofix® hanging system — magnetic + adhesive — so you can rearrange your display as often as you like without ever damaging your walls. Start with four tiles or order a full set; either way, the wall is yours to shape.
For the bigger picture of how photo tiles fit into a full home decor plan, browse our complete wall décor range — canvas prints, framed prints, photo board, photo tiles and more. Whatever the wall, there is something here that will fit.
Frequently Asked Questions About Photo Tiles and Polaroid Walls
-
In normal use on standard painted walls, yes — adhesive-backed photo tiles are designed to come off cleanly. The two situations where damage can occur are very fresh paint (under six weeks old) and old wallpaper that is already lifting. Always test in a hidden spot before committing to a display.
-
For above a standard UK three-seater sofa (180–200cm wide), aim for 9–12 tiles in a grid or cluster. For a feature wall (wall behind a bed, alcove, hallway end wall), 16–25 tiles makes a strong statement. For a small accent — between two doorways, in a hallway corner — three to five tiles is plenty.
-
Best avoided in the main bathroom or anywhere that gets direct steam. The adhesive can struggle in high humidity and the print finish may degrade over time. A downstairs cloakroom with proper ventilation is usually fine, but the family bathroom is a no-go.
-
Most wallpaper is fine for adhesive tiles, but the risk on removal is that the tile pulls a small section of paper away with it. If you love your wallpaper and don't want any risk, use Command Strips designed for delicate surfaces, or hang photo prints from picture rails or shelves instead.
-
A dry or barely damp microfibre cloth, wiped gently over the surface. Avoid all spray cleaners, alcohol, abrasive cloths, or anything containing solvents. Photo tile prints are durable but the surface can dull with the wrong cleaner.
-
Yes. Most photo printing services in the UK offer polaroid-style prints in standard formats (around 8×10cm). Upload your phone photos, choose the polaroid border style, order a batch, and you have a polaroid wall waiting for layout. Many people now find this preferable to actual instant film because the print quality is sharper and it costs a fraction per print.
-
There is no rule, but most polaroid wall displays look best when they cover at least a 60×80cm area on the wall. Smaller and they look like an afterthought; larger and they need to be deliberately curated rather than just thrown up. Around 30–60 polaroid prints is the sweet spot for most rooms.
-
Yes, especially with magnetic + adhesive systems. The tile itself is reusable — you just need new wall strips for the new property. Buy a small pack of replacement adhesive strips and you are sorted. Tiles with built-in adhesive are also reusable but the adhesive may weaken after multiple removals, so reattach them with a fresh Command Strip if needed.
-
Print a batch of polaroid-style prints from your phone (often a few pence each), pick up a pack of mini wooden pegs and a length of warm-white fairy lights, and you have a full-wall display for under £25. For a more polished look, a starter pack of photo tiles costs roughly the same as a single mid-priced framed print — and gives you nine times the wall coverage.
-
Properly made photo tiles, kept out of direct sunlight, hold their colour and finish for many years. The print itself shouldn't fade noticeably with normal indoor lighting. Direct sun (a south-facing wall in midsummer) is the main thing that ages prints — keep displays out of strong direct light if you want them to last decades.
-
Technically yes, but they may not match perfectly in size, thickness or finish. A wall of mixed-brand tiles often looks slightly off because the eye picks up tiny inconsistencies. If you want one cohesive display, stick to one brand and one size. If you want a deliberately mixed-media look, mixing brands is fine — but lean into the contrast rather than trying to hide it.
-
Genuinely one of the better photo gifts. They land well because the recipient gets to put them up however they like, and they require zero DIY commitment from someone who might not own a hammer. A starter pack of 4–6 tiles featuring shared memories is a popular birthday, anniversary or housewarming gift in 2026.