Wedding Photo Display Ideas: 30+ Ways to Show Off Your Big Day at Home (UK 2026)
Right, you've got the photos. Hundreds of them. Probably more. Your photographer has dropped a download link into your inbox and there's months of memories sitting on your phone. The honeymoon's over, the thank-you cards are sent, and now you're staring at a hard drive thinking… now what?
Here's the truth nobody tells newlyweds: most couples never properly print their wedding photos. They mean to. They get an album sample from the photographer, they pin a few ideas on Pinterest, and then life takes over and the gallery link expires, sitting in an old email folder. Five years later they're still scrolling through low-res phone copies.
It doesn't have to go that way. This guide is about getting your wedding photos off the screen and onto the walls — properly, in a way that fits your home and isn't naff. We'll cover how to choose the photos, which formats actually work for wedding shots (some don't), where to hang them in a typical UK home, sizing rules that stop the whole thing looking lopsided, and a stack of creative ideas beyond the obvious.
No wedding album required. Though we'll talk about that too, because there's a way to do it that doesn't involve it gathering dust in a drawer.
What's inside this guide
- How to actually pick the photos to display (the bit most couples get stuck on)
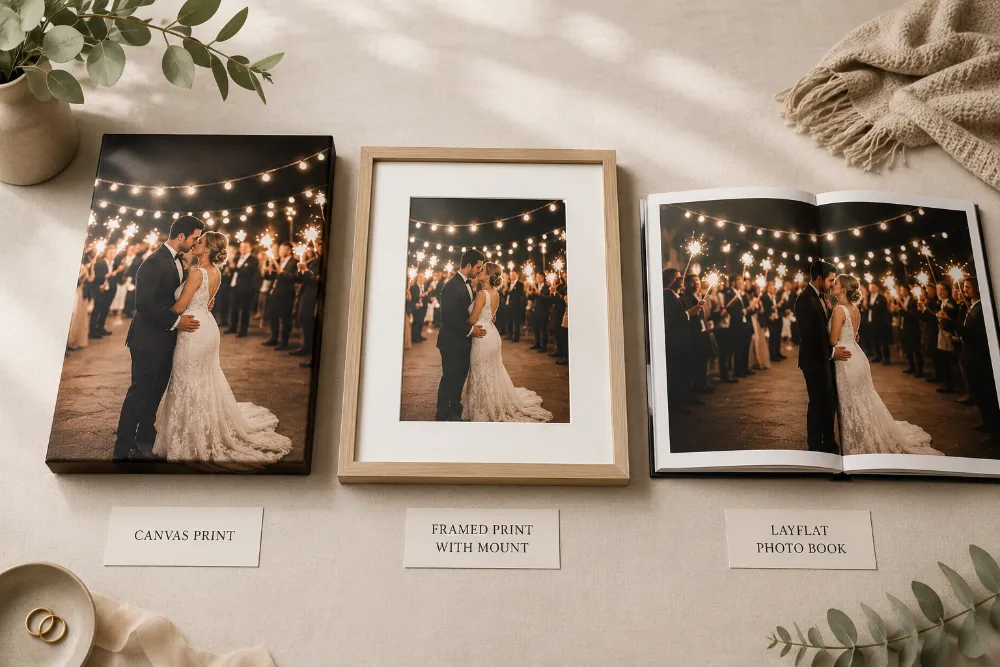
- Wedding photo format guide: canvas vs framed vs collage vs photo book
- 30+ display ideas room by room — bedroom, living room, hallway, dining and more
- 10 wedding-specific creative concepts (first dance, vow prints, star maps, generational walls)
- Sizing, spacing and lighting — the practical stuff that makes or breaks a display
- Common mistakes to avoid
- FAQs answered
Choosing which photos to display
Before formats, before walls, before any of the fun stuff — you've got to whittle down the photos. This is where most couples freeze. Your photographer has given you 400 to 800 final edits. They're all gorgeous. How do you pick?
There's no clever algorithm here. Just a process that works.
The four-pass shortlist method
- First pass — the gut check. Go through every photo and 'favourite' or star anything that makes you smile, pause or feel something. Don't second-guess yourself. Don't worry about whether you look good. Just react. Aim for around 10–15% of the gallery making the cut.
- Second pass — the story. Now look at what you've shortlisted. Does it tell the day? You want a mix: getting ready, the ceremony, the first kiss, the group shot, the speeches, the first dance, the silly late-night moments. If you're missing a beat, go back and add one in.
- Third pass — the cull. Cut your shortlist roughly in half. Be ruthless about near-duplicates. Two photos of you laughing at the same speech? Pick the better one and move on.
- Fourth pass — the wall test. Of what's left, which would you genuinely want to look at every single day for the next decade? Those are your hero photos. The rest are perfect for a photo book or smaller secondary displays.
Most couples end up with somewhere between 1 and 8 'wall' photos and 30 to 80 'book' photos. There's no right number — only what fits your home and your taste.
A note on photo quality
Wedding photos from a professional photographer are nearly always high enough resolution to print large. Phone snaps from guests are a different story — they're great for a photo book where they sit small on the page, but they often won't hold up at A2 or canvas size. Check the file size: anything over 3MB will usually print well at 60 x 40cm.
If a guest sent you a shot you absolutely love and the resolution isn't quite there, don't write it off. Black and white converts forgive a multitude of pixel sins, and printing it slightly smaller (say A4 framed rather than wall-canvas size) keeps it sharp.

Choosing the right format
Format matters more than people realise. The same photo printed three different ways looks like three different photos. A laughing portrait of you both on shiny acrylic feels modern and clinical. The same shot on cotton canvas feels warm and storied. On framed matte paper it feels traditional and considered. Pick the format that matches how you want the room to feel — not just the photo.
Here's a quick comparison of the formats that work best for wedding shots.
| Format | Best for | Why it works (or doesn't) |
|---|---|---|
| Canvas print | First dance, romantic portraits, statement pieces | Soft, painterly finish that flatters skin tones. No glass means no glare. Best for one big hero photo rather than a tight gallery. |
| Framed print | Gallery walls, classic portraits, mixed-photo arrangements | The mount and frame add gravitas. Easier to mix sizes and orientations. Glass needs cleaning but reflects light beautifully. |
| Collage canvas | Showing the whole story in one piece | Ten or twenty photos arranged on a single canvas. Good for couples who can't pick favourites and want one statement piece, not a wall of frames. |
| Photo book | The full archive — 50 to 200 photos | Albums lived in coffee tables for a reason. They're still the best way to keep the bulk of the gallery accessible without putting it all on the walls. |
| Acrylic / aluminium | Modern interiors, bold colour shots | Glossy, high-contrast finish. Striking, but can feel cold for soft, candid wedding moments. Better for one bold piece than a whole display. |
| Poster print | Budget feature wall, vow prints, signage repurposed | Cheapest way to go large. Works well behind glass in a frame; less convincing left as a poster on its own for a wedding shot. |
How couples typically combine formats
There's no rule that says you have to pick one. Most couples who get this right end up using two or three formats together. Some patterns we see again and again:
- One large canvas of the first dance or the kiss — placed somewhere prominent (above the bed, behind the sofa) — paired with a photo book on the coffee table.
- A gallery wall of framed prints on the staircase or hallway, mixing wedding shots with engagement and honeymoon photos so it doesn't feel like a shrine.
- A single collage canvas in the bedroom showing the whole story, with maybe one separate framed print of a parent or grandparent moment elsewhere in the house.
- A star map of the venue and date on the bedside wall, treated almost like a piece of typography rather than a photo. Subtle and personal.
If you want to dig deeper into what the inside of an album actually looks like and how to lay one out, our wedding photo book guide on the product page covers binding options (hardcover, layflat, softcover) and paper types in detail. Layflat is the one most couples want for wedding photos — the page spreads open completely, so panoramic shots aren't split down the spine.
Where to display wedding photos around the home
Where you hang them matters as much as what you hang. Wedding photos have a different energy from family snaps or holiday pictures — they're romantic, intimate, sometimes a bit posed. Some rooms suit that. Others don't.
Here's a room-by-room breakdown of what works in a typical UK home, whether you're in a Victorian terrace, a modern build, or a one-bed flat.
Bedroom: the natural home for wedding photos
If there's one place wedding photos belong without anyone questioning it, it's the bedroom. It's private, it's romantic, it's where the two of you actually live as a couple. Anything goes here — even photos that might feel a bit much in the living room.
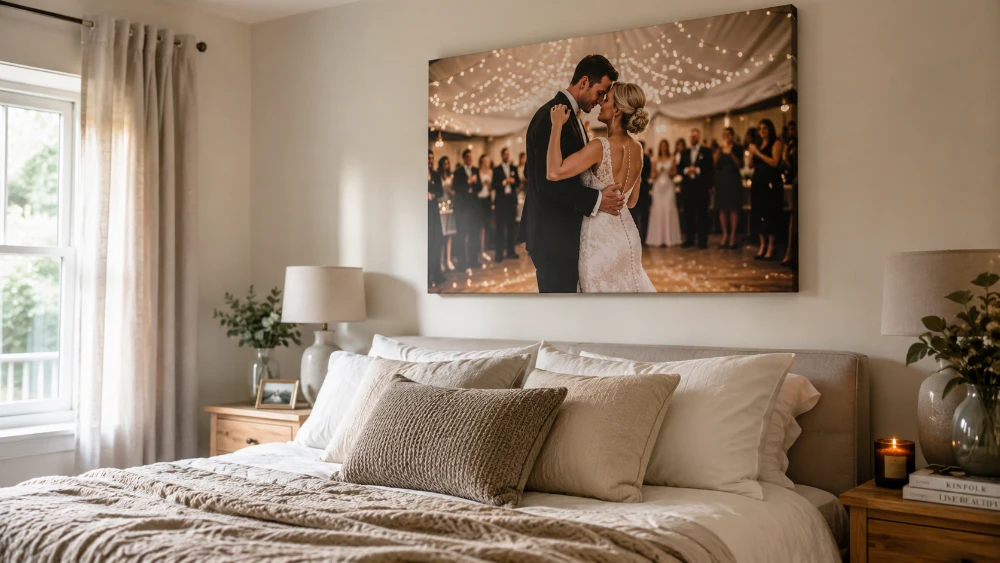
Idea 1: The above-the-bed statement canvas
Pick the single photo that captures how you felt that day — usually the first kiss, the first dance, or that quiet moment between the ceremony and the reception when you actually sat down together. Print it large. We're talking 80 x 60cm minimum, ideally 120 x 80cm if your bed is a king or super-king. A wedding canvas is the right format here — no glass, no glare from the bedside lamp, no frame fighting the photo. Just the image.
Idea 2: The triptych above the headboard
Three matching panels in a row tells a small story without overwhelming the wall. Pre-ceremony, ceremony, party — or getting ready, the kiss, the first dance. Use the same crop and frame style across all three so they feel like a set, not three random photos. This works particularly well above headboards because the horizontal line mirrors the bed.
Idea 3: The bedside frames
Two small framed photos, one on each bedside table — a portrait of each of you, taken at the wedding. Subtle, personal, and the first thing you see in the morning. Keep them small (15 x 10cm or 20 x 15cm) so they don't dominate the table.
Idea 4: The dressing area or wardrobe wall
If you've got a separate dressing area or a long wall opposite the wardrobes, that's prime gallery wall territory. Mix wedding photos with engagement photos, honeymoon shots, and pictures from significant trips you've taken since. It evolves as your relationship does, which stops it feeling like a frozen moment in time.
Idea 5: The above-the-bed star map
Not a photo at all, but a piece that fits brilliantly in a wedding context — a personalised star map showing the night sky over your venue at the moment you said yes. Treated as art rather than memorabilia, it sits beautifully above a bed. The text underneath usually reads something like 'Hampshire, 14th June 2025' — which means non-family guests don't read it as a wedding piece at all. They just see thoughtful astronomy.
Living room: how much wedding is too much?
The living room is where guests spend most of their time. There's a balance to strike: you want your home to feel personal, but you don't want every visitor to be confronted with twenty photos of your wedding day. The trick is one strong piece, well placed, that reads as 'art' first and 'wedding' second.
Idea 6: The single hero canvas above the sofa
Above the sofa is the most-looked-at wall in most UK living rooms. One big canvas — 100 x 70cm or larger — works far better than a busy gallery wall here. Pick a photo where the framing reads almost like a film still. Wide composition, both of you slightly off-centre, the venue or landscape behind you. It feels like a piece of art rather than a wedding souvenir.
Idea 7: Black and white for living room subtlety
Colour wedding photos in living rooms can sometimes clash with sofas, cushions and rugs. A black and white conversion solves the problem instantly. It also makes the photo feel more timeless and less 'period-specific' — fashion, hair and makeup styles all date faster in colour.
Idea 8: The mantelpiece arrangement
If you've got a fireplace, the mantelpiece is made for this. Three to five framed photos of varying sizes, leant rather than hung. Mix in one or two non-wedding pieces — a candle, a plant, a small ornament — so it doesn't feel like a memorial. Lean photos rather than stand them upright; it's a more relaxed look and easier to swap out.
Idea 9: The collage canvas as living room centrepiece
If you genuinely can't pick one photo, a photo collage on canvas gives you the gallery effect in a single piece. Twelve to twenty photos arranged on one canvas, so the wall stays clean but you get to show the whole day. This works best in modern interiors with clean lines — it's a contemporary look. Stick to a tight colour palette across the photos (e.g. all warm tones, or all converted to black and white) so the collage reads as one composition rather than a scrapbook.
Hallway and staircase: the gallery wall favourite
Hallways and staircases were made for wedding photo galleries. They're high-traffic but low-furniture, so there's plenty of wall space. They're transitional, so a busy display doesn't fight with anything. And they're typically the first thing guests see, which makes them the ideal place to set the tone of the home.
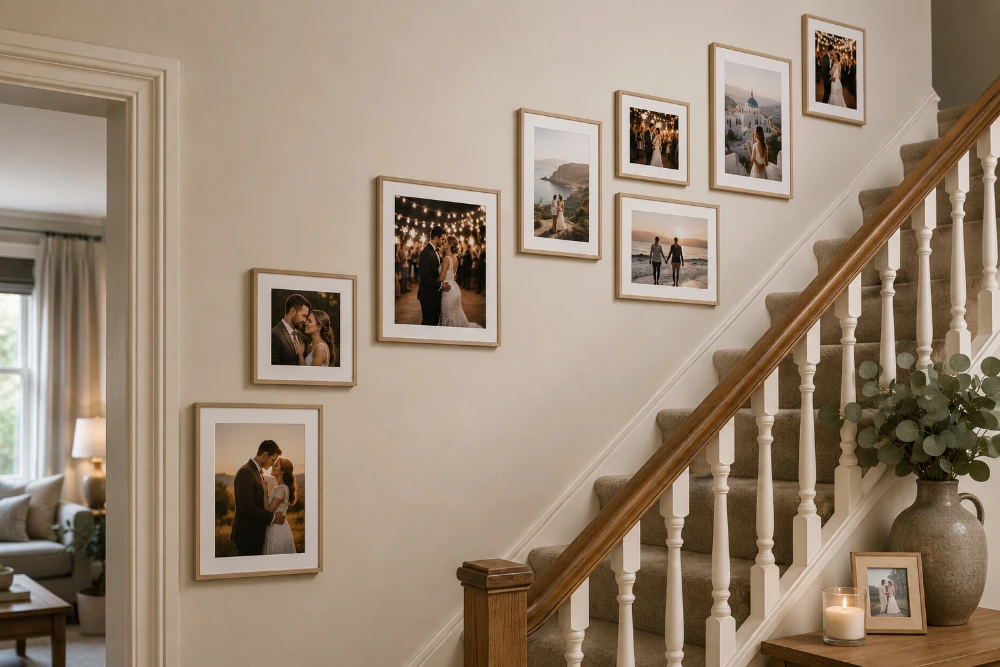
Idea 10: The ascending staircase gallery
The classic. A row of frames climbing the wall alongside the staircase, following the angle of the bannister. Use 5–9 photos depending on staircase length. The bottom edge of each frame should sit roughly 5–8cm above the line of the bannister. Mix portrait and landscape photos but keep frame styles consistent — it's the only thing holding the visual line together.
Idea 11: The chronological hallway timeline
Walk down the hallway, walk through the day. Start with getting-ready shots near the front door, move through ceremony photos, then reception, ending with the late-night dance floor at the far end. Most people won't consciously notice the chronology, but it gives the display an underlying logic that keeps it from feeling random.
Idea 12: The narrow hallway vertical stack
If your hallway is too narrow for a horizontal gallery (common in Victorian terraces and modern flats), go vertical. A column of three or five frames stacked above each other on a single wall section. Tighter spacing than you'd use horizontally — 4–6cm between frames — keeps it visually contained.
Kitchen and dining room: handle with care
Kitchens are tricky for wedding photos. Heat, steam, oil splatter and intense lighting all work against printed pictures. If you absolutely must put a wedding photo in the kitchen, keep it well away from the hob and the kettle. A small framed shot in a breakfast nook is fine. A canvas above the cooker is asking for trouble.
Dining rooms are easier. They're meant for entertaining and conversation, and a well-placed wedding photo can be a genuine talking point at dinner.
Idea 13: The dining room conversation piece
One large framed photo print on the main dining wall — usually opposite or behind the table, depending on layout. The mount adds presence; the frame adds formality. Choose a wide group photo from the day if you've got one — guests sat at your dining table will spot themselves and you'll be eating off the back of stories about who was where.
Idea 14: The framed reception details cluster
Not portraits — details. The flowers, the cake, the table settings, the cufflinks, the shoes, the rings. Three to six small framed photos clustered together in one corner of the dining room. It's an unusual angle that doesn't shout 'wedding' from across the room but rewards anyone who walks up close.
Idea 15: One photo behind the desk
If you work from home, a single small framed photo of your partner — or both of you — directly in your eyeline during video calls says more about your life than any tidy bookshelf could. Keep it understated. 20 x 15cm or 25 x 20cm framed, off-centre rather than directly behind your head.
Idea 16: The downstairs loo
Hear us out. Downstairs loos are tiny, often windowless, and people are stuck in there for two minutes with nothing to look at. A small cluster of three or four wedding photos turns it from a forgotten room into a moment. Cheeky, slightly unexpected, and your guests will all comment.
Idea 17: The under-the-stairs nook
Most UK homes have one — that awkward triangular space under the stairs that nobody knows what to do with. A single framed photo or a vertical stack of three turns dead space into something purposeful.
Idea 18: The window ledge ledge
Lean small framed photos along a deep window sill. Two or three at most. The light streaming through behind them gives them an almost backlit quality at certain times of day. Just check the photos themselves aren't getting full direct sun for hours — UV fades prints.
Ten wedding-specific display concepts
Beyond standard 'where to hang it', there are display concepts specific to weddings that work because of the occasion itself. These are the ideas that lift a wedding photo display from 'nice photos on the wall' to something genuinely thoughtful.
Idea 19: The first dance focal piece
There's a reason the first dance keeps coming up — it's almost always the photograph of the day. Lights low, both of you mid-movement, no posing. Print this one big and put it somewhere it can breathe. If you only ever do one wedding canvas, this is the photo.
Idea 20: The vow print
The actual words you said to each other, set as typography on a print. Not the whole vows — usually one line each, the bit that sums it up. Hung as a pair, his and hers, in the bedroom or the dressing area. Quieter than a photo but arguably more personal.
Idea 21: The triptych narrative
Three photos that tell the day in three beats. The classic version: ceremony, vows, party. Hung as a horizontal row with consistent spacing and matching frames. The discipline of three forces you to choose carefully and gives the display a clear visual rhythm.
Idea 22: The confetti close-up gallery
Most wedding galleries feature confetti shots at the church door or venue exit. They're often the most joyful images of the day, but they can feel cliché framed individually. The trick is to crop in tight on close-up moments — a single piece of confetti caught in your hair, a hand reaching to throw, the look on a friend's face — and group three or four together. It turns a familiar shot into something you actually look at.
Idea 23: The personalised star map
A star map showing the night sky over your venue at the moment of the ceremony or first kiss — usually printed as a poster or on photo board, with the date, location and coordinates beneath. It's the most subtle wedding piece you can put on a wall, because anyone who doesn't know the date won't read it as a wedding piece at all.
Idea 24: The generational gallery
A small wall — usually three to seven frames — where your wedding photo sits alongside your parents' wedding photo, your grandparents' wedding photos, and (if you can find them) earlier ancestors. It contextualises the day in a quiet way. You'll need to scan or rephotograph the older images and accept that quality will vary — black and white conversion across the whole set helps unify them.
Idea 25: The ledger-style picture rail
A simple wooden picture ledge fixed to the wall, with framed photos leant rather than hung. The advantage: you can swap photos in and out without filling holes. As your life moves on, you can rotate in honeymoon shots, anniversary photos, kids if and when they come — rather than your wedding day being a fixed point on the wall forever.
Idea 26: The anniversary update
Some couples deliberately add one photo per year on their anniversary. Year one: a wedding photo. Year two: a honeymoon photo (yes, a year late). Year three: a photo from a holiday or a milestone. Over a decade, the wall becomes a record of the marriage rather than just the wedding. A shelf or a long picture rail handles this best — fixed-frame galleries are harder to expand without redoing the whole thing.
Idea 27: The one-photo room
Counterintuitive, but it works. Pick a single photo, print it really large (100cm or more on the long edge), and give it a whole wall to itself. No other photos in the room. The minimalism makes it feel intentional — like a piece of art chosen for that space — rather than nostalgic.
Idea 28: The reception details on aluminium or acrylic
Cake, flowers, table settings, the venue at golden hour. The shots that capture the look of the day rather than the people. These work brilliantly on aluminium or acrylic prints because the gloss finish brings out colour and detail. Group three together for a tight, modern arrangement in a dining room or hallway.
Idea 29: The honeymoon-included mixed gallery
Pure wedding walls can feel slightly frozen — a single day immortalised on plaster. Mixing in two or three honeymoon shots opens the wall up. The viewer reads it as 'this couple, the start of their life' rather than 'this couple, that one day'. Stylistically, honeymoon shots also tend to be more landscape and less portrait, which helps balance a gallery.
Idea 30: The shadow-box cluster
Box frames that have actual depth, holding a small printed photo plus a physical memento — a piece of confetti, a corsage, a place card, a length of ribbon from the bouquet. One alone looks twee; a cluster of three or four feels considered. Best in a hallway or a dressing area where guests will get up close enough to actually read them.
The practical bit — sizing, spacing and lighting
Most badly hung wedding displays aren't bad because of the photos. They're bad because something is the wrong size or hung at the wrong height. This is the section that prevents that.
Sizing rules that actually work
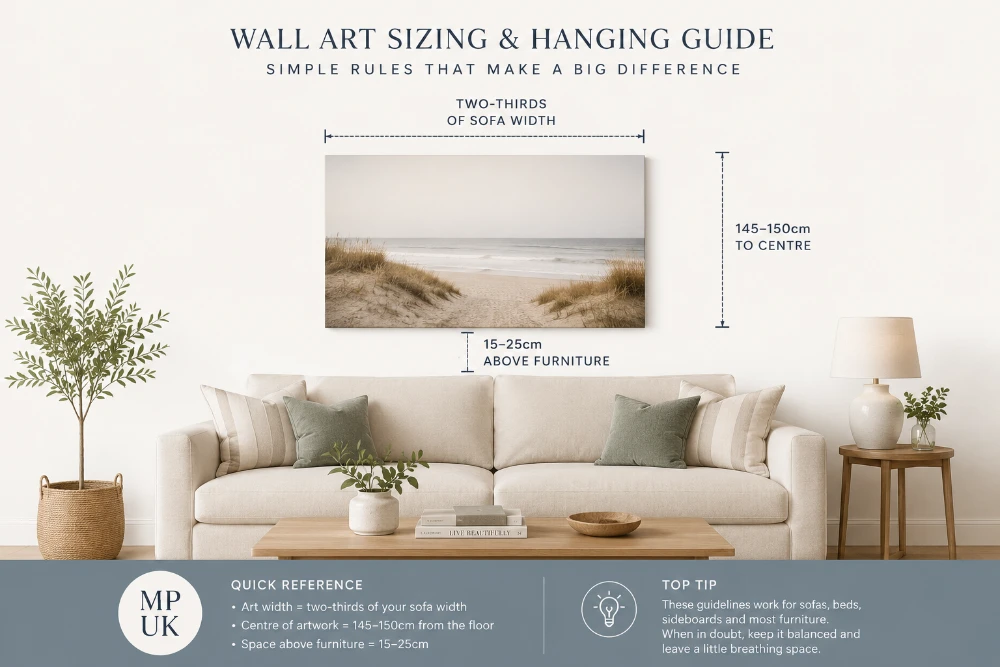
- Above a sofa: the artwork (single piece or full gallery) should span roughly two-thirds the width of the sofa. A standard 3-seater UK sofa is about 200cm wide, so aim for 130–150cm of art width.
- Above a bed: the same rule — two-thirds of the bed width. King-size beds (150cm wide) want 100–120cm of art. Super-kings (180cm) want 120–140cm.
- Above a fireplace mantel: art should be slightly narrower than the mantel itself — roughly 60–80% of the mantel width. Goes wider and it overshoots; goes narrower and it looks lost.
- On its own wall: leave at least 30cm of clear wall on either side, more if the wall is over 3 metres wide.
Hanging height
Galleries are nearly always hung too high in UK homes. The rule from museums and galleries is that the centre of the artwork should sit at 145–150cm from the floor — eye level for an average-height adult standing. Most people instinctively hang at 165–170cm because that's where their hands are when they reach up. It's wrong. Drop it lower than you think.
When art is going above furniture (sofas, beds, sideboards), the bottom edge should sit 15–25cm above the top of the furniture. Closer than 15cm and it feels squashed; further than 25cm and the art floats unconnected.
Spacing within a gallery
Frame-to-frame spacing depends on frame size:
- Small frames (under 30cm): 4–6cm between frames
- Medium frames (30–60cm): 6–8cm between frames
- Large frames (60cm+): 8–12cm between frames
Consistency matters more than the exact number. A gallery with all 6cm gaps will look better than one with random spacing, even if 6cm is slightly wrong for the frame sizes.
Lighting wedding photos properly
- Avoid direct sunlight. UV fades prints and yellows whites. Wedding dresses look terrible after eighteen months of direct south-facing sun.
- Warm bulbs over cool. Wedding photos almost always have warm tones — candlelight, golden hour, skin. Cool LED bulbs (4000K+) drain the warmth out of the photos. Aim for 2700K–3000K.
- Picture lights are worth it. A small picture light fitted above a hero canvas or framed print transforms how it reads in the evening. Mantelpiece displays in particular benefit from dedicated lighting.
- Watch reflections. Glass-fronted frames reflect everything in front of them. If your sofa or TV is opposite, the photo competes with its own reflection. Anti-reflective glass costs more but makes a real difference; canvas removes the problem entirely.
If you want a step-by-step on the actual mechanics of getting a canvas onto a wall — D-rings, picture hooks, plasterboard versus brick — our how to hang a canvas print guide walks through every method, including what to do when you can't drill into the wall.
Common mistakes (and how to avoid them)
Hanging too soon
Most photographers deliver galleries 4–8 weeks after the wedding. Don't hang anything in the first month. You'll be too emotionally invested to make objective choices. Wait until the post-wedding glow has settled — usually around month 3 — and then pick. The photos that still hit you at that point are the keepers.
Going only formal
Almost every couple has at least one ridiculous photo from the wedding — a face mid-laugh, the dog photobombing the family shot, a four-year-old eating cake off the floor. Include at least one. The walls of homes that feel lived-in always have one photo that breaks the seriousness.
All wedding, all the time
If every framed photo in your home is from one day, the home feels arrested. Mix in engagement shots, honeymoon photos, family pictures from before the wedding, and pictures taken in the years since. The wedding day becomes part of a bigger story rather than the only story.
Cropping wedding shots wrong
Wedding photographers compose carefully — there's usually breathing room around the subjects on purpose. Aggressive cropping for a square format can lose what made the shot work. If a photo isn't holding up at a particular size or shape, change the print size rather than crop the image. Or pick a different photo.
Forgetting print quality
Not all printers print equally. Wedding photos rely on accurate skin tones, gradient backgrounds and detail in white fabric. Cheap printing flattens skin, blocks up shadows in suits, and turns wedding dresses into bright white blobs. Look for inkjet printing with at least 6-colour ink sets and FSC-certified frames if you're going framed. Latex inks (used for canvas) handle skin tones better than older solvent inks and don't smell.
When to hang what — and when to update
Wedding displays don't have to be a one-and-done decision. Most couples evolve them. Here's what tends to happen, and what to plan for.
Year 1: the hero piece
Most couples put up their hero canvas or main framed portrait within 3–6 months. A few opt for the full gallery wall straight away. Both are fine. If you're not sure, start small — one big piece — and add later.
Years 2–5: the gallery expands
This is when most couples add the gallery wall. The wedding photos are joined by anniversaries, holidays, and (often) a baby. The earlier you went big, the harder this expansion is — which is why many couples now plan for it from the start by using picture rails or shelves.
Years 5+: the album becomes essential
After about five years, most of the original wedding photos have come down or been moved to less prominent walls — replaced by more recent photos. This is where the photo book earns its keep. The wall display has moved on; the album is where the full day still lives.
If you're early in the marriage, build for this. Get the hero piece on the wall now, but commission the photo book at the same time. The wall will change. The book won't.
Budget realities
Wedding photo displays don't have to be expensive. Here's what you can do at different price points:
Under £50
One medium canvas (60 x 40cm) of your hero photo, or a softcover photo book of 30–50 pages. Either works. Start here if you're unsure.
£50–£150
One large canvas or framed print as a hero piece, plus a hardcover or layflat photo book. This is what most couples spend on their first round of wedding decor and it covers 90% of homes.
£150–£400
A hero piece plus a small gallery wall (5–7 framed prints) plus a photo book. Or one statement collage canvas plus a star map plus a book. This level gives you presence in two or three rooms rather than just one.
£400+
Multi-room display covering bedroom, hallway, and one main living area. Likely 8–15 individual prints across canvas, framed, and a book. Picture lights and proper hanging hardware become worth the money at this level.
If the wedding gifts angle is more useful — i.e. you're displaying these as gifts for parents or close family rather than for your own home — our best wedding gifts UK guide covers personalised options, what UK couples typically spend, and which gifts actually get used versus quietly re-gifted.
Final thought
Your wedding photos are going to be looked at far more often, by far more people, over far more years than you probably realise. Even if you only put one canvas above the bed and never do anything else, that single photo will be there every morning when you wake up and every night when you go to sleep, for as long as you live in that home. It's worth getting right.
Don't overthink it. Pick a photo you genuinely love. Print it well. Hang it at eye level. Get the album done so the rest of the day isn't lost to a hard drive crash in 2032. Everything else is detail.
Frequently Asked Questions About Wedding Photo Displays
-
Most homes work best with 1 to 8 wall-displayed wedding photos in total. One hero piece (a canvas or large framed print) plus optionally a small gallery of 4–7 frames in a hallway or bedroom is the sweet spot for most UK homes. Beyond that, the bulk of your photos should live in a photo book or digital archive — not on the walls.
-
Canvas works best for one large hero photo — usually the first dance or a romantic portrait. The matte, textured finish flatters skin and avoids glare. Framed prints work better for gallery walls and arrangements with multiple photos, because the mount and frame add the formality and structure that gallery walls need. Most couples use both: canvas for one statement piece, framed for everything else.
-
Aim for the canvas to span roughly two-thirds the width of the bed. A double bed (135cm wide) wants a canvas around 90cm wide; a king (150cm) wants 100–120cm; a super-king (180cm) wants 120–140cm. Going smaller makes the canvas look lost; going wider than the bed feels overwhelming.
-
The bedroom is the most natural location — it's intimate and personal. Hallways and staircases work well for gallery walls. Living rooms suit one large statement piece rather than a busy display. Avoid kitchens (heat and steam damage prints) and bathrooms (humidity), and keep prints out of direct sunlight to prevent UV fading.
-
Most couples receive their full gallery 4–8 weeks after the wedding. Wait at least another month before making display decisions — emotional distance helps you choose better. A reasonable target is to have your hero piece up by month 3 and your photo book ordered by month 6. There's no rush, but don't let the gallery sit unused for years.
-
Sometimes — it depends on the file size. Phone photos over 3MB usually print well at small to medium canvas sizes (up to 60 x 40cm). Anything smaller, or below that file size, will look soft when enlarged. For wall-sized prints (80cm and bigger), stick to your professional photographer's high-resolution files. Black and white conversion can rescue lower-quality phone shots for medium prints by hiding noise and softness.
-
Colour for the hero piece — that's where the warmth, the flowers, the dress all earn their keep. Black and white for gallery walls in living rooms, where colour photos can clash with sofas and rugs. Black and white also ages better; colour film and digital sensors capture period-specific tones that date over decades, while black and white feels timeless. A mixed gallery — some colour, some black and white — usually looks worse than committing to one or the other.
-
A wedding photo wall is a curated collection of wedding photos displayed together on a single wall, usually as a gallery of frames or a mixed arrangement of canvas and framed prints. To plan one: choose your wall, measure it, lay out paper templates of your intended frames on the floor first, photograph the layout, then hang from the centre outward. A typical wedding photo wall uses 5–9 photos across a wall 1.5–3 metres wide, with 6–8cm spacing between frames.
-
Yes — they do different jobs. Wall prints display 1–8 photos in your daily eyeline. A photo album holds 50–200 photos that you'll genuinely flip through years later. Couples who skip the album and only do wall prints almost always regret it within five years, when the wall display has moved on and 90% of the wedding gallery has effectively disappeared. The album is the long-term archive.
-
In a small UK flat, focus everything on one strong piece in the bedroom — usually a canvas above the bed — and skip the gallery wall entirely. Add a photo book on the coffee table or a side shelf for browsing. If wall space is genuinely scarce, freestanding framed photos on bookshelves or bedside tables work better than crowded wall displays. Vertical wall stacks (3 small frames in a column) work in narrow hallways where horizontal galleries don't fit.
-
Personalised wedding photos are consistently rated among the most appreciated wedding gifts UK couples receive — and the same applies to parents. A framed group photo of you with your parents on the day, or a photo book featuring family-focused images, lands far better than generic decor or kitchenware. For parents who already have everything practical, a personalised wedding gift is one of the few categories that genuinely earns wall space in their home.