How to Edit Your World Cup Photos for Printing: A Phone-First Guide
The World Cup is going to leave you with a camera roll full of pictures you actually want to keep. Pub watch parties, the kids in their first England shirt, the panorama outside the ground if you’re lucky enough to travel, that one perfect shot of the screen at full-time when the place went mental. Most of these photos will sit on your phone forever. A few of them deserve to be on a mug, on a magnet on the fridge, on the cover of a photo book.
The gap between a phone snap and a print-ready photo is smaller than people think. You don’t need Photoshop, a desktop, or a paid subscription. You need a free app, about ten minutes, and a checklist that fits the way phone cameras actually behave when you’re holding a pint in one hand and shouting at a TV with the other. Here’s the one to follow.
Why phone photos need a quick edit before they’re printed
A photo that looks fine on a 6-inch screen can look noticeably off once it’s printed on a mug, a magnet, or a glossy photo-book page. Three things change at print size.
First, brightness. Phone screens are backlit; prints reflect ambient light. A photo that looks well-exposed on your phone will print darker than you expected, particularly anything taken inside a pub or at a fan zone after sunset. Second, colour. Phone screens push saturation to make images look punchier in the camera roll. Once printed onto ceramic, paper or fabric, the same image can look slightly washed out. Third, framing. Phone cameras shoot at fixed ratios (usually 4:3 or the wider 16:9 on newer iPhones and Pixels), but most gift products have their own print area: a mug wraps in a long thin strip, a square magnet is 1:1, a tote bag is usually square or portrait, and a photo book lets you mix all of them. If you don’t crop deliberately, the product editor will crop for you, and you might lose a head, the trophy lift, or half the goalpost.
Spending ten minutes on these three issues is the difference between a print you keep on your desk and one you keep meaning to redo.
The free phone apps worth installing
You only need one. Two if you want to be precise.
Snapseed (free, iOS and Android)
Owned by Google, no ads, no subscription, no watermark. The Tune Image, Crop, Rotate (which also straightens), Selective, and Healing tools cover everything you need for World Cup photos. The Perspective tool fixes leaning stadium shots in seconds. If you only download one app, make it this one.
Adobe Lightroom Mobile (free tier, iOS and Android)
More polished than Snapseed and stronger on colour grading, particularly if you took photos in RAW or HEIC. The free version covers everything in this guide; you only hit the paywall if you want cloud sync or selective masking, neither of which you need to print one photo well.
Google Photos / Apple Photos (already on your phone)
The built-in editors are better than they used to be. Apple Photos in particular has a strong auto-enhance and a brilliant straighten tool. Fine for a quick fix; reach for Snapseed when you want more control.
Skip anything that wants you to pay before exporting. Skip anything that watermarks the result. Skip the AI-filter apps that smooth faces and force a fake-tan look. Print is a different medium and those edits will look strange at scale.
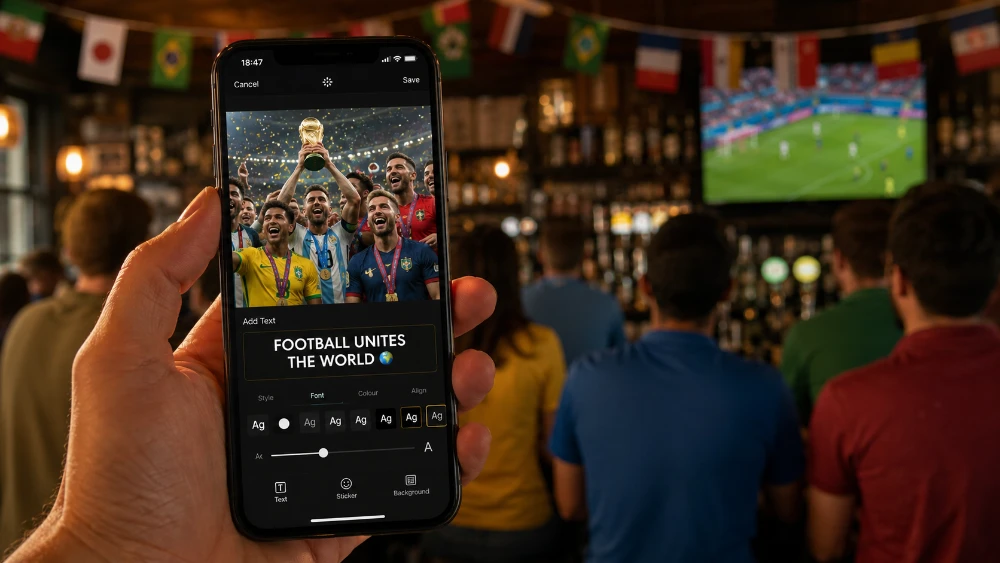
Step 1: Crop for the right print ratio before anything else
Crop first. Every other edit (brightness, colour, sharpness) is calculated against the visible area of the photo, so cropping after you’ve adjusted everything else means redoing the work.
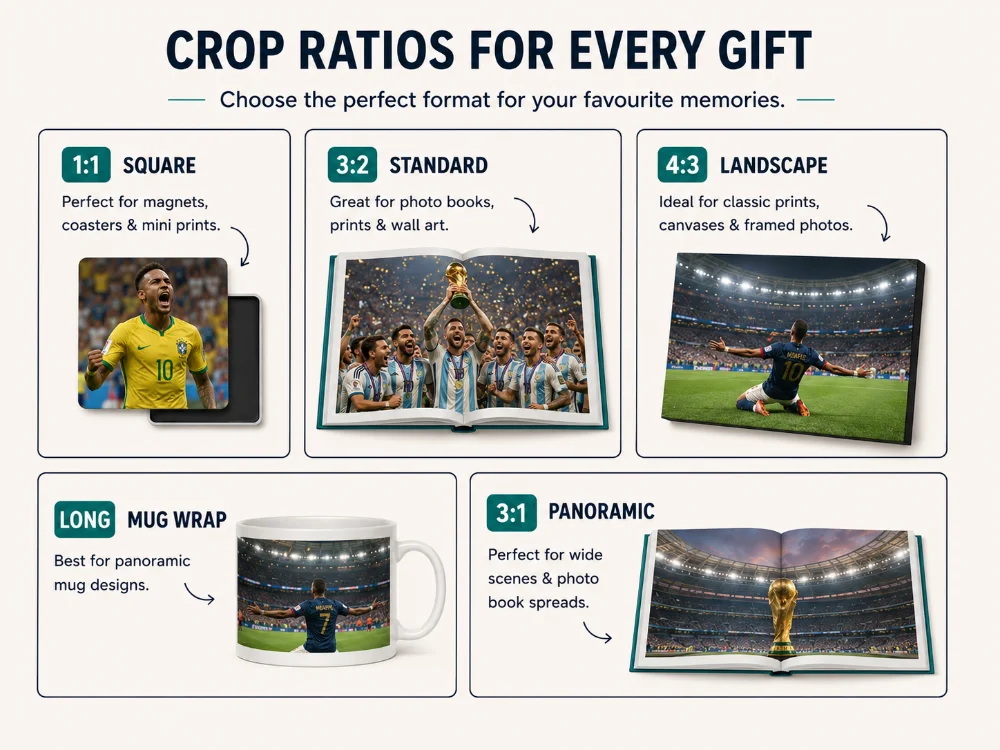
The ratio you crop to depends on what you’re printing onto:
- Square (1:1) — best for Instagram-style group shots and tight portraits. The default ratio for fridge magnets, keyrings and most photo-book grid layouts.
- Standard photo (3:2) — the classic format. Suits action shots and candid pub photos. The natural ratio for photo book full pages and the front of most tote bags.
- Wider landscape (4:3 or 16:9) — phone default. Good for atmosphere shots: the crowd in the stand, the fan zone wide, the projector screen across the bar. Sits well on photo-book double-page spreads and the wrap-around print panel of a mug.
- Long horizontal strip — mugs print onto a single long rectangle that wraps almost the full way round. If you’ve got a wide group shot or a panoramic celebration scene, the mug wrap is the format it’s made for.
- Panoramic (3:1 or wider) — only if you actually shot a panorama. Looks dramatic across a double-page photo book spread, but the file needs the resolution to support it.
In Snapseed, the Crop tool lets you lock to specific ratios — pick one before you start dragging the corners. Don’t trust the freehand crop unless you know the exact print size you’re ordering. If you’re undecided, leave the photo at its original ratio and decide at the order stage. The personalised photo mug editor and the photo book builder both let you adjust the crop in the preview, so you can see what gets cut before you commit.
Two specific things to watch.
First, the mug wrap. A mug print runs from one side of the handle all the way round to the other, so the photo gets stretched into a long horizontal strip. A group shot in a wide line works brilliantly. A tight portrait gets blown out into a slightly distorted shape. If you’re printing a group shot onto a mug, the more horizontal you can crop, the better it sits on the curve.
Second, the bleed area on photo book and tote bag prints. Both products print right to the edge of the panel, which means anything you don’t want trimmed needs at least 1–2cm of breathing room around faces, the trophy, the scoreboard — anything you care about. Magnets and keyrings are tighter still: leave a 3–4mm safety margin around every important detail and you’ll never lose a head to a trim line.
Step 2: Straighten skewed horizons and leaning verticals
This is the easiest fix and the one most people skip. A wonky horizon — a tilted pub bar, a leaning stadium roof, a slanted goalpost — looks fine on a phone and obvious on a print. The brain corrects for it on a small screen and refuses to on a printed surface, particularly when the photo is held in your hand and inspected up close (a mug, a keyring, an open photo book).
In Snapseed, use Rotate (not Crop). The grid that appears lets you line up against the bar, the touchline, the steps in the stand. Drag in 0.5-degree increments until the longest straight line in the photo runs parallel to the gridline. Apple Photos has the same tool under the crop icon and even auto-detects horizons in most outdoor shots.
For panoramas — particularly the kind that sweep round a fan park or a pub courtyard — phone cameras stitch with a slight curve. Snapseed’s Perspective tool flattens this out. Use the Free option, drag the corners gently, and stop the moment the curve straightens. Overdoing it stretches the photo and makes faces look wide — which on a photo book double-page spread or a tote bag panel is the kind of thing you’ll notice every time you pick it up.
Step 3: Brighten dark and night-time shots
Most World Cup photos in the UK are going to be shot in poor light. England matches in this tournament kick off in the early evening UK time, which means pubs at peak gloom, fan zones lit by big screens, and living rooms where someone’s kept the lamps off for atmosphere. Phone cameras handle this surprisingly well — but the photos still need lifting before they print.
In Snapseed, open Tune Image and adjust in this order:
- Brightness +10 to +20. A small lift; don’t overdo it.
- Highlights -10 to -20. Pulls back any blown-out areas (TV screens, overhead lights).
- Shadows +20 to +40. Recovers detail in the dark areas where most of the people usually are.
- Ambience +5 to +15. Snapseed’s hidden weapon — adds local contrast that makes faces and shirts look more defined.
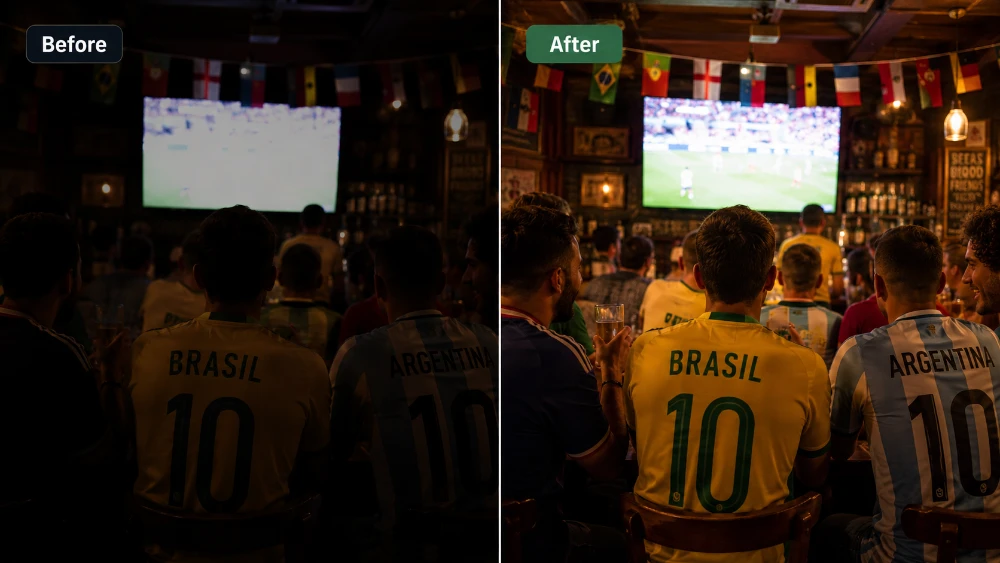
Resist the urge to push everything to maximum. The aim is to make the image look the way the moment felt, not to turn night into day. If the original was atmospheric and dim, keep some of that. Two surfaces do behave a bit differently, though: a tote bag’s natural cotton fabric will soften and slightly darken the print, so lift the shadows a touch more than feels right on screen. The same goes for the brushed microfibre of a sports towel — fabric eats light. For a ceramic mug, a glossy photo book page, or a magnet, what you see on screen is more or less what you’ll get.
Step 4: Boost colour without breaking it
England kits, flags, fan-zone lighting, the green of the pitch — World Cup photos are colourful by nature. The mistake is pushing saturation too far in editing, particularly on reds. The St George’s red on an England shirt sits in a narrow band; over-saturate it and the white parts pick up a pink cast and the red itself starts to bleed at the edges when printed.
In Snapseed’s Tune Image, use Saturation +5 to +15 max. Then use Warmth: positive (warmer) for pub interiors with yellow lighting that’s already pulling the photo orange — counterintuitively, pushing it slightly warmer balances skin tones; negative (cooler) for fan-zone shots with overhead daylight LEDs that make everything look greenish.
If the white balance is properly off — common in mixed lighting — open Selective in Snapseed instead. Drop a control point on a section of the photo that should be neutral white (the white panel of an England shirt, a white wall, the screen border) and pull the warmth slider until it actually looks white. The rest of the image colour-corrects automatically. This single step does more for print quality than any filter.
One specific note for fabric products: cotton tote bags and microfibre towels very slightly desaturate the print compared to a ceramic mug or glossy photo book page. If you’re printing onto a tote or a towel, push saturation about 5 points higher than you would for the harder, smoother surfaces. For mugs, magnets, keyrings and photo books, leave it where it looks right on screen.
Step 5: Remove lens flare, screen reflections, and that one bloke in the background
Phone lenses flare badly when you point them at bright stadium lights or a TV screen. The flare shows up as soft hexagonal blobs or a milky haze in the corner of the frame. Snapseed’s Healing tool fixes this in about thirty seconds: zoom in on the flare, brush over it with your finger, and the app samples the surrounding pixels to fill it in.
Healing is also the answer to:
- A spilled pint on a table you’d rather not commemorate.
- A reflection of yourself in the TV screen or pub window.
- Someone walking through the back of your group shot at the wrong moment.
- Pub furniture, exit signs, or stray glasses cluttering the foreground.
It works best on small, isolated objects against a clean background. It struggles with anything in front of a face, anything overlapping the main subject, or anything covering a large area. Don’t try to remove a whole person — it’ll smear. Move on, pick a different photo. This matters even more for small-print gifts like keyrings and magnets, where the print area is tiny and any healing scar shows up immediately.
Step 6: Sharpen — but only at the end and only a little
Sharpening is the last edit you do. Sharpen too early and it’ll be exaggerated by every later adjustment. Sharpen too much and the photo looks crunchy: faces get edge halos, jersey numbers get jagged, the whole image starts to look like a phone wallpaper rather than a print.
In Snapseed’s Details panel, use Structure +10 to +20 for everything except portraits — it adds depth to crowd shots, stadium views, and pitch-side scenes without making faces look harsh. For close-ups of faces, leave Structure alone and use Sharpening +10 to +15 instead. That’s it. If you can see the sharpening, you’ve gone too far.
One exception: very small print areas like keyrings and individual magnets. At that size, fine detail compresses and a slightly stronger Structure +20 to +25 helps faces stay readable. For larger surfaces like a tote bag or a sports towel, stay light — oversharpening on a soft fabric looks particularly strange.
Step 7: Export at the right size for print
This is where most people lose quality without realising. Phone apps default to JPEG export at a compressed size optimised for sharing, not printing. Snapseed in particular has a sneaky Save option (overwrites the original at lower quality) and an Export option (saves a fresh JPEG). You want Export.
Tap the three dots in Snapseed, choose Settings, and set the format to JPG 100% — not 95% or Auto. In Lightroom Mobile, use Share, then Export As, and set Image Sizing to Largest Available with JPEG 100. Either way, the resulting file should be at least 3 to 5 MB for a phone photo. If the export comes out under 1 MB, the quality is too compressed for a larger gift print like a tote bag, a sports towel or a full-page photo book spread. There’s a fuller breakdown of file size and resolution in MYPICTURE’s guide to resizing images for printing, which is worth reading once if you’ve ever had a photo come back blurry.
As a rough rule for what your phone photo can support across the gift range:
- 12 megapixels (most iPhones up to the 14, most Android flagships): comfortably prints across mugs, magnets, keyrings, photo book pages and tote bags. A full-coverage sports towel is its upper limit — the photo will print fine but go in expecting fabric softening, not a perfect-detail reproduction.
- 48 megapixels (iPhone 14 Pro and later, recent Pixels and Galaxy S models): prints everything in the gift range with detail to spare — including full-bleed photo book spreads and full-coverage towels.
- Anything cropped heavily during editing loses resolution proportionally. A 12MP photo cropped to half its area is now effectively 6MP. Print onto a smaller surface (a magnet, a keyring) or pick a less-cropped frame.
Matching the photo to the gift format
Different keepsakes suit different World Cup photos. Worth thinking about before you order, not after.

The full tournament story — a six-week run of photos
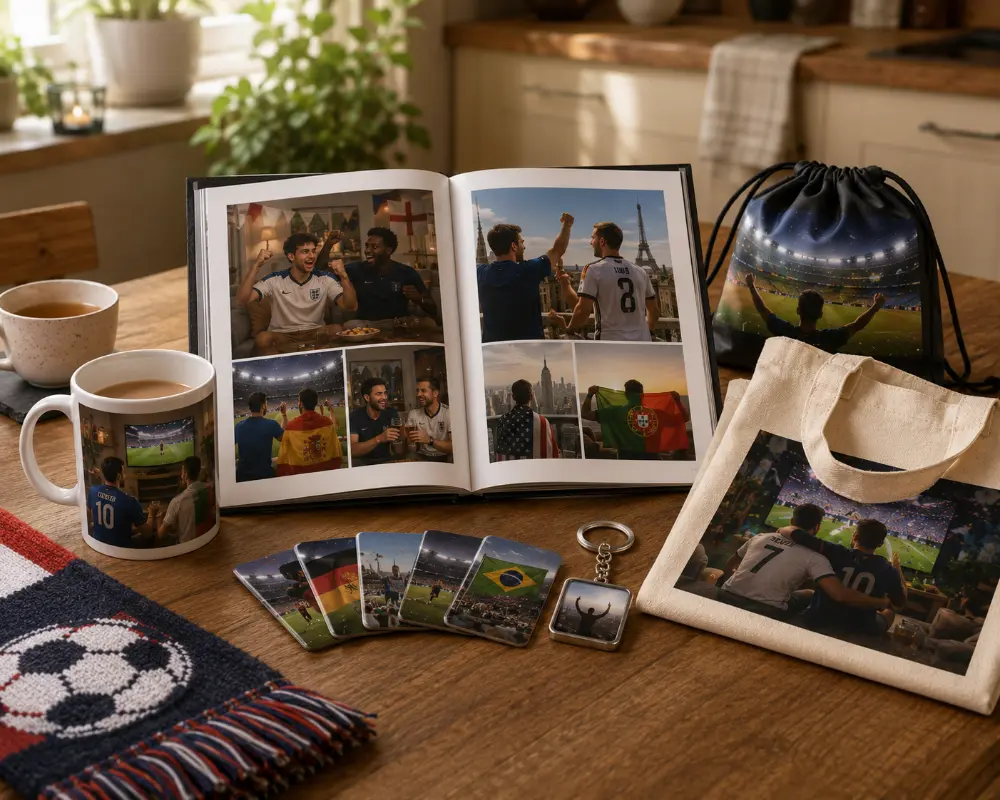
Best as a personalised photo book. If you’ve come away from six weeks of group stages, knockouts and a final with thirty or forty photos you can’t bring yourself to delete, a photo book is the keepsake that holds them all. One page per match, captions underneath, the score, the pub. Open it in ten years’ time and the summer comes back. Particularly suited to mixing photo types — a wide atmospheric pub shot on one page, a portrait of the kid in their England shirt on the next, a panorama from the fan zone across a double-page spread.
The single iconic shot — for the daily reminder
Best on a personalised photo mug. A clean, simple, defined subject is what works on a mug — the kid in their kit, the group lined up at the pub, the goal celebration with everyone’s arms in the air. The print wraps around the ceramic in a long horizontal strip, so wider crops work better than tight portraits. A mug is the keepsake that actually gets used: every morning cuppa, every cup of tea after work. It’s also a brilliant group gift — order one for everyone in the photo and you’ve got an end-of-tournament present that costs less than a couple of rounds. The heat-sensitive magic mug option is worth a look too — the thermochromic coating means the photo only appears when you pour in something hot.
The match-by-match fridge timeline
Best as MixMags photo magnets. If you’ve got one good photo from every match you watched together, MixMags let you put the whole tournament on the fridge side by side. They’re small, square, magnetic, and the genius is that you get a set of them rather than committing to just one image. Easy to rearrange as new matches happen across the tournament. Renter-friendly and reposition-friendly: zero damage, no drilling, no permanent commitment. The cleanest way to display a collection of tournament photos without having to pick a favourite.
The portable token — for the mate who moved away
Best as a personalised photo keyring. Sometimes the best gift is the smallest one. A keyring with the squad photo printed on it sits on the keychain forever — a tiny daily reminder of the summer. Order one for everyone in the group, post them in standard envelopes at the end of the tournament. Particularly good for groups where one or two members have moved to a different city: a small physical reminder that the group still exists, jangling in their pocket every time they unlock the front door. Keep the photo simple — the print area is tiny, so a tight portrait of two or three faces reads better than a wide shot of fifteen people.
The match-day workhorse — the print that gets used
Best as a personalised tote bag. A tote bag with the group photo on it sounds like a novelty, but it’s the most genuinely useful keepsake on this list. Carry it to the next match with scarves and snacks, take it to the supermarket, sling it over the back of a chair at work — and every time you do, the photo is on display. For the knockout rounds especially, having matching totes for the group becomes its own small ritual. Pick a wider crop (a group lined up, a pub interior, a fan-zone shot) since the print panel is roughly square — portrait crops sit awkwardly.
The five-a-side crossover — the gym-bag keepsake
Best as a personalised sports towel. Slightly more niche, but worth a mention. If your fan group is one of those that combines watching the matches with playing five-a-side or hitting the gym, a sports towel with the squad photo printed across it is a brilliant in-joke that doubles as a properly useful bit of kit. Made from soft microfibre and supplied with a small carry-bag, it shrugs off a session without complaint and still has your mates’ faces on it at the end. Pick a wide horizontal crop with high contrast — fabric softens detail, so simple compositions read better than fiddly ones.
Common mistakes worth avoiding
A few things people do that quietly ruin otherwise good prints:
- Editing a screenshot of a photo. Screenshots are at screen resolution, not photo resolution — typically a fraction of the original. Always start from the photo file itself.
- Editing a photo someone sent you on WhatsApp. WhatsApp compresses photos heavily by default. Ask the sender to share via AirDrop, email, or WhatsApp’s ‘send as document’ option to preserve the original quality.
- Applying an Instagram or TikTok filter and then trying to fine-tune it. Layered filters fight each other and the result rarely prints well. Start from the original; build up in one app.
- Editing in portrait orientation on your phone, then ordering a product with a landscape print panel (a mug wrap, a wider photo book spread). The crop will surprise you. Rotate the phone or check the print preview before ordering.
- Forgetting to remove the date stamp. Some camera apps stamp dates in the bottom corner by default. Heal it out before printing or it’ll be there forever.
And one general rule: edit on the largest screen you have. A photo that looks great on your phone might reveal flaws on an iPad or laptop preview that will be obvious when printed onto a mug, magnet or book page. Send the file to yourself before ordering and have a final look at full size. There’s a longer set of editing tips in MYPICTURE’s expert guide to editing photos for printing that’s worth a quick read if you’re new to this.
Printing directly from your phone
Once the edit is done, you don’t need to transfer the photo anywhere. The MYPICTURE site works in mobile browsers, the upload reads from your camera roll, and the preview lets you check the crop before you commit. The full guide to printing pictures from phone storage walks through the upload step in detail, including how to handle iCloud-stored photos and HEIC files (which sometimes need converting before they upload).
One small thing that catches people out: if you’ve enabled Optimise iPhone Storage in iCloud settings, the version of the photo on your phone might be a low-resolution preview, with the full file held in iCloud. Tap the photo and let it download fully before uploading, or you’ll be printing a thumbnail.
The point of all this
World Cup tournaments don’t come round often, and the ones that matter — the goal you watched in the pub, the kid’s face when England scored, the night the place erupted — deserve better than to disappear into a camera roll. Editing for print isn’t about making photos look perfect. It’s about making them look the way the moment felt: warm, sharp, with the right colours, framed deliberately.
Take ten minutes. Crop properly, straighten the horizon, lift the shadows, balance the colour, heal out the distractions, sharpen lightly, export at full quality. Then upload — onto a mug for every morning, a magnet for the fridge, a keyring for the mate who moved away, a tote bag for the next match, or a photo book that holds the whole summer in one place. That’s the bit that turns a phone snap into something worth keeping.
Frequently Asked Questions About World Cup Photo Editing
-
Snapseed (made by Google) is the strongest free option for both iPhone and Android. It has no ads, no watermark, and includes all the tools you need for print prep — crop with ratio locks, rotate-to-straighten, selective brightness adjustment, healing for removing flare or small distractions, and full-quality JPEG export. Adobe Lightroom Mobile is a close second on its free tier and is better for colour grading; Apple Photos and Google Photos are fine for quick fixes but limited compared to Snapseed.
-
Crop first to a wide horizontal ratio (the mug print wraps round the ceramic in a long strip, so wider crops sit more naturally than portrait ones). Lift brightness slightly, pull shadows up by 20–40 in Snapseed’s Tune Image to recover detail in pub or evening light, keep saturation moderate (+5 to +10) since ceramic reproduces colour cleanly, and sharpen lightly with Structure +10 to +20. Leave 2cm of breathing room around faces so they don’t end up close to the handle. Export as a JPEG at 100% quality before uploading.
-
Pick 20–40 of your best shots from across the six weeks and edit each one with the same workflow (crop, straighten, brighten, colour, sharpen). For consistency across pages, try to keep your edits in a similar style — don’t over-saturate one shot and leave another untouched. Mix landscape and portrait crops to give the book visual variety, and save your widest shots (panoramas, fan-zone wides) for double-page spreads where they can fill the full width. Export each one at JPEG 100% so the photo book builder can use the full resolution.
-
Phone screens are backlit, which makes everything look brighter than it really is. Prints reflect ambient light instead, so any photo will print roughly one stop darker than it appears on screen. Fabric products like cotton tote bags and microfibre sports towels make the effect more pronounced because the surface absorbs more light than ceramic, paper or magnet board. The fix is to brighten the photo slightly before printing — Brightness +10 to +20 and Shadows +20 to +40 in any free editor — rather than expecting the printer to compensate.
-
As a general rule: a 12-megapixel phone photo (most iPhones up to the 14 and most Android flagships) is comfortably enough for every product in this guide — mug, magnet, keyring, tote bag, photo book pages and a sports towel. A 48-megapixel photo (iPhone 14 Pro and later, recent Pixels and Galaxy S models) gives you detail to spare, particularly useful for full-bleed photo book spreads and full-coverage towels. Heavy cropping reduces the printable area proportionally — a 12MP photo cropped to half its area is effectively a 6MP image, so stick to smaller products like keyrings and magnets, or use a less-cropped frame.
-
Yes — every step in this guide can be done on a phone using free apps. Snapseed and Lightroom Mobile cover cropping, straightening, brightness, colour, healing, and sharpening. The MYPICTURE editor also runs in mobile browsers, so you can upload, preview, and order without ever touching a laptop. The only time desktop helps is when you want to do a final size check on a larger screen before ordering — useful, but not required.
-
Two reasons. First, phone screens display colour differently to printers — most phones boost saturation to make photos look punchier in the camera roll, while printers reproduce more accurate (slightly muted) colour. Second, your phone screen is backlit while a print reflects ambient light, which can shift how reds and warm tones look in particular. Fabric products like totes and towels desaturate slightly more than ceramic mugs or paper photo book pages. To minimise the gap, use the white balance tool in Snapseed (drop a control point on something that should be neutral white, then pull the warmth slider until it actually looks white), and don’t push saturation higher than +15.
-
Only as much as needed to fit the print ratio and remove distracting edges. Heavy cropping reduces the resolution available for printing, which is the most common reason a print comes out blurry — particularly on small products like keyrings and magnets, where every pixel counts. Use Snapseed’s Crop tool with a locked ratio rather than freehand, and check the print preview on the MYPICTURE site before ordering. Each product editor shows the exact area that will print, including any safety margins around the edges.