Build a World Cup Gallery Wall: Step-by-Step Sports Fan Guide for UK Homes
The World Cup is the biggest one ever. 48 teams, three host countries, and matches running across June and July like a slow-motion festival. If you have ever shown up to a pub in a replica shirt, watched a knockout game through your fingers, or shouted at a TV in a Tesco function room, you already know the feeling.
This guide is about turning that feeling into something you can hang on your wall.
A proper sports gallery wall does what a single framed shirt cannot. It tells the story. The summer you went to the Euros. The match where your kid first scored a goal. That away day in Newcastle when it absolutely chucked it down. A Liverpool home game with your dad. A photograph of the squad lifting a trophy. All of it together, on one wall, where you actually live.
And here is the good news. You do not need to be an interior designer to make it work. You need a plan, the right mix of formats, and roughly two hours of patient measuring.
This guide walks you through it step by step, with sizes, spacing, layouts and hanging tips that actually fit British homes. We will use the World Cup as the example throughout. But everything here works just as well for the Premier League season, the NFL International Series, the Bundesliga, the rugby calendar, or whatever else you follow once the trophy has been lifted.
Why a sports gallery wall beats a single framed shirt
Most football fans, when they decide to put something sport-related on the wall, default to the same thing: one shirt, one frame. It is fine. It is also a bit lonely up there.
A gallery wall does more, for two reasons that are worth thinking about before you start.
First, sport is about context. A photo of a player celebrating means more if it is hung next to a picture of you watching that goal go in. A match day programme is more interesting if it sits beside the train ticket from the away trip. A gallery turns scattered moments into a story that people can read across a wall.
Second, gallery walls suit how fans actually collect things. Most of us have a phone full of stadium photos, half a drawer of old programmes, a few half-decent action shots from local games, and an autograph or two from a player meet-and-greet. None of that fits neatly into one frame. A gallery wall absorbs all of it.
There is also a practical bonus. A varied gallery wall handles fashion shifts better than a single statement piece. When the team you love changes managers and the kit goes from striped to plain, your wall does not look out of date — because the rest of the gallery carries it.

The seven-step plan: how to build a World Cup gallery wall
If you follow these seven steps in order, you will end up with a wall that looks intentional rather than thrown together. Skip any of them and it gets harder.
Step 1: Decide what your wall is actually about
Before you pick a single photo, decide what story the wall is telling. This sounds obvious. People skip it constantly and then wonder why their gallery feels random.
There are four good angles for a World Cup gallery wall, and most fans pick one (or a combination of two).
Angle 1: The tournament timeline
This is the classic format. Photos from the build-up, the group stages, the knockout rounds and the final, arranged left to right. Match day pub photos. Stadium shots if you went. Press clippings of the big moments. A photograph of you in the kit on day one and another on day 31.
Angle 2: The country journey
Especially good if you followed England, Wales, Scotland or Ireland through qualification. The wall becomes a portrait of the squad's tournament — players you wanted to see start, the goals that mattered, the moments that defined the campaign. A team photo at the centre, surrounded by individual standouts.
Angle 3: The fan experience
Less about the football, more about the people watching it. Family on the sofa during the late kick-off. Mates on a beach in Spain who found a TV. The pub being absolutely rammed for an England match. A toddler in an oversized shirt. This is the angle that ages best — five years from now, the football is just context for the people.
Angle 4: A wider sports wall, with the World Cup as one chapter
If you watch the Premier League all season, get to a couple of NFL International games at Tottenham, follow the Six Nations and book in a few rugby weekends, you might want a broader wall that captures the whole sporting year — with the World Cup as the centrepiece. This is the most flexible option, and the easiest to keep updating.
Pick one before you go any further. The angle determines everything else: the photos, the colour treatment, the layout, the sizes.
Step 2: Pick the photos and prints
Now go and find your raw material. You probably have more than you think.
Open your phone gallery and search by date. Most phones tag matches automatically once you start using calendar reminders for them. Pull every shot from the past tournament, the current league season, away days and game nights at home. Do not over-filter at this stage — pull anything decent and narrow down later.
Then look at the wider material:
- Match programmes — these scan beautifully for canvas or framed prints
- Tickets and ticket stubs — set them next to the matching photo for context
- Stadium photos taken from your seat — usually better than action shots from a phone
- Family or kids playing the game — you in your Sunday league kit at 12, your daughter at her first football camp
- Atmosphere shots from the pub or a fan zone — these often beat the actual match shots
- Squad photos and team line-ups from the official tournament — useful as anchor pieces
Photo quality reality check
A few things to know before you commit to printing. Match action photos taken on a phone from row Z are usually too far away to print large. Crop in tightly and they pixelate. Wider shots — the stadium full of fans, the players walking out, your group cheering — work better at scale because the eye does not focus on facial detail.
As a rough guide:
- 20×30cm prints work with almost any decent phone photo from the last six years
- 40×60cm prints need at least 1,600×2,400 pixels — fine for most modern phones in good light
- 80×60cm or larger needs roughly 2,400×3,200 pixels — recent iPhones and Samsung Galaxy phones, taken in daylight or floodlit conditions, are the sweet spot
- Heavily zoomed phone shots from the stands almost never enlarge well
If you want to know more about resolution requirements before printing, our guide to how to arrange photos on a wall walks through the basics of resolution and aspect ratio in plain English.
Step 3: Choose your print formats (this is where the wall comes alive)
The single biggest mistake in sports gallery walls is using one format for everything. A wall of identical canvas prints, all the same size, all hung the same way, looks like a hotel corridor. The point of a gallery wall is variation.
Sports content suits four different print formats particularly well, and mixing all four — even just two of them — makes the difference between a wall that looks shop-bought and one that looks like yours.
Canvas prints — for the atmospheric photos
This is the workhorse of any sports wall. Gallery-wrapped canvas prints are perfect for stadium shots, atmospheric crowd photos, big celebration moments and squad photographs. The slight texture of canvas softens digital photos in a way that suits action photography especially well — it removes some of the over-sharp digital look that phone shots can have.
Canvas also handles dramatic lighting brilliantly. Floodlit night matches, golden-hour kick-offs, dawn travel-day shots — all of it works on canvas. And because canvas does not sit behind glass, you do not get reflections or glare in a TV-room setting, which matters for a wall you will look at while watching games.
Best canvas sizes for sports walls: 30×40cm and 50×70cm for individual photos, 80×60cm for an anchor centrepiece (a squad photo, a stadium panorama, the trophy lift).
Framed photo prints — for the formal and personal moments
For the more meaningful, intimate or formal photographs, framed photo prints with a pure-white bevel-cut mount give the image proper weight. A photo of you and your dad at the match, your kid kissing the FA Cup at a museum visit, your group on the steps of Wembley — these are the photos that benefit from the formality of a frame and mount.
The mount matters more than people realise. A photo with a clean white border around it reads as a deliberate, important image — not just another snapshot. For a sports wall, this distinction helps the viewer's eye know which pieces are the emotional anchors and which are the supporting cast.
If you are not sure which frame style suits your photos, our explainer on the different types of picture frames runs through the options — but for sports content, plain black or warm wood almost always works.
Metal prints — for the bold, graphic shots
This is the format that gives a sports gallery wall real edge. A metal print on aluminium composite produces images with deep contrasts, rich colours and a clean borderless finish that works perfectly for stadium architecture, kit close-ups, action freezes and abstract details (the centre circle from above, the floodlights against a dark sky).
Metal prints have a slight metallic sheen at the edges that gives them a contemporary feel, almost like they have been pulled from a sports magazine. They are also genuinely tough — a sports room with kids, dogs and a regular flow of mates is a more chaotic environment than a formal lounge, and metal handles it.
One large metal print used as the focal point of an otherwise canvas-and-framed gallery is a layout we keep coming back to. The single shiny piece pulls the whole wall together.
MIXPIX® photo tiles — for the rotating, flexible bits
This is the secret weapon. MIXPIX® photo tiles are square photo tiles with a Magnofix® hanging system — a small adhesive disc on the wall, a magnetic lightfoam tile that snaps onto it. You can rearrange them as many times as you want, no drilling, no wall damage.
For a sports gallery wall, this matters more than it sounds. Football is a season-by-season story. Last year's transfer window heroes are this year's bench. The kid you photographed at U10 level is now scoring at U13. A wall that takes a year to drill into and then sits frozen does not match the actual rhythm of being a fan.
Use MIXPIX® for the parts of the wall you know will change — recent match day photos, current squad standouts, kids' team photos. The 20×20cm tile size sits comfortably alongside larger canvas and framed pieces, and you can swap individual tiles whenever you want without taking down the whole gallery.
Step 4: Plan the layout
Now you have your photos and your formats. Time to work out how they all fit together.
A few principles before the specific layouts. Sports gallery walls work best when there is one clear anchor piece — the largest single image, usually 60×80cm or 80×60cm — and everything else is built around it. The anchor is the image that earns the most attention. Pick it deliberately.
Spacing is the single biggest signal of "professional" versus "slapdash." Keep gaps between frames consistent at 5–7cm. Tighter spacing (3–4cm) makes the wall feel denser and more energetic; looser spacing (8–10cm) feels calmer and more formal. Pick one and stay consistent throughout.
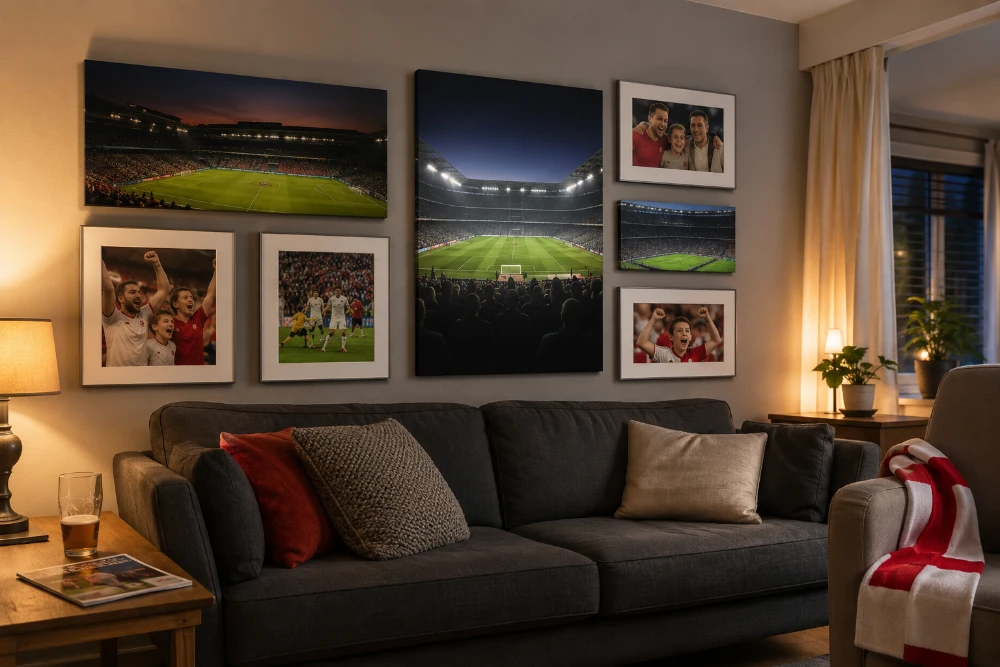
Layout 1: The triptych anchor with supporting cluster
Three matching canvas prints in a horizontal row form the anchor — typically the build-up, a key match moment and the celebration. Around and below this, a looser cluster of 5–7 smaller framed photos and MIXPIX® tiles fills out the wall.
Why it works: the formal triptych gives the eye a clear focal point. The looser cluster adds the personal, lived-in feel.
Best for: above-sofa walls, 200–250cm wide. Total wall coverage: roughly 150×120cm.
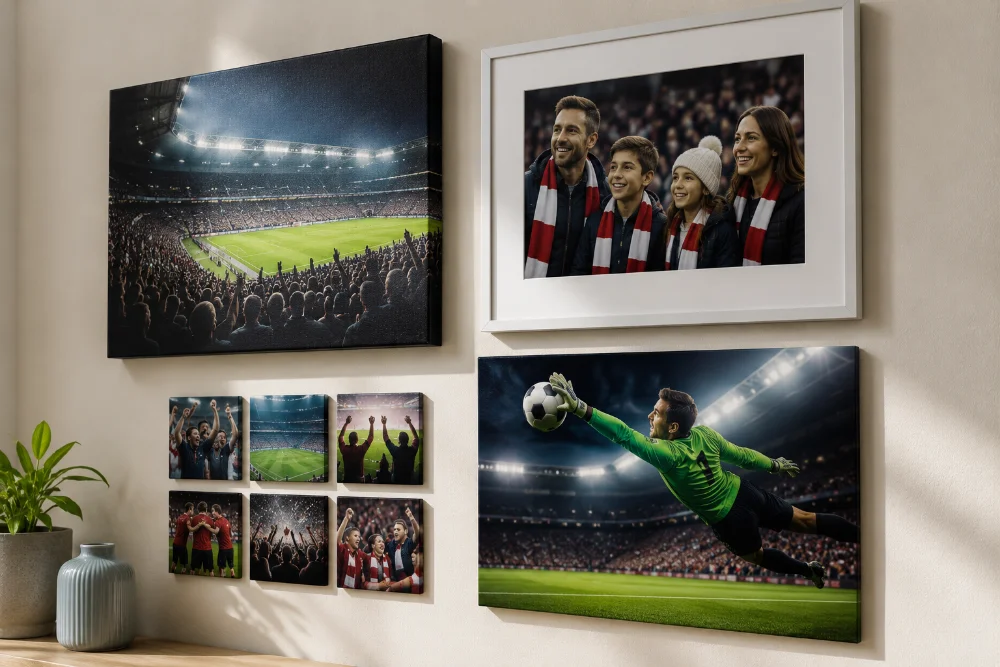
Layout 2: The single statement metal piece + flanking gallery
One large metal print (60×80cm or larger) sits dead centre. To either side, a tighter cluster of 3–4 canvas and framed prints fills the space symmetrically.
Why it works: the metal piece grabs immediate attention, the canvas and framed prints around it provide depth and personal context.
Best for: feature walls, 250–350cm wide. Particularly good above a TV unit or fireplace.
Layout 3: The horizontal stadium row
A single horizontal row of 5–7 prints, all hung at the same centre height. Mix sizes within the row — alternating 30×40cm and 40×30cm — but keep all the centres on a single line.
Why it works: rows like this read as a deliberate timeline, which suits the chronological angle (Step 1, Angle 1) particularly well. They also work brilliantly above a long sideboard or radiator.
Best for: rooms with low ceilings (common in UK new builds, where 2.4m ceilings make tall arrangements feel cramped), or above a long piece of furniture.
Layout 4: The 3×3 squad grid
Nine MIXPIX® tiles or square canvas prints in a perfect 3×3 grid. Used for one squad photo split across the grid, or for nine individual player portraits, or for nine match day moments from across the tournament.
Why it works: the geometric repetition feels modern and considered. Particularly striking with consistent black-and-white treatment across all nine photos.
Best for: contemporary or minimalist rooms, smaller walls (about 90×90cm coverage), or as a cleaner alternative to a sprawling salon-style gallery.
Layout 5: The salon-style fan wall
This is the maximalist option: 15–25 mixed prints covering most of a feature wall, in a deliberately loose arrangement. Includes everything — the trophy lift photo, the family pub shots, the kid's first kit photo, the away day group shot, the match programmes scanned and printed.
Why it works: when done well, salon-style walls feel like a properly curated personal museum. The trick is to start with the largest piece, place it slightly off-centre, and build outwards keeping consistent spacing throughout.
Best for: dedicated sports rooms, mancaves, bigger living rooms with a full feature wall to fill (350cm+ wide). Not for above-sofa walls in a small terrace, where it will feel claustrophobic.
Layout 6: The vertical stairwell column
If you have a tall stairwell wall — common in Victorian semis and converted lofts — a vertical column of 4–6 prints, stacked floor to ceiling, makes brilliant use of an otherwise wasted space.
Why it works: tall stairwells are difficult to fill with traditional landscape art. A vertical sports timeline (e.g. England managers from 1990 to now, or one canvas per major tournament) suits the proportions perfectly.
Best for: stairwells, tall narrow walls, anywhere with awkward verticality.
The paper template trick — do not skip this
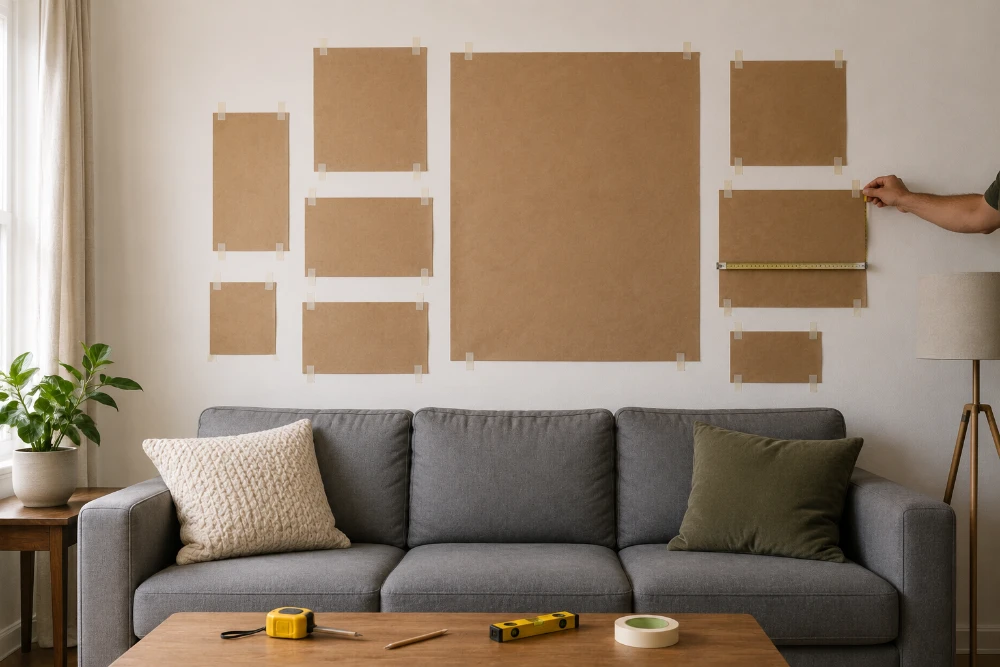
Before you drill a single hole, cut pieces of newspaper or kraft paper to the exact size of every print and tape them to the wall with low-tack masking tape. Stand back. Look at it from across the room and from the sofa. Live with it for a day or two.
Move things around. Swap the anchor piece for one of the smaller pieces and see if it works better. Try a tighter spacing. Try a looser one.
This is the single best way to avoid the most common mistake in gallery walls — putting the photos in nearly-the-right places and never quite being able to fix them. If you want a more in-depth walkthrough of layout planning, our complete guide to gallery wall ideas covers more than 100 specific layouts across every room, with templates for each.
Step 5: Get the sizes right for your wall

This is where most home-grown gallery walls go wrong. Either everything is too small (and looks lost), or one piece is too big (and dominates everything else).
Here is the rule that fixes nine out of ten sizing problems. Whatever you hang above a sofa or sideboard should span roughly two-thirds of the furniture's width.
So:
- Above a 200cm three-seater sofa: aim for arrangement around 130–140cm wide
- Above a 160cm two-seater sofa: aim for arrangement around 100–110cm wide
- Above a 120cm sideboard: aim for arrangement around 80cm wide
- Above a fireplace mantelpiece (typically 110–140cm wide in UK terraces): match the mantel width
Quick size reference for sports gallery walls
- Anchor piece (the centrepiece): 60×80cm canvas or 80×60cm metal print
- Secondary anchors: 50×70cm canvas, 40×50cm framed prints
- Supporting pieces: 30×40cm canvas or framed, 20×30cm small canvas
- Cluster fillers and rotating tiles: 20×20cm MIXPIX® tiles
Hanging height (this is the second most common mistake)
The centre of your gallery wall should sit at 145cm from the floor. This is gallery standard — the natural eye level for most adults. Most people hang sports memorabilia about 15–20cm too high, mostly because the photos feel too "important" to be at sofa level.
Two situations where 145cm changes:
- Above a sofa or sideboard: leave 15–25cm between the top of the furniture and the bottom of the lowest print, even if that pushes the centre slightly higher
- Above a fireplace: leave 15cm between the top of the mantel and the bottom of the lowest print
Step 6: Hang it properly
Now the technical bit. Different parts of British houses need different fixings, and getting this wrong is why some gallery walls end up on the floor at 3am.
Fixing into different UK wall types
Tap the wall first. A solid sound means plaster on brick (typical of pre-1980s housing). A hollow sound means plasterboard with a void behind, either dot-and-dab on brick (typical of new builds) or stud wall.
- Plaster on brick (Victorian/Edwardian terraces, post-war semis): use a 6mm masonry drill, standard wall plug and screw. Holds anything you throw at it.
- Dot-and-dab plasterboard (most homes built after 1990): use cavity wall fixings — Toggler-style or Driva fixings. Standard wall plugs sit in the void and will pull out under weight.
- Stud wall plasterboard: aim for the studs (typically 400–600mm apart) using a stud finder, or use proper plasterboard fixings between studs.
Weight matters more than people think
A 30×40cm canvas weighs around 1kg. A 60×80cm canvas weighs around 3kg. A large metal print can hit 4–5kg. A standard brass picture hook handles up to 5kg, but for anything larger, use a proper screw and wall plug — and for prints over 60×80cm, use two fixings rather than one to stop the print tilting if it gets knocked.
Renting? Three drill-free options
- Command Strips (3M brand) hold prints up to about 3–4kg. Clean the wall with an alcohol wipe first, press for 30 seconds, wait an hour before hanging.
- MIXPIX® photo tiles use a Magnofix® adhesive disc — designed to come off cleanly when you move out, leaving no trace.
- Picture rails — if your Victorian or Edwardian property has them (look for moulding strips about 30cm below the ceiling), use brass picture rail hooks and steel wire. Zero wall damage and infinite adjustability.
The spirit level rule
It takes 30 seconds to check a print is straight. If it is not, you will notice every time you walk into the room. Use a proper spirit level — the smartphone apps are not reliable enough for this.
Step 7: Build for the long term — beyond the World Cup
Here is the thing nobody tells you when you build a sports gallery wall around a single tournament. Six months later, the wall will start to feel a bit dated. The trophy lift is in the past. The squad has changed. The summer of football is over.
This is why the best sports galleries are designed to evolve.
Bridge into the Premier League and EFL season
The World Cup final is on 19 July 2026. The 2026/27 Premier League season kicks off in mid-August. You have about a month to start adding domestic football into your wall.
The two anchor pieces of your World Cup wall — the trophy lift and the squad photo — will probably stay. Around them, swap in:
- Match day photos from the first home game of the new league season
- Stadium shots from your team's ground (a different angle each season works as a slow-build series)
- Family or kids' team photos from the new league season
- Programme scans from significant matches — derbies, cup runs, season openers
MIXPIX® tiles are perfect for this rotating Premier League content because you can swap them out as the season unfolds without disrupting the canvas and framed pieces around them.
Bridge into the NFL International Series
If you also follow American football, the NFL International Series at Tottenham Hotspur Stadium and Wembley gives you a few autumn match days that fit naturally into a sports gallery. Tottenham hosted regular-season NFL games right through 2025 and 2026, and the trip itself is a proper away-day experience even if it is on the Tube. Photos from these days have a different visual energy from football — broader stadium shots, the brass band, the on-pitch entertainment, the warm-ups — and they sit well in a wider sports gallery.
Bridge into the Bundesliga, La Liga or other leagues you follow
If you make annual European trips — a Bundesliga away day in Dortmund, a La Liga match in Madrid, a Serie A weekend in Milan — these belong in your sports wall too. They tend to produce some of the most photogenic content (continental stadiums look better than most British grounds, frankly), and they extend the wall's narrative beyond the domestic season.
The yearly refresh ritual
The most successful sports gallery walls we see come from fans who treat the wall as a living thing. Once a year — usually around the end of the football season in late May — they:
- Take down two or three pieces that no longer feel current
- Add three or four new pieces from the most recent season
- Reshuffle the layout if needed (the paper template trick again)
- Keep the long-term anchors (the World Cup trophy lift, your wedding-style team portrait, your child's first kit photo) in place
UK-specific considerations for sports walls
British homes have their own quirks. A few things to think about depending on what kind of property you live in.
Victorian and Edwardian terraces

If you live in a terrace built between roughly 1840 and 1910, you probably have a chimney breast in the lounge with alcoves on either side, picture rails near the ceiling, and walls that are plaster on brick.
- The chimney breast above the fireplace is a brilliant single-anchor location for a 60×80cm metal print or canvas — particularly the trophy lift or the most iconic photo from your collection
- The alcoves on either side suit smaller, symmetrical pairs — a 40×60cm canvas in each works beautifully
- Picture rails are a renter's gift — use them with brass hooks and adjustable wire for zero wall damage
- Tall stairwells suit the vertical column layout — it makes use of awkward height that landscape art usually wastes
New-build homes (post-2000)
Newer homes have their own constraints. Lower ceilings (typically 2.4m) make tall vertical arrangements feel cramped. Open-plan living-kitchens mean your gallery wall is visible from the kitchen too. Dot-and-dab plasterboard means standard wall plugs do not work.
- Stick to horizontal arrangements rather than tall vertical ones
- Use proper cavity wall fixings (Toggler-style) for anything heavier than 3kg
- In open-plan rooms, make sure the gallery looks good from the kitchen angle too — avoid anything too text-heavy or tightly-detailed because it will not read at a distance
Rented flats and shared houses
The drill-free options work harder than you think. Command Strips for prints up to 3–4kg, MIXPIX® tiles for the rotating content, and picture rails if your property has them. A salon-style sports gallery built entirely with MIXPIX® tiles is genuinely viable in a rental — and you take the whole thing with you when you move.
Sports rooms, dens and mancaves
If you have a dedicated sports room — even a small spare bedroom converted into a den — the rules relax. You can go fuller, denser, more salon-style. You can put the gallery on a wall that the TV faces directly, instead of having to compete with it. You can use the kind of bold metal prints that might overpower a more formal lounge.
This is also where you can be most ambitious with mixing formats. Three large canvas prints, two metal prints, six framed photos, and a 3×3 grid of MIXPIX® tiles can fill an entire wall and feel completely intentional in a dedicated sports room.
World Cup: a quick timeline for your wall planning
If you are building this wall in real time as the tournament unfolds, here is a rough timeline of when each phase happens — and what photos to gather as you go.
- June 2026 — group stage: Match day pub photos, family-on-the-sofa shots during the early kick-offs, scarves and shirts, programmes
- Late June 2026 — round of 32 and round of 16: The atmospheric shots get more dramatic — fans biting nails, mid-match tension, celebrations
- Early July 2026 — quarter-finals and semi-finals: Anchor-piece moments. If your team gets here, the photos from these match days are the ones you will want to print biggest
- 19 July 2026 — final: Trophy lift, final-whistle reaction, the post-match aftermath. The photo of the lifted trophy is almost always the wall's centrepiece
- August 2026 — Premier League / domestic season opener: Bridge content. First home game shots, season-ticket renewal photos, kid in the new kit
You do not need to wait until the tournament is over to start building the wall. In fact, the best approach is to start with a placeholder structure — paper templates on the wall, a few photos already up — and add to it as the tournament unfolds.
Five design touches that lift sports gallery walls above the average
1. Use one consistent colour treatment for at least half the wall
If you mix colour and black-and-white photos randomly, the wall feels chaotic. The best sports galleries either go fully black-and-white, fully colour, or use a deliberate split — colour for the World Cup-specific photos and black-and-white for the broader sports timeline around them. The split signals "this is the main story, this is the supporting context."
2. Include at least one detail shot
Most sports walls are wide-angle: stadiums, crowds, group photos. Add at least one detail — a kit close-up, a programme, a goal-net texture, the centre circle, the captain's armband. The shift in scale gives the eye somewhere to rest.
3. Mix scanned memorabilia with photographs
Programme covers, ticket stubs and signed photos all scan and print beautifully. A canvas of an old match programme alongside a canvas of the match itself makes the wall feel like a curated archive rather than just a photo collection.
4. Add one piece that is not strictly about the sport
A photo of you and your dad at the match, your group eating breakfast in a hotel before kickoff, your kid asleep in the team kit — these humanise the wall and stop it feeling like a museum exhibit. The football is the context, not the subject.
5. Resist the urge to fill every gap
Negative space — empty wall around the prints — is what makes a gallery feel curated rather than cluttered. Aim for the prints to cover roughly 60–70% of the available wall, not 100%. Your eye needs places to land.
Final thoughts: more than just decoration
A World Cup gallery wall, done properly, is more than wall decoration. It is the visual record of a summer that you will not get again — the matches, the parties, the highs and lows that you actually lived through.
The wall is also surprisingly low-effort to build, once you have the seven-step plan in place. A few hours picking photos, two hours planning the layout with paper templates, an hour drilling and hanging. Then years and years of looking at it every time you walk into the room.
Mix your formats — canvas for atmosphere, framed for the personal moments, metal for the bold statements, MIXPIX® for the rotating content. Get the sizes right (two-thirds the furniture width). Hang at 145cm centre height. Use the paper template trick before drilling.
And build it to evolve. The World Cup ends. Your gallery wall does not have to.
Frequently Asked Questions About World Cup Gallery Walls
-
For a typical UK living room above-sofa wall, 7–12 prints in a focused arrangement is the sweet spot. For a feature wall or dedicated sports room, 15–25 works better. Anything fewer than 5 looks sparse; anything over 25 needs to be in a salon-style maximalist layout to feel deliberate rather than overwhelming.
-
The total arrangement should span roughly two-thirds of the sofa's width. For a standard 200cm three-seater, that means an arrangement around 130–140cm wide. Use one anchor piece at 60×80cm or 80×60cm, with smaller prints in 30×40cm and 20×30cm building outwards.
-
Mix all three for the strongest result. Canvas works best for atmospheric crowd and stadium shots. Framed prints with white mounts suit personal, formal or sentimental moments. Metal prints look brilliant for bold action shots, kit close-ups and architectural stadium photography. A wall using one format for everything tends to look flat — variety in format is what makes the gallery feel curated.
-
5–7cm between prints is the standard gallery spacing. Tighter (3–4cm) makes the wall feel denser and more energetic. Looser (8–10cm) feels calmer and more formal. Pick one spacing and apply it consistently across the whole wall — inconsistent spacing is what makes amateur galleries look amateur.
-
The centre of the arrangement should sit at 145cm from the floor — this is the standard gallery height and the natural eye level for most adults. Above a sofa or sideboard, prioritise leaving 15–25cm of space between the top of the furniture and the bottom of the lowest print.
-
Yes — modern smartphones (iPhone 11 onwards, Samsung Galaxy S20 onwards) have more than enough resolution for canvas prints up to 80×60cm, provided the photos are well-lit. The exception is heavily-zoomed shots from far back in the stands; these almost never enlarge well. For best results, use unzoomed wide shots and crop in software afterwards.
-
Only if you build it to evolve. The most successful sports gallery walls treat the World Cup as a chapter, not the whole book. Keep the iconic anchor pieces (the trophy lift, the squad photo) and rotate in domestic football, NFL International, rugby or other content as the year unfolds. MIXPIX® tiles make this rotation easy because they swap out without drilling.
-
Three options. Command Strips (3M) for prints up to 3–4kg — clean the wall first, press for 30 seconds, wait an hour. MIXPIX® tiles, which use an adhesive Magnofix® disc designed to peel off cleanly. Picture rails, if your property has them — period homes often do.
-
Absolutely. A consistent colour treatment (all black-and-white, or all in the same warm-toned filter) ties the different sources together. Many of the best sports gallery walls actually look better with this mix — the World Cup chapter sits in context, and the wall feels like a proper sports timeline rather than a single tournament's snapshot.
-
Hanging everything too high. The instinct is to hang sports content above eye level, almost like a display in a sports bar. But your sofa-eye-level is around 110–120cm from the floor, and the wall reads better when the gallery's centre sits at 145cm rather than 165cm. The second most common mistake is using the same format and size for every print, which makes the wall feel monotonous.
-
Photograph or scan them in good natural light, with the item flat against a plain background. Programme covers scan particularly well because the print quality on most match programmes is decent enough to enlarge. Tickets are smaller and need slightly more careful work — photograph them at high resolution, crop tightly, and they print beautifully on small framed prints (15×20cm) or as part of a MIXPIX® tile cluster.
-
Only if you treat it as a one-off tournament installation. Treated as a long-term sports timeline that you update each season, a gallery wall actually ages beautifully – the early World Cup photos become historical, the recent league photos stay current, and the family-and-fans content stays meaningful regardless of which team is winning. The yearly refresh ritual is what keeps the wall feeling alive.