How to Photograph World Cup Celebrations: A UK Phone Guide for the Football Tournament
There is a specific moment, about half a second after your team scores, when every face in the room changes at the same time. Eyes go wide. Mouths drop open. Hands hover halfway between the table and the air. Drinks tilt. Someone is already on their feet.
That is the photo. The one you will look back at in twenty years and remember exactly where you were, who was next to you, what the room sounded like.
And almost everyone misses it. They are watching the screen, not the people. By the time they reach for their phone, the moment has gone — and what they end up with is a blurry shot of someone’s back, taken three seconds late, completely out of focus.
This guide is about not missing it.
We are going to walk you through how to capture the noise, the chaos and the genuine emotion of World Cup celebrations on your phone — wherever you happen to be watching. Settings to change before kick-off. Where to point the camera and when. How to be in the photo yourself when you are also the one taking it. And once you have got the shot, what to do with it so it does not just sit in your camera roll until your phone dies in 2034.

Key takeaways
Short on time? Here is the whole guide in seven lines.
- Burst mode is the single most important setting. Twenty frames give you one keeper. One careful shot gives you nothing.
- Point at the faces, not the screen. The goal will be on Match of the Day later. The reaction is on those faces, in that room, this one time only.
- Turn off HDR, Night mode and the flash before kick-off. All three ruin moving subjects, in different ways. Grid lines on, 0.5x wide-angle lens for groups in good light.
- Pick the photographer deliberately. The right person is sober-ish, has a recent phone, and is not too emotionally invested in the match.
- Plan one shot of yourself per match. Front camera with arm raised, ten-second timer with the phone propped, or hand it to someone at the next table.
- The keeper has open eyes, open mouths and movement. Slight motion blur on hands is fine — it reads as energy, not as a mistake.
- Turn the keeper into something you’ll actually use. A photo mug, a fridge magnet, a tote bag, a keyring or a photo book of the full tournament. The summer will not last forever — but the keepsakes you make from it can.

Why World Cup celebration photos are different
Most photos on your phone are static. A coffee. The dog. A view from a hotel window. They sit there fine, but no one is going to ask to see them.
Goal celebration photos are different. They have movement, sound (you can almost hear the room from a good shot), and pure emotion frozen on real faces. People who never photograph well — your mate Dave who blinks in every wedding photo, your dad who refuses to smile for cameras — suddenly look extraordinary, because they have forgotten the camera exists.
The World Cup is the biggest tournament ever held. 48 teams, six weeks of matches, three host countries. That is a lot of late nights, nervous group stages, and moments when the room goes properly mental. If you want one photograph from the summer that earns its place on the wall (or the fridge, or the bookshelf, or in your pocket), the celebration shot is the one.
Set up your phone in 60 seconds before kick-off
Most phone cameras come out of the box with default settings that are wrong for celebration photography. Three minutes of tweaking before kick-off is the single best investment you can make in your World Cup photo album.
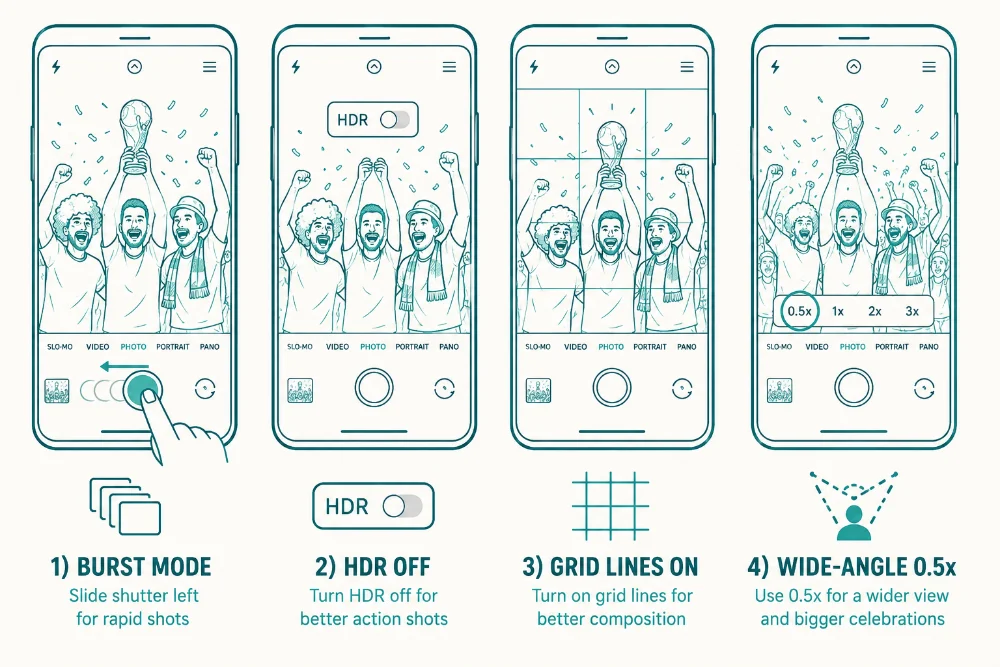
Turn on burst mode (the most important setting on your phone)
Burst mode is the single most useful feature you can use for celebration photography. It takes around ten photos per second for as long as you hold the button — meaning in five seconds you have got fifty frames of the goal reaction, and one of them is going to be the keeper.
On iPhone (iPhone 11 onwards): tap and hold the shutter button, then slide it to the left. The camera fires off shots until you let go. To make burst even easier, go to Settings → Camera → and turn on “Use Volume Up for Burst” — now holding the volume-up button on the side fires the burst, which is much easier to grip steadily during a chaotic moment.
On Samsung Galaxy and most Android phones: press and hold the shutter button, or in some models swipe the shutter down. If your camera does not seem to do this, dig into the camera settings menu — most have a “Shooting Methods” or “Burst” option that needs to be enabled once.
Fifty frames is genuinely excessive — you will not need more than fifteen for a good shot — but the option to keep going is there for the moments where the celebration keeps building, like a winning goal in extra time.
Turn HDR off
HDR sounds like a good idea. The phone takes several photos at different exposures and merges them. The problem is that takes time. If anyone in the frame moves between the merged shots, you get ghosting and blurring at the edges of every figure — which is what happens during every goal celebration ever.
On iPhone: Settings → Camera → Smart HDR → off. On Samsung and Android: look in the camera settings for “HDR” and toggle it to off or “Auto only”.
You can turn it back on after the match if you remember. Most people do not, and their phone photos quietly improve from then on.
Switch on grid lines and learn the rule of thirds
The grid is the single best aid to composition that exists on a phone. Three lines down, three lines across — the rule of thirds, which is the foundation of how good photographs are framed. Place the most expressive face on one of the four points where the lines cross, rather than dead centre, and the photo immediately looks more deliberate. The classic rules of photo composition — rule of thirds, diagonal method, leading lines — apply just as much to a phone snap in a pub as they do to a professional shot in a stadium.
On iPhone: Settings → Camera → Grid → on. On most Android phones: open the camera, tap the gear or settings icon, find “Grid lines” or “Composition guides”.
Use the wide-angle (0.5x) lens for groups
Modern phones have multiple lenses. Most people stick to the default 1x main lens because it is what opens automatically. For a celebration with eight or ten people erupting in different directions at once, that is wrong.
The 0.5x ultra-wide lens fits more of the room into the frame. Tap the small “0.5” button at the bottom of the screen, near the shutter, and you will see the view zoom out. The image will look slightly warped at the very edges (this is normal for ultra-wide lenses) but the warping is barely noticeable in a celebration shot, and it is a worthwhile trade-off for getting everyone in.
One catch: the 0.5x lens is generally the lowest-resolution lens on the phone, and it struggles in very dim light. If you are in a properly dark pub, drop back to the 1x main lens and accept a tighter crop on the celebration. We will come back to lighting in a minute.
Settings to leave well alone
- Portrait mode: do not use it for groups of more than four or five people. The phone gets confused about which faces are in focus and starts artificially blurring people, often the wrong ones.
- Night mode: turn it off. Night mode takes long exposures, which means anyone moving comes out as a ghost. For a goal celebration, where everyone is moving, this is a disaster.
- Flash: never. The flash on a phone is harsh, kills the warm pub atmosphere instantly, and reduces all faces to a deer-in-headlights expression.
- Filters: do not apply them before taking the shot. You can edit afterwards from the original — but you cannot un-filter a shot you have already filtered.
The one rule that changes everything: watch the faces, not the screen
This is the single most important thing in this guide, and most people get it wrong.
When you want to photograph a celebration, you have to stop watching the match.
That sounds painful, and it is. But here is the maths. The actual scoring happens in maybe one second — the ball hits the net, the whistle goes. The reaction lasts five to ten seconds and is far more interesting than the goal itself. The goal will be on Match of the Day later. The reaction is on those faces, in that room, this one time only.
So one person needs to take photographer duty. Pick someone deliberately rather than letting the loudest person in the group default into it. The right person is:
- Reasonably sober, relative to everyone else
- Has a phone with a recent camera — iPhone 13 onwards or a Samsung Galaxy S22 onwards is the safe zone, though older phones are fine in good light
- Willing to fire off bursts of fifteen or twenty shots rather than one careful click
- Not particularly emotionally invested in the match (the heartbroken England fan is a bad photographer)
- Comfortable putting their phone in everyone else’s face for a few seconds
If your group has someone who actually takes photos as a hobby, recruit them well in advance. Buy them a pint. Make it official. They will appreciate having a job and you will get vastly better photos than if everyone is freelancing on their own phones.
A different kind of photo — the posed group shot — is a separate art form altogether. We have written a full guide on how to organise people into a proper posed photo, with formations, lighting and timing, in our World Cup group photo playbook. The two guides cover different things and work well together — posed shots before kick-off, candid celebration shots during the match.
Capturing the goal: timing the burst
You have got your settings sorted. The match is on. Now what?
The goal moment is the highest-stakes shot in football photography. It happens once or twice in a match if you are lucky, lasts about three seconds, and cannot be reshot. Here is how to actually nail it.
Anticipating the moment
You cannot just hold the shutter button down for the entire ninety minutes. Your battery will be dead by half-time and you will fill your phone with 50,000 photos of nothing happening. You need to know when to start the burst.
Watch the match for cues. Goal-scoring moments are usually preceded by something visible: a corner kick, a counter-attack, a free kick from a dangerous position, a striker through on goal. The room often reacts before the ball is in the net — a low collective gasp, leaning forward, hands hovering near mouths. That is your signal. Start the burst right then.
A good rule: the moment the ball is being struck towards goal, your finger should already be on the shutter button. You will get five seconds of build-up footage and then ten seconds of either celebration or groan. Either way, you have got it.
Where to point the camera
Not at the screen.
This is the most common rookie mistake. People want a photo of the moment the goal goes in, so they film the TV. The result is a slightly blurred shot of a televised goal that looks like every other shot of a televised goal in history.
The camera should be pointed at the room — at faces, at the group, at the chaos. The TV is a backdrop, at most. If you can frame the shot so the screen is just visible in the corner showing the green pitch, that is brilliant context. But the people are the subject. The TV is supporting cast.
Holding the phone steady in a packed pub
In a small pub with the room going off, holding a phone steady feels almost impossible. A few tricks help:
- Tuck your elbows in. Pinning your elbows tight against your ribs gives the phone a stable platform — much steadier than holding it out at arm’s length.
- Use both hands. Right hand on the shutter, left hand cupped under the phone for support.
- Lean against something. A wall, a chair back, a friend’s shoulder. Any solid surface stabilises the shot — the few seconds spent finding one are worth it.
- Use the volume button. If you set up “Use Volume Up for Burst” earlier, you can keep the phone in a relaxed grip and just press the side button. Far less wobble than poking at the screen.
What a brilliant goal celebration shot looks like
When you sift through your fifty burst frames afterwards, you are looking for very specific qualities. The keeper shot usually has:
- At least three faces fully visible (not blocked by arms or backs of heads)
- Mouths open mid-shout, not closed in a polite smile
- Eyes open and looking up or sideways at the screen — closed eyes are usually a bin
- Some movement — arms in the air, someone leaping, scarves flying — to convey the energy
- A clear central focal point: usually the most expressive face in the group
It almost never has perfect focus on every face. Some movement blur on hands and arms is fine and actually helps the photo feel alive. Razor-sharp focus on a still subject would look posed and dull.
What to do with the keeper (the morning-after test)
Once you have found the brilliant frame from the burst, decide there and then to do something with it. The trick is to pick a format you actually pick up rather than one you stop noticing.
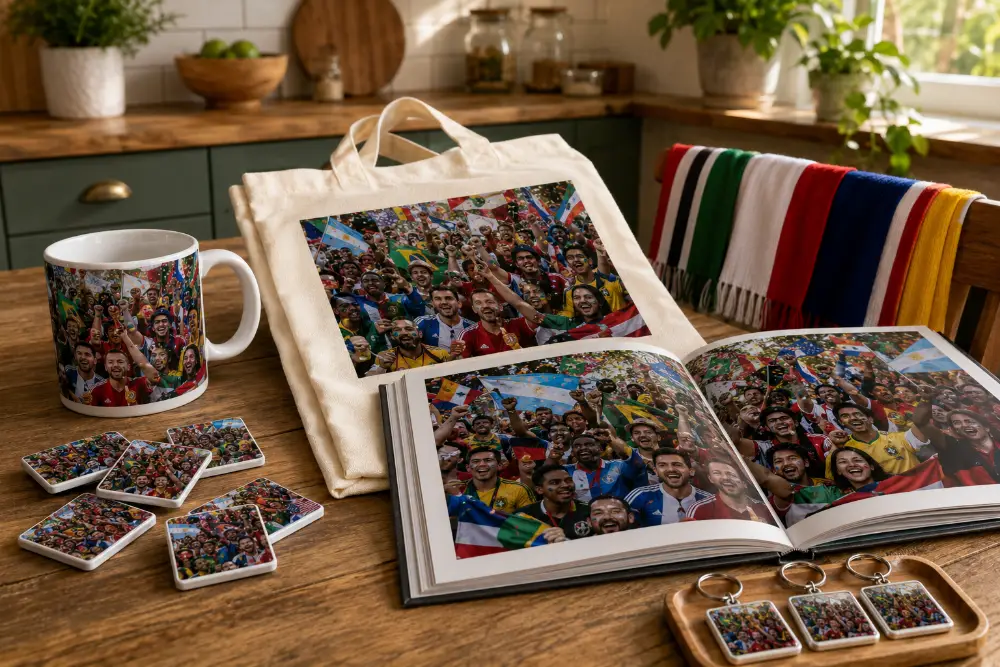
A personalised photo mug is one of the most natural homes for a celebration shot, for a reason most people miss: you hold it every morning. The moment your team scored, in your hand at 7:45 on a wet Tuesday in November, while the kettle is still boiling. We print these using heat-sublimation, which fuses the ink into the surface so the image stays bright through years of dishwasher cycles. A photo mug each for the people in the shot is the kind of group gift that genuinely gets used — far more than a printed calendar that gets stuck in a drawer.
If your celebration photo also has heat-changing potential — say a mate covering his face in despair just before the equaliser arrived — the magic mug version reveals the photo only when filled with a hot drink. Worth thinking about for the more dramatic frames in your burst.
The wider crowd: capturing the wave, not just one face
The single goal-moment shot is one type of celebration photo. The other type — the crowd wave — is what happens at the bigger venues: fan zones, packed pub gardens, stadiums. Hundreds of people moving as one. This needs a slightly different approach.

Two ways to shoot a fan zone wave
In a fan zone or stadium concourse, when a goal goes in, the celebration ripples through the crowd. Hands go up in pockets first, then spread, then peak, then fade. The whole sequence takes maybe six seconds.
Two approaches both work well:
Shoot from inside the crowd: You are part of the wave. Hold the phone above your head, lens pointing down and slightly forward, and fire a burst. You will get a sea of arms and faces from a height nobody else is shooting from. Wide-angle (0.5x) is essential for this, and you will need to crop in afterwards to clean up the framing.
Shoot from the edge: Stand back from the main crowd and shoot across or into it. You get a wider view that captures the scale of the celebration, with a clear horizon line and a recognisable backdrop (the bar, the stage, the screen). This shot tells a different story — less “I was there” and more “look at this”. Wide-angle works here too, but you can use the 1x lens if there is decent light.
The single face in the chaos
Sometimes the best photo is not the wide crowd shot — it is one face in the middle of the chaos. Pick out one person reacting (a stranger you have never met, your own dad, a kid on someone’s shoulders) and frame them tight while the celebration explodes around them.
This is the iconic newspaper-photographer shot. One person, mid-emotion, with the rest of the crowd just out of focus behind them. It works because the eye knows exactly where to look, and the energy of the wider scene is implied rather than spelt out.
The 1x lens (or even 2x telephoto if your phone has one) is the right choice here. Burst mode still on. Shoot through the crowd, looking for an unposed face that has truly let go.
Carrying your kit to the fan zone
Fan zones and beer gardens are not casual visits. You tend to arrive with stuff — a folded jacket in case the weather turns, a bottle of water, a packed-up scarf for when it cools down, the kids’ sun cream, a power bank for everyone’s dying phones. By the seventh match of the tournament, you have got a routine.
A personalised tote bag printed with last year’s group photo — or a shot from earlier in the tournament — does double duty as practical kit-carrier and a conversation starter. Every fan at the next picnic table will ask where you got it. The print is full-colour, edge-to-edge, and the cotton is sturdy enough for a full day at the fan zone with crisps, scarves, a power bank and the unread paperback you keep optimistically packing. Easy to throw in the wash on Sunday morning. Easier still to use match after match across the whole tournament.
Where you watch changes how you shoot
Where you happen to be watching the match changes everything about how the photo will turn out. Four common UK situations, four different sets of tricks.
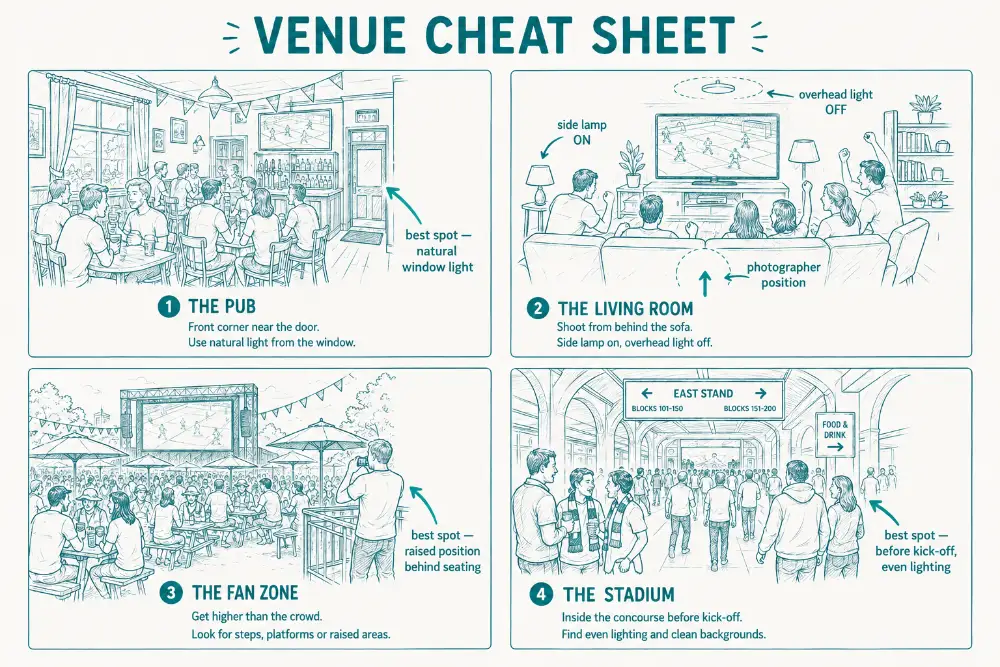
The traditional British pub
The most common UK watch spot, and the trickiest for photography. Yellow tungsten lighting, low ceiling, often crowded, the TV is the brightest thing in the room. Most pub photos come out looking dim, orange and slightly out of focus.
- Stand near the window or front door. Even on a grey afternoon, daylight is brighter and more flattering than tungsten pub bulbs. Move the group towards the window before the moment, not during.
- Avoid backlighting. A window directly behind the group turns everyone into silhouettes. The window should be to one side, lighting faces from an angle.
- Find the brightest corner during your first round. Most pubs have one corner that is naturally better-lit than the rest. Identify it early so you can drag people there for the half-time photo or the post-match celebration.
- Use the 1x lens, not 0.5x. The wide-angle lens performs poorly in dim light — the photos come out grainy and soft. The main lens has a larger aperture and copes much better.
The home watch party
Living room, big TV, sofa full of people facing the screen. The TV is now the dominant light source, throwing weird blue-white light onto half the group while the other half is in shadow. Plus, you cannot easily move people during a tense moment.
- Pause the match at half-time, turn the room lights on. A side lamp with a fabric shade is the best home lighting for groups — soft, even, flattering. Get the photo in the gap between halves, not during play.
- Position yourself between the TV and the group. When you do shoot during the match, stand with your back to the screen so the TV becomes a soft glow behind you, lighting the front of the group rather than blasting them from behind.
- Avoid overhead spotlights. Down-lighting from a single ceiling light creates harsh shadows under eyes, noses and chins. Switch to lamps where possible.
- Watch for the post-goal hug. Living room celebrations often peak about three seconds after the goal — the room exhales, then leans in and hugs. Burst through it, do not stop after the initial reaction.
The fan zone or beer garden
Outdoor or partly outdoor venues with a big screen, communal seating, and a crowd of strangers as well as your own group. Generally the best photographic conditions of any venue — natural light, plenty of space, recognisable backdrops — but you have to share the space.
- Late afternoon is your friend. Golden-hour light just before sunset is the most flattering natural light there is. Many World Cup matches will run into evening UK time — that is your free professional lighting.
- Find an elevated position. Stand on a chair, a bench, a low wall — anywhere a foot or two above the crowd. Shooting down across the crowd captures the whole scene; shooting at eye level just gets the back of the person in front of you.
- Include the screen in some shots. A wide shot showing the crowd and the giant screen showing the goal is brilliant context — instantly recognisable as a World Cup moment, not just any pub.
- Mind the harsh midday sun. Bright direct overhead sun makes everyone squint and casts hard shadows on faces. If the match is at noon UK time, position the group in open shade — under a parasol, against the side of a building, in the shadow of a tree.
The stadium itself
If you have actually made it to a World Cup match in the United States, Mexico or Canada, you are in rare company. The photography rules at a stadium are different from anywhere else.
- Take your best photos in the concourse, not the seats. Lighting in the concourse before kick-off is far more even and flattering than the floodlit playing surface, and the background is recognisable (the stadium architecture, signage, the entrance). Plus, you are not blocking anyone’s view of the match.
- Floodlights cast harsh top-down light. When you are in the seats, ask the group to tilt their faces upwards slightly so the floodlight reaches under their brows and lights their full face, not just the tops of their heads.
- Post-match shots on the way out are gold. The lit stadium behind the group, the crowd dispersing, the energy still high. Phones with good night mode handle the contrast well.
- Do not block aisles or photographers. Stadium staff and other photographers will move you on quickly if you are in the way. Get your shots fast and step out of the path.
One bit of practical kit worth mentioning: a personalised sports towel with carry-bag is the most useful thing you can pack for a 2026 stadium trip beyond your ticket and your phone. The fixtures this summer are mostly in US, Mexican and Canadian heat — concourses get sweltering, the walk from the parking lot to the stadium can be brutal at 35°C. A microfibre towel printed with your group’s photo or a country crest folds tiny, dries fast and packs into its own carry-bag. Doubles as a seat cover for hot plastic stadium seats, a sun shade for the kids, and an emergency mop-up if a beer goes flying mid-celebration. The same towel comes home in your suitcase a week later and lives in your gym bag for the next decade — every gym session a small reminder of the trip.
Don’t forget to be in the photo yourself
There is a problem with being the photographer. You are not in any of the photos.
Six months later, the album of brilliant celebration shots is full of everyone except you. This is fixable, but you need to plan for it.
The selfie shot
The most basic option. Flip the phone to the front-facing camera, hold it high above your head, point down at the group, and take a burst. Modern phone front cameras are good enough that the result is genuinely shareable, especially on iPhone 15 onwards or recent flagship Android phones.
The trick is the angle. Selfies taken from below the chin make everyone look terrible. Selfies taken from slightly above, looking down at the group, are far more flattering. Get your arm up high. Tilt the phone slightly downwards.
Front-facing cameras typically do not have a 0.5x ultra-wide option, but they do have wide-enough lenses to fit five or six people into the frame. For larger groups, the front camera is not the right tool.
The timer trick for bigger groups
For groups of seven or more, the front camera is not wide enough. Use the rear camera with the timer and prop the phone somewhere stable.
Set the timer to ten seconds, not the default three (three is barely enough time to put the phone down, let alone run round to your spot in the group). Most phones now have a “10 seconds + burst” option hidden in the timer settings, which fires off a burst of three to five frames once the countdown ends. Use it. One person blinking is much less likely to wreck the only frame.
Where to put the phone:
- Lean it against a stack of books or a folded jumper on a table — instant tripod
- Wedge it between two pint glasses (carefully — phones really do break)
- Set it on the bar with a beer mat propped behind it for the right tilt angle
- Buy a small phone tripod for around £15. The bendy GorillaPod-style ones grip onto chair backs and table edges and last for years
Hand it to a stranger
Sometimes the simplest answer is best. Hand the phone to someone at the next table during half-time, ask them to take a few burst shots of your group, and offer to do the same for them. Universally well-received in British pubs.
Just remind them — burst mode, hold the button, do not stop. Anyone who has not used burst mode before tends to take one nervous shot and hand the phone back, which defeats the point.
The pocketable group keepsake
Once you have got a brilliant group shot with yourself in it — a half-time selfie, a timer-burst at the bar, a stranger-snapped group hug — there is a small product worth knowing about. A personalised photo keyring carrying that shot is the most pocketable possible version of the moment. Order one for every person in the photo and slip them into envelopes at the end of the tournament. It costs little, weighs nothing, and yet it puts the celebration in everyone’s pocket for years.
Some people will lose them within months. Others will carry them for a decade — finding them again in a coat pocket the next time the World Cup comes round, four years later, and remembering exactly where they were. Either way, the gesture is what counts.
After the match: picking the keeper from your burst
You have done the hard part. There are two hundred photos on your phone, half of them in burst sequences, and somewhere in there is the photo that goes on the wall. Here is how to find it.
Reviewing burst photos on iPhone
Open Photos. Find the burst — it will be marked “Burst (X photos)” in the top corner of the thumbnail. Tap it, then tap “Select” at the bottom of the screen. iPhone shows you the burst as a film strip across the bottom; swipe through it slowly, looking at each frame. The dots under the strip indicate the photos iPhone thinks are best (it makes a reasonable guess based on focus and faces).
Tap to select your favourites. You can save just the best ones and delete the rest, which is sensible — fifty near-identical frames will fill your storage fast.
Reviewing burst photos on Samsung and Android
Samsung Galaxy and most Android phones save burst frames as a single grouped item in the gallery. Open the burst, tap through frame by frame, and tap the heart or save icon on each one you want to keep. Newer Samsungs have a “Best photo” suggestion built into the gallery app.
What to look for in the keeper
Among twenty near-identical frames, the differences are tiny but they matter. Look for:
- Eyes open. In any group of ten people, the odds of someone blinking in any single shot are roughly 50%. Bursts solve this — find the frame where every face has open eyes.
- Mouth shapes. Genuine shouts and laughs have open mouths. Polite smiles or closed-lip expressions look posed and dull. Pick the frame with the most open mouths.
- Action peaks. Within a burst, the peak of the celebration usually happens about two-thirds of the way through. The first frames often catch people just starting to react; the last frames catch them coming down. The middle is where the energy lives.
- Composition. Apply the rule of thirds — the strongest frame is usually the one where the most expressive face sits at one of the four intersection points of the grid, not dead centre.
- Some movement blur is fine. Razor-sharp focus on every limb looks artificial. Slight motion blur on hands and arms reads as energy, not as a mistake.
Editing — keep it light
Phone photos benefit from light editing, especially celebration shots taken in mixed pub lighting. Free apps like Snapseed (cross-platform) and the built-in Photos app on iPhone do everything you need.
Useful adjustments:
- Brightness: most pub photos come out slightly underexposed. A small lift (+10 to +20 in the exposure or brightness slider) makes faces clearer.
- Contrast: a small bump (+5 to +15) makes the photo feel more vivid without being unnatural.
- White balance: if the photo looks too orange (tungsten pub light) or too blue (TV-lit living room), nudge the white balance towards the opposite end.
- Crop: crop in slightly to remove distracting edges, but not too much — a celebration shot needs space around the action to breathe.
- Black-and-white: if the colours are unrescuable, a clean black-and-white conversion saves the photo and gives it a timeless quality. Use a proper black-and-white filter rather than just desaturating.
Avoid heavy filters, oversaturation and aggressive sharpening. The goal of editing is to make the photo look the way it actually felt in the room, not like an Instagram template.
Once you have got the keeper: copies for the group
A keepsake on a wall is for one person. A celebration photo, though, usually has half a dozen of your favourite people in it. They will all want a copy — and the keepsake that gets seen most often is rarely the one in a frame on a wall.
MixMags® photo magnets are the answer when you want a copy for everyone in the photo, rather than a single piece of wall art. They stick to the fridge, the dishwasher front, the side of a filing cabinet, any metal surface — and they put the moment somewhere you walk past every day. No nails, no drilling, no Command Strips, no hooks. Re-positionable any time.
The most popular uses:
- A magnet for everyone in the group as a tournament-end gift — slip into an envelope with a card
- A small set of magnets sent to grandparents who watched the match somewhere else
- A run of magnets covering different matches across the tournament — a growing collage on your own fridge by the time July arrives
- A magnet on the office fridge that gets a nod from a colleague every coffee break for the next five years
MixMags come in packs so you can do a whole set for a watch group in one order — no awkward minimums to wrestle with.
The whole tournament, not just one moment
A single mug captures one frame. A magnet captures one frame. A photo book captures the whole summer of 2026 — every match, every venue, every pre-match group shot, every celebration burst, every post-match analysis with a pint. In one keepsake that lives on the coffee table or the bookshelf for the next thirty years.
A photo book is the format that holds the full tournament in one place. Six weeks, dozens of photos, all the side-stories — the kids in face paint, the slightly-too-large kit shirt you bought on impulse, the sausage rolls at half-time. A book has room for all of it. A single keepsake does not.
Three ways to structure a World Cup photo book:
- Chronologically: a section for each match in order, with the build-up shots, the celebration moments and the post-match group photo grouped together. Tells the tournament as a story.
- By venue: a chapter for the pub, a chapter for home matches, a chapter for the fan zone or stadium. Tells the story of where you were rather than what was on the screen.
- By emotion: a chapter on build-up moments (faces of concentration), a chapter on peaks (arms in the air), a chapter on aftermath (hugs and replays). Tells the story of how it felt.
Photo books work especially well for football because so much of the experience happens around the matches rather than in the matches themselves — the conversations at the bar, the kid at his first World Cup, the face paint that ran in the rain. A4 or square 30×30cm hardcover formats are most popular for tournament keepsakes. Lay-flat binding (where the pages open flat without a gutter in the middle) is worth the small extra cost if you want full-bleed double-page spreads of crowd shots.
Common mistakes (and what to do instead)
A quick scannable cheat sheet of the things that ruin most World Cup photos, and the simple fix for each.
- Filming the TV instead of the room. The goal is on Match of the Day. The reaction is not. Point at faces.
- Taking just one shot. Burst mode. Always burst mode. Twenty frames give you one keeper; one frame gives you nothing.
- Leaving HDR and Night mode on. Both create blur during fast movement. Turn them off before the match starts.
- Using the flash. Kills the room’s atmosphere instantly. Use available light or do not take the shot.
- Forgetting to be in the photo. Front camera, hand it to a stranger, or use the timer with the phone propped on a pint glass. Plan one shot of yourself per match.
- Heavy editing afterwards. Light brightness, light contrast, optional white balance. No filters, no over-saturation. The photo should look the way the room felt.
- Leaving the keeper on the phone forever. Turn it into something. A mug, a magnet for the fridge, a keyring for the group, a photo book of the whole tournament. Phone storage runs out. A photo on a mug does not.
One last thing
The simplest piece of advice in this guide is also the most important. Take more photos than you think you need.
A typical celebration sequence should produce thirty to fifty burst-mode frames. Of those, three or four are properly good. One is genuinely brilliant. That is the one that ends up on a mug, on a fridge magnet, on the front of next year’s Christmas card.
If you take only one or two shots at any given moment, the odds of the brilliant frame collapse to almost nothing. Burst, burst, burst. Multiple angles, multiple venues across the tournament. Then sift afterwards and pick the best.
And once you have it — actually do something with it. Print it. Drink from it. Stick it on the fridge. Slip a keyring into an envelope for everyone in the photo. Build the whole tournament into a book. The summer of 2026 will not last forever. Your photo of it can.
Frequently Asked Questions About World Cup Celebration Photography
-
Burst mode is the most important setting. On iPhone, hold the shutter and slide left, or set Volume Up to fire bursts. On Android, hold the shutter button. Combine burst with HDR turned off (so the camera shoots quickly without merging frames), grid lines on for composition, and the wide-angle 0.5x lens if there is enough light. Fire the burst the moment the ball is being struck towards goal, and keep firing for five to seven seconds.
-
Move the group towards a window or front door for natural light. Use the 1x main lens, not the 0.5x ultra-wide (the wide lens performs poorly in low light). Turn off Night mode (it creates motion blur during celebrations) and turn off the flash (it kills atmosphere and flattens faces). Tuck your elbows in tight against your ribs to steady the phone, or lean against a wall. If photos still come out grainy, convert to black-and-white — monochrome handles low-light grain much better than colour.
-
Generally no, especially for groups of more than four or five people. Portrait mode artificially blurs the background using software, but in a busy celebration with multiple faces at different distances, the phone gets confused about what to keep in focus and starts blurring the wrong people. Use the standard Photo mode with burst on. Save Portrait mode for posed close-ups of one or two people at half-time.
-
Three options. First, the front-facing selfie camera with your arm up high, pointing down at the group — works for groups of up to five or six. Second, the rear camera on a 10-second timer (not the default 3 seconds), with the phone propped on a stable surface or a small phone tripod — works for any group size, and most phones can be set to fire a burst once the timer ends. Third, hand the phone to someone at the next table during half-time and ask them to take a few burst shots, offering to do the same for them.
-
It depends on how often you want to see it. A photo mug puts the celebration in your hand every morning while the kettle is still boiling — the most-used keepsake there is. A fridge magnet puts it in front of you every time you walk into the kitchen. A keyring keeps it in your pocket for years. A photo book is the only format that holds the whole tournament in one place. There is no single right answer — the best format is the one matched to where you actually spend your time.
-
Yes, in most cases. Modern smartphones — iPhones from about 2018 onwards (iPhone XS and newer) and recent Samsung Galaxy phones — produce photos with more than enough resolution for printed mugs, magnets, keyrings and photo books. The exceptions are heavily zoomed shots (digital zoom degrades quality fast), shots in very low light without Night mode (often grainy and soft), and screenshots (usually too low resolution). If your celebration shot looks sharp on your phone screen at full zoom, it will print cleanly.
-
Burst mode is your main tool — within twenty frames, at least one will be sharp even if your hand is shaking. Hold the phone with both hands, elbows tucked in, or lean against a wall or chair back. Turn off Night mode and HDR, both of which create blur when subjects move. If you have shaky hands or the room is genuinely dark, drop back to the 1x main lens (which has a larger aperture and copes with low light better) and accept a tighter framing.
-
Light editing helps, heavy editing hurts. A small brightness lift (+10 to +20), a small contrast bump (+5 to +15), and a white balance correction if the colours look too orange or too blue will make most pub or home photos look noticeably better. Avoid heavy filters, oversaturation and aggressive sharpening — they tend to make celebration photos look artificial rather than alive. Free apps like Snapseed and iPhone’s built-in Photos app have everything you need.
-
Counter-intuitively, a fan zone or beer garden in late afternoon light is often the best photographic venue, beating both the dim pub and the floodlit stadium for sheer image quality. Natural late-day sunlight is the most flattering light there is, the recognisable backdrop (the screen, the bunting, the crowd) is unmistakably a World Cup setting, and you have space to find good angles. The pub is the most atmospheric but technically the hardest. The stadium has unbeatable status but tightly controlled photography conditions.
-
More than you think. A typical match should produce 50 to 150 photos in burst mode (most of which you will delete), of which maybe 5 to 10 are properly good and one or two are genuinely brilliant. Across a full tournament you might end up with 500 to 1,000 photos, with a final keeper set of 30 to 50. Out of those, you will probably turn three to five into keepsakes. The 1,000-to-5 ratio sounds extreme, but burst mode means the cost of “extra” photos is essentially zero, and the cost of missing the one perfect frame is enormous.
-
A candid celebration shot captures the genuine emotional reaction of a group to something happening on the screen — arms in the air, mouths open, faces unguarded. It cannot be reshot. A posed group photo is arranged deliberately, with a chosen formation, controlled lighting and people looking at the camera. Both have their place.
-
Yes, and it is one of the best uses of a photo book. The book holds the full mix of pre-match group shots, in-match candid celebrations, half-time selfies and post-match analysis photos in one place. A typical 30-page tournament photo book might have a chapter per match: a posed pre-match group shot on the opening page, a double-page spread of celebration burst-mode shots in the middle, and the post-match group reaction on the closing page. The combination tells the story far better than any single format.